Felling trees with a chainsaw is dangerous.
Toppling timber with power tools creates hazards. Using the five-step felling plan helps identify and mitigate tree felling danger from start to finish. This plan is suitable for both professionals and nonprofessionals.
Five Step Felling Plan
- Identify tree height, lean, and hazards.
- Make sure you have the equipment needed for the job.
- Plan and clear the escape route.
- Cut the notch.
- Make the bore or back cut and use the escape route.
Step 1: Identify the height, lean and hazards of the tree
Before approaching the tree with a chainsaw, put on a hard hat and take a few minutes to make the following determinations:
- How tall is the tree? This will help estimate where the top of the tree will land on the ground and whether something is in its fall path.
- What hazards are in, on, and around the tree that can harm you or the property?
- Does the tree lean? If so, it may not fall where intended.
Assess height
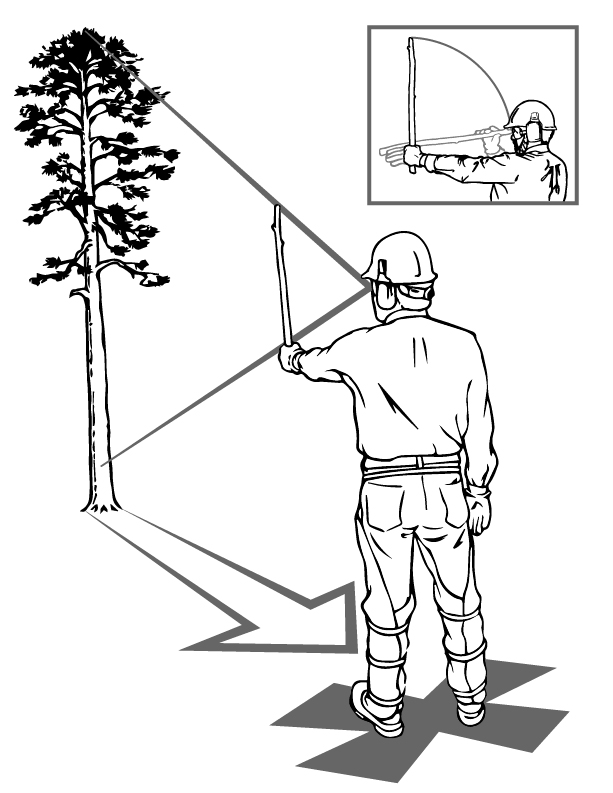
There are many tools for assessing the height of a tree, like cell phone apps, clinometers, and transits. The “stick trick” is reasonably accurate and uses items always available at a work site: a stick and your arm, hand, and eyes.

To measure the tree height using the “stick trick,” find a straight stick that’s as long as the distance between your hand and your eye when your arm is stretched out straight (Figure 1). To find a stick of appropriate length, rest one end of the stick on your shoulder while holding the other end in your hand.
With the arm still outstretched, line up your thumb with the spot on the tree where the notch will be cut. Rotate the stick up off your shoulder 90 degrees without dropping your arm or moving your wrist or head. Moving just your feet and eyes, step back until the tip of the stick is even with the top of the tree. You should now be standing where the top of the tree will hit the ground. Plant the stick into the ground where your feet are, and measure from the base of the tree to the stick to get a fairly accurate estimate of height from your notch to the top of the tree.
If the tree leans or the felling path is not level, the measurement will need to be adjusted. If the tree leans forward, the height estimate will be high. If it leans back, the estimate will be low, and the top of the tree will land beyond the spot marked by the stick. Conversely, if the tree stands on a slope and falls uphill, the height estimate will be low; if it falls downhill, the estimate will be high.
Determine lean

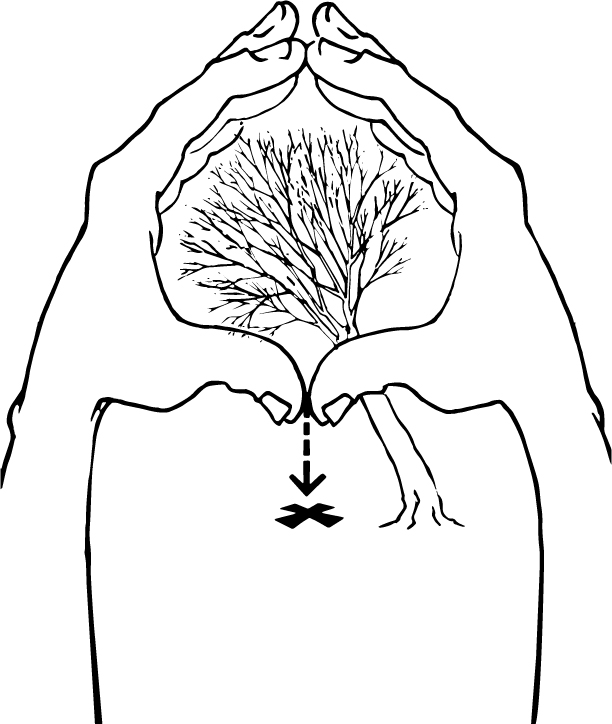
There is a simple way to tell if the tree leans: Standing along the line in which you plan to drop the tree, place your index fingers and thumbs together to make a circle. Looking through the circle, make sure the path is clear and step backwards until most of the tree’s canopy is visible within the circle (Figure 2). Drop an imaginary line from the thumbs to the ground or move the hands down until the thumbs appear to touch the ground. Mark the spot and measure the distance to the base of the tree to determine the amount of lean.
Now, repeat this exercise along a line that is 90 degrees perpendicular to the anticipated felling line. Generally, if the tree has 3 feet of lean or less, the notch can be adjusted to compensate. If, however, the amount of side lean is more than 3 feet from the base of the tree, it will not fall along its intended path. Ropes, wedges, mechanical advantage, and/or a new plan may be needed. If the line in which the tree will be felled is changed, re-assess the lean in the new line of fall, and again at 90 degrees perpendicular to it.
Identify hazards
Hazards may be on the ground, in the air, or in the tree. Walk around the tree, looking outward for things that the tree—or its branches—may strike when falling. This includes buildings, cars, pets, and people on the ground; power lines above; and neighboring trees that may change the direction of the fall or catch the tree and stop its fall.
Then examine the tree and canopy for hazards hiding there. Vines can be quite dangerous. They can change the fall direction and pull down surrounding trees and branches. Mushrooms and fungus on the trunk or around the tree are indicators of interior rot. A rotting tree may collapse during cutting. Similarly, cracks in the ground may indicate an unstable root system. Up in the tree, look for “widowmakers”—dead or broken branches hung up in the tree—that are likely to drop as cutting shifts the balance of the tree toward falling. Scan the trunk and branches for cavities and nests where biting and stinging wildlife may live.
Step 2: Make sure you have the equipment needed for the job
Once the tree and site assessment are completed, it’s time to gather and examine the equipment needed to safely complete the job, starting with personal protective equipment (PPE). A hard hat, eye protection, ear protection, chaps, and appropriate boots are mandatory. These items are covered in University of Georgia Extension Circular 1148, Chainsaw Safety: Always use your Personal Protective Equipment (PPE).
Next, determine what equipment is needed to ensure that the tree falls along its intended path. Make sure all the necessary equipment is available, and that each piece is in sound working order before cutting.
No felling job should be attempted without a well-maintained, properly running chainsaw. The saw should have an engine powerful enough to do the job; a bar that is slightly longer than the diameter of the tree; and a sharp chain that is in good repair.
Wedges are required on-site equipment any time a tree is felled. Always place a wedge in the back cut, regardless of the direction of lean. An axe or hammer is needed to drive the wedges into cuts.
If the tree has back or side lean, a throw line, rope, or mechanical advantage may be needed to help pull the tree over.
If the equipment needed is not available, walk away and schedule the job for another day. Alternatively, put the site in a safe condition and go get the necessary equipment to complete the job.
Step 3: Plan and clear the escape route

This step is very important.
Ninety percent of tree felling accidents happen within 15 sec of the tree beginning to move, and within 5 ft of the trunk. This is called the “90-15-5 rule.” Don’t become a victim of this rule.
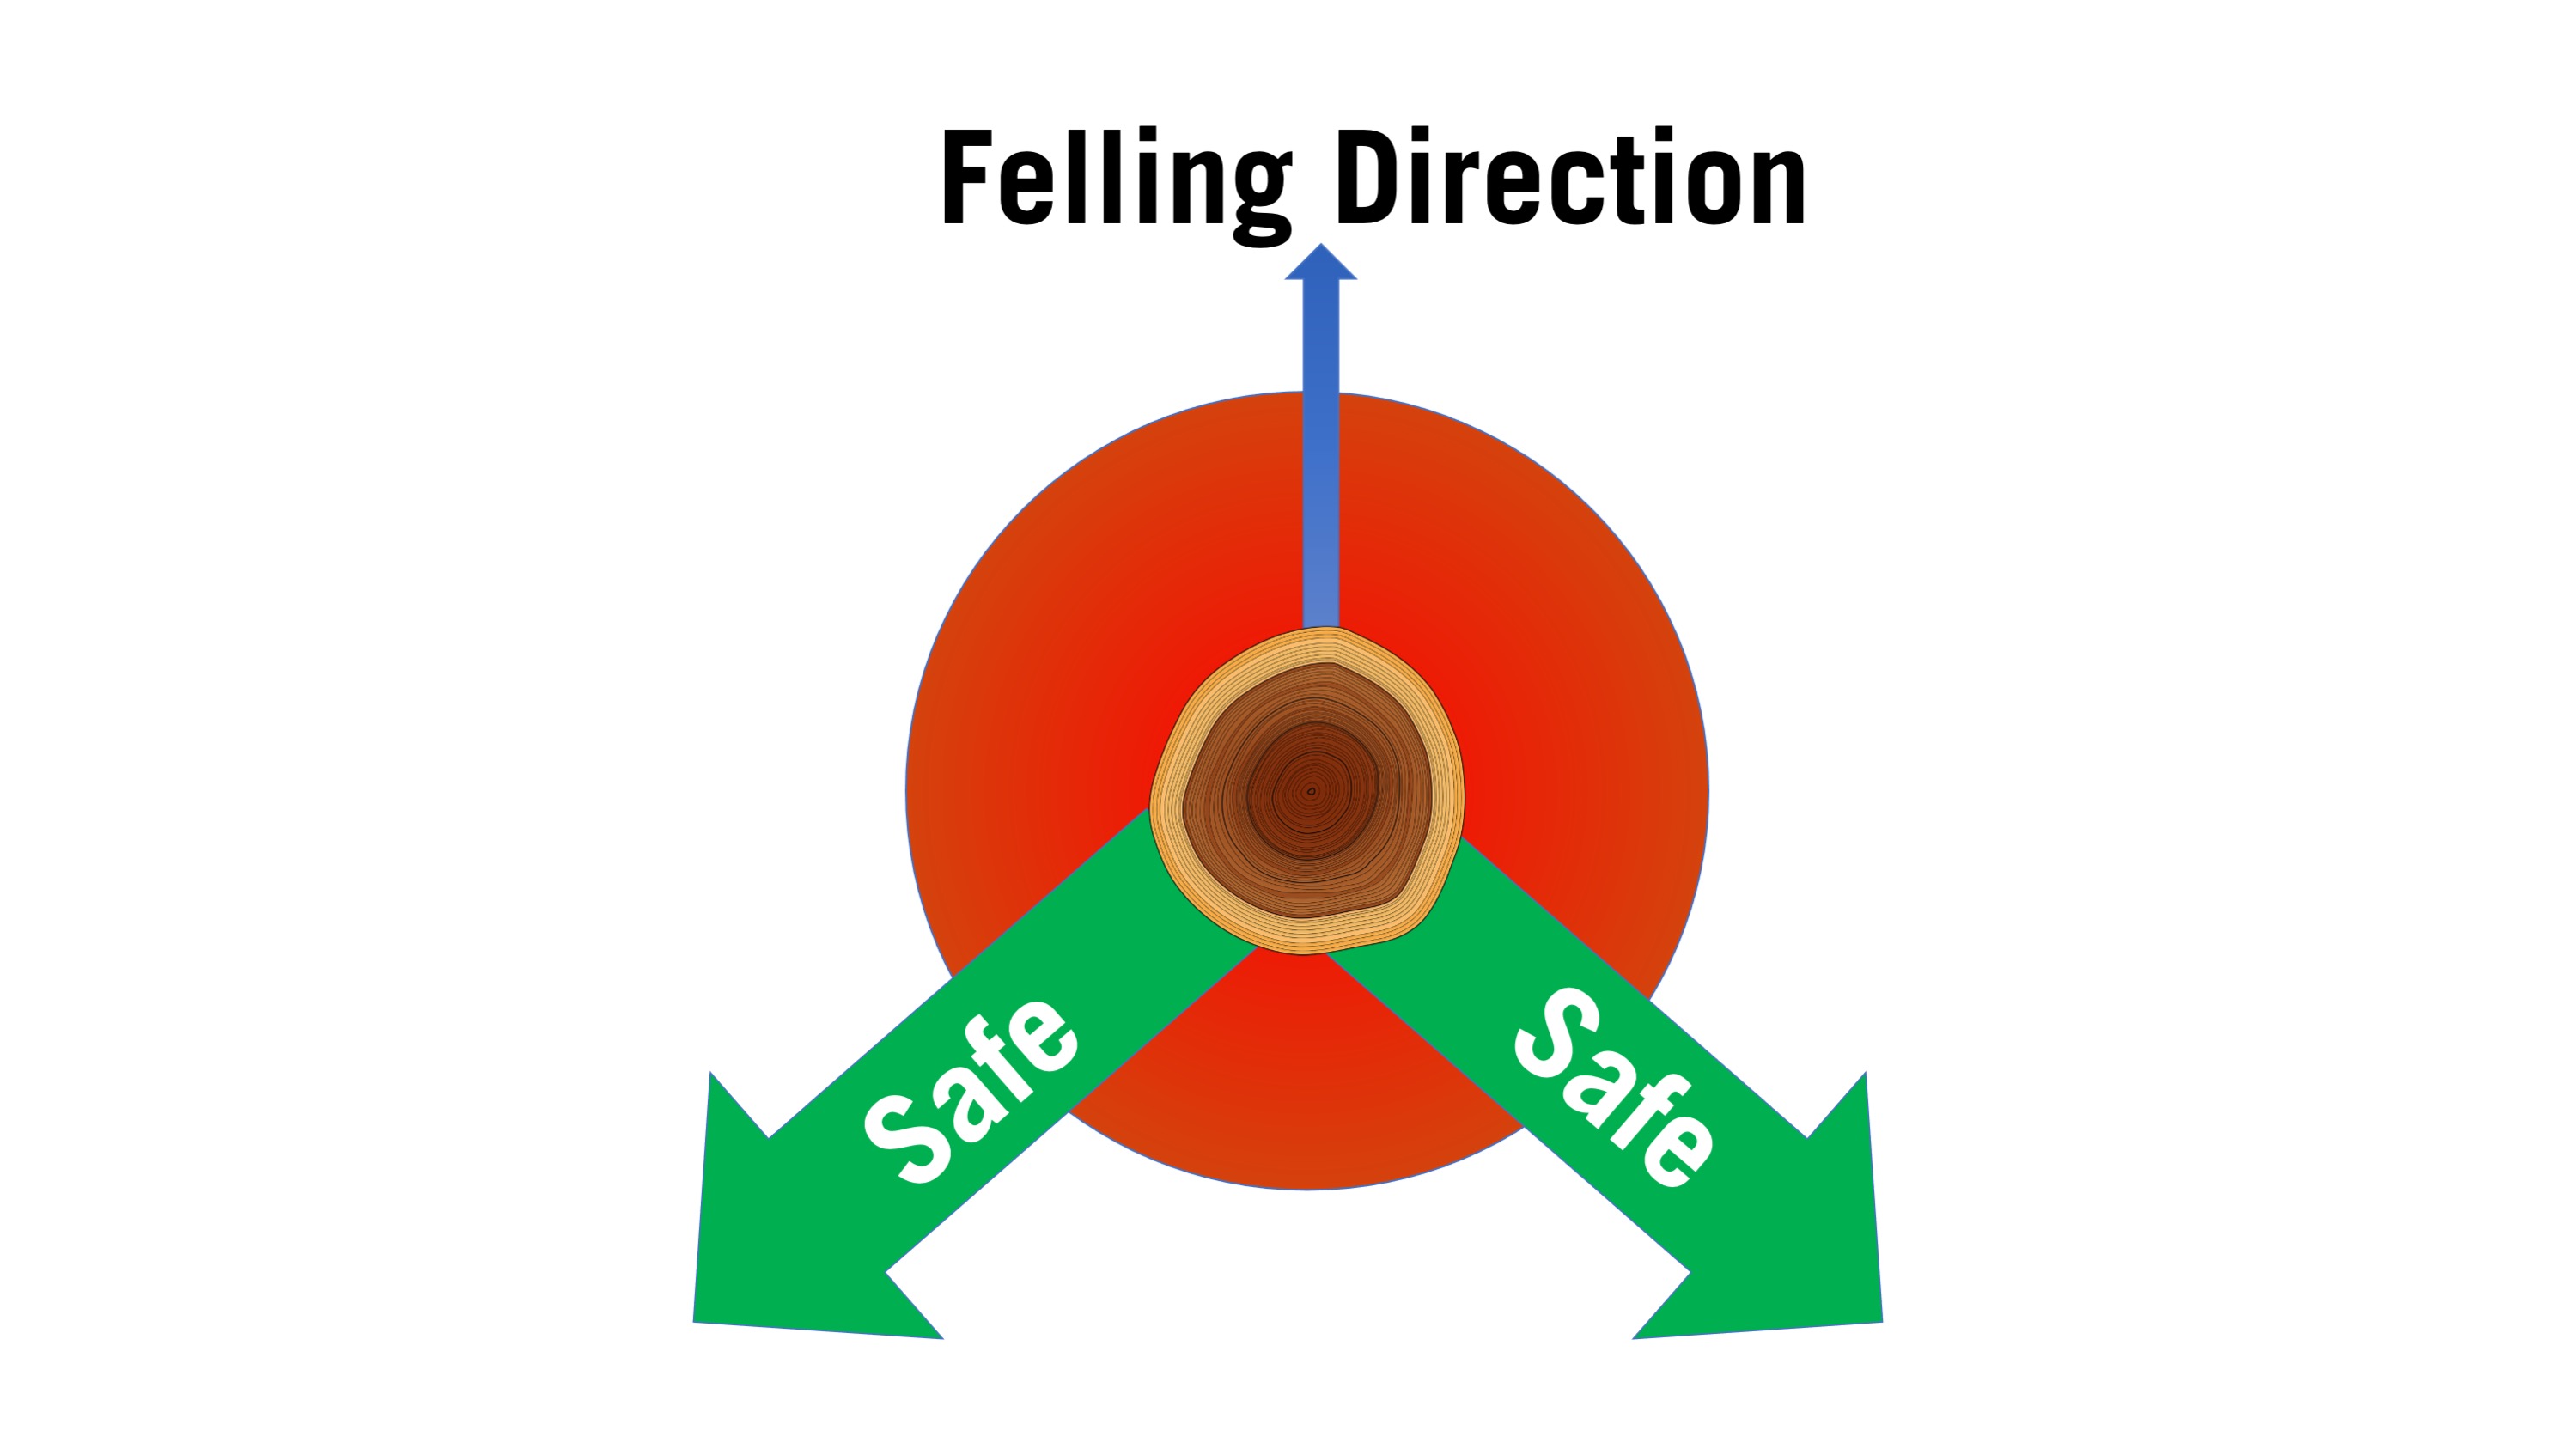
Once the felling direction is determined, plan and clear the escape route. The route should be at a 45-degree angle away from the direction of fall (Figure 3). Take the time to clear away tripping hazards such as branches, undergrowth, and debris along the escape route. Use this escape path as soon as the tree begins to move in response to the back cut. Continue to monitor the fall throughout the escape. Do not turn your back on a moving tree.
Step 4: Cut the notch in the tree

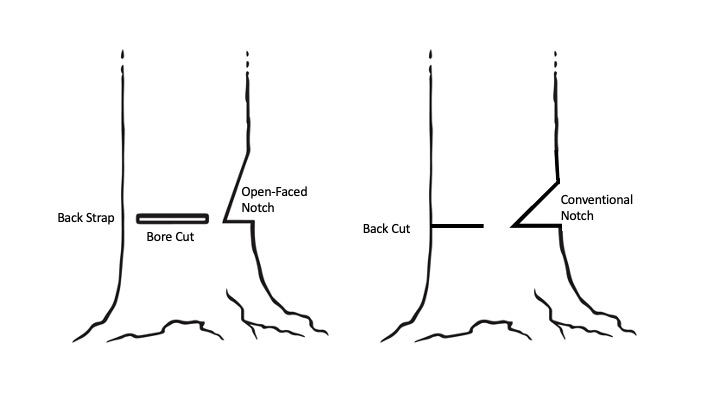
In step four, cut the notch in the direction the tree will fall. An open-faced notch, made at a 70- to 90-degree angle, is safer than the traditional 45-degree notch for two reasons (Figure 4). The wider, open-faced notch offers the advantage of allowing the tree to fall all the way to the ground before the two cut faces come together. This helps maintain the hinge and the control provided by the hinge.
In addition, the release of this notch allows the feller to be well down the escape route and out of the danger zone before the tree moves. However, it is also acceptable to use a conventional notch (or Humboldt notch, which has a horizontal top cut and an upward lower cut).
Step 5: Make a bore or back cut and use escape route to leave the area
When using an open-faced notch, make a bore cut (sometimes called a plunge cut) to create a hinge that is the appropriate thickness for the tree. If the diameter of the tree is 24 in. or less, the hinge should be 10% of the remaining tree material after the notch is removed. If the tree is larger than 24 in. in diameter, the hinge should be 5% of the remaining tree material after notch removal.
If you are not familiar with a bore cut, practice it before tackling a standing tree. The hinge should be uniformly thick across the entire diameter of the tree. The tree will be held in place by the back strap. Cut the back strap (or tap the wedge) and immediately escape along the precleared escape route. If using a conventional notch, make the back cut and use the escape path as soon as the tree begins to move.
If all five steps are followed properly, the tree will remain attached to the stump at the hinge and will fall along the intended path while you move safely away on your escape route.
References
Bauske, E. M. (Producer). (2017). The five step felling plan: A safe and effective way to take down a tree with a chainsaw [Video file]. University of Georgia Center for Urban Agriculture. https://www.youtube.com/watch?v=tnZrlEqDEcA
Bauske, E. M., Orellana, R., & Hutcheson, W. (2018). Chainsaw Safety: Always Use Your Personal Protective Equipment (PPE) (Publication No. C 1148). University of Georgia Cooperative Extension. https://extension.uga.edu/publications/detail.html?number=C1148
Status and Revision History
Published on Dec 03, 2020
Published with Full Review on May 11, 2023


