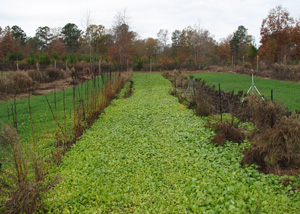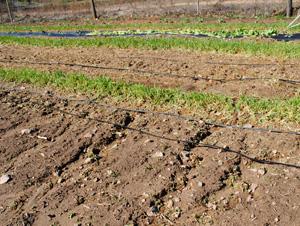
Cover crops can be an important component to any home garden. They are used for various reasons, including building the soil, controlling soil erosion, and limiting the initiation and spread of certain diseases and insects in the soil. Cover crops are primarily used to "rest" or leave a garden area open during non-production times. Therefore, they are most often planted in the fall. However, summer cover crops can be equally effective and can provide the same benefits as a fall cover crop.
Benefits of Cover Crops
It is important to mention the benefits of cover crops and why you should consider using them in your garden. Leaving an unplanted area of your garden as bare soil can easily lead to the germination of unwanted weeds and to damaging soil erosion. Cover crops are intended to cover this bare soil and provide a cheap source of nutrition for your garden plants, when cover crops are turned under and decomposed into the soil. They also increase the organic matter of the soil, as they break down into humus.
Cover crops look more attractive than bare soil and, depending on the type of cover crops you plant, can attract beneficial and pollinating insects. They can also be used between rows in your garden to help hold the soil and block weeds from germinating. Rotating between different vegetable families, as well as planting cover crops, can assist in starving out damaging soil pathogens by providing a non-host plant. Overall, the planting of cover crops is an essential organic method of protecting your garden, building better soil and increasing production.
Selection of Seed
The time of year will determine whether you plant a cool- or warm-season cover crop. Cool-season cover crops should be established after the summer garden fades, usually from early September into the first part of October. If you are not planning on planting a winter vegetable garden, you should consider seeding your entire garden in a cover crop.
Try using a combination of a cereal grain with some type of legume. Typically, wheat, oat or rye is planted with a legume, such as clover or winter peas. The grass-type cereal grain is quick to establish and helps hold and protect the soil while the slower germinating legume crop takes hold. Legume crops have the added bonus of fixing atmospheric nitrogen, which can be used by the crops that follow when the legumes are tilled into the soil. This can help reduce your fertilizer expenses.
A typical mix might be 3 to 4 pounds of a cereal grain with 0.25 pounds of a legume per 1,000 square feet. For a garden as large as an acre, you can go with 50 pounds of cereal grain and 5 pounds of clover per acre.
An important consideration is the use of a legume inoculant. Specific Rhizobia bacteria invade the roots of legumes, forming nodules where nitrogen fixation takes place. These bacteria are specific for different legumes and can be purchased to inoculate legume seed prior to planting. Inoculant comes in the form of a powder and is actually live bacterial. There are specific inoculants for various types of clovers and other legumes, so be sure to purchase the correct one.
Nitrogen fertilizer should not be applied to legume cover crops as this interferes with nitrogen fixation; however, applications of phosphorus and potassium according to soil test recommendations can enhance nitrogen fixation. Be sure you do not use ryegrass for a winter cover crop. Ryegrass is different than the cereal grain rye, and it is much too competitive and difficult to eradicate.
Summer cover crops can also be beneficial when you need to rest an area of the garden yet protect the soil from erosion and invasive weeds. Typical summer cover crops include buckwheat, millet, cowpeas, sorghum-sudangrass or soybeans. Depending on your selections, they should be planted at a rate of 1 to 5 pounds of seed per 1,000 square feet. They can be planted as a single cover crop or mixed in any combination; reduce the planting rate appropriately when mixing seeds.
Planting and Establishment

Cover crops establish quickly when planted on a well-prepared seedbed. Prepare the bed by removing old vegetable plants and tilling the area to a depth of 4 or 5 inches. Seed can be broadcast over the intended planting area at the proper rate discussed earlier. It is best to test the soil prior to planting to determine the pH and fertility needs of your cover crop. Lime and fertilizer can be applied at time of planting and should be tilled into the soil just prior to spreading seed.
After the seed has been planted, lightly rake or drag the seed into the soil to establish good soil contact. Tiny seeds, such as clover, should not be buried deeply; make sure they are just barely below the soil surface. If you happen to have access to a roller or cultipacker, it is an excellent idea to go over the seedbed with such a tool to help firm the bed and increase germination.
Water the newly planted area every other day for the first week or two to assist in germination. Once the cover crop is up and growing, you can cut back watering to once a week. A fully established cover crop will typically survive on rainfall alone.
Use in Prevention of Soil Erosion

One of the greatest benefits of cover crops is erosion control because cover crops reduce the amount of time soil is left bare. Living plants and plant residue intercept falling raindrops and absorb the erosive energy of the rain before the water reaches the soil. The cover also slows the flow of water across the surface and increases the rate at which the water soaks into the soil.
Cover crops address the management concepts of soil health by:
- Disturbing the soil less (less is more).
- Increasing the diversity of soil biology and assuring a successful growing area by using a combination of plants.
- Keeping a living root system of plants growing throughout the year.
- Controlling erosion and compaction before they start.
Status and Revision History
Published on Sep 30, 2014
Published with Full Review on Jul 13, 2022


