Many plants can be reproduced from cuttings, or pieces, of the parent plant. This allows the gardener to produce a flowering plant faster than from seed. It also helps maintain certain characteristics of the parent plant, like flower color or growth habit, that might change if propagated by seed.
Plant propagation is the creation of new plants from existing ones. Plants can be propagated by two main methods, including sexual (seed) and asexual (vegetative) propagation. Asexual, or vegetative propagation, is done by inducing root formation on a piece of the parent plant so that a new and independent plant is created. The vegetative plant part is placed under conditions favorable for rooting. The plant part must develop its own roots to allow for water and mineral uptake.
In most cases, vegetative propagation produces a clone which is genetically and physically identical to the parent plant. The offspring is identical to the parent because there is no mixing of the gene pools as in seed propagation. For some plants, vegetative propagation is the only way to maintain the characteristics unique to the plant, such as variegation or dwarfing.
Vegetative propagation is advantageous for multiple reasons. Unique characteristics that would not continue through seed propagation, such as color variegation or contorted growth, can be preserved through vegetative propagation. New plant forms can be introduced to the market more quickly through vegetative propagation than through sexual propagation. A larger plant can be obtained in a shorter period of time, and new plants will flower faster than seed-propagated plants. Very little tissue from the parent plant is needed to produce many plants. In cases of declining specimens or historic plants, plant lineage can be maintained by vegetatively propagating replicas that have the vigor of young plants.
Before propagating plants, gardeners must confirm that they have permission to propagate them. Many plants are patented and it is unlawful to propagate them for any reason, including personal use! A patent is granted on intellectual property and prohibits anyone else but the patent owner from profiting. To find out if a plant is patented, check the U.S. Patent and Trademark Office website (www.uspto.gov). While the USPTO is considering whether to grant a patent, a cultivar is sold as “PPAF,” which stands for “plant patent applied for” (e.g., Hemerocallis ‘Inkheart’ PPAF). This status also prohibits propagation by anyone except licensed growers.
Growing Plants From Cuttings
Some plants can be reproduced by cutting propagation. Cutting is a general term used in vegetative propagation and can be any portion of the vegetative plant body used to create new plants. In most plants, the areas that contain meristems (growing points) have to be included in the cutting. The meristems are found at the shoot tip, the tips of side branches (usually at a node, the point on the stem where the leaves are attached), and the root tips.
Propagation by cuttings relies on a plant’s ability to form adventitious shoots or roots. These shoots and roots are wound-induced or preformed and occur in places where they were not originally found, such as at a node or the base of a leaf. Wounding induces hormones to form in the cutting at the wound site. These hormones in turn cause cells to proliferate and form a dense mass of tissue called a callus. Adventitious roots form from calluses.
Both herbaceous and woody plants can be propagated vegetatively by cuttings. It is important to use the correct type of cutting for the plant you are trying to propagate.
Shoot Cuttings
Shoot cuttings may be made from branch tips or stems (Figures 1A and 1B). They also may be made from tip cuttings, which consist of the apical bud and the first one or two nodes on the stem, or they may be made from a stem section containing a single node or several nodes. Remove the lowermost leaves, as they tend to rot once under the soil line. Some people remove the smallest, most tender leaves along with the tip, because they tend to lose water very quickly and wilt. This practice may be used with plants with tender young growth. When taking stem cuttings, include at least two nodes, as the lower node should be beneath the soil surface. Any flower or seed heads also should be removed, as they divert the plant’s energy to themselves and away from the process of making roots. This method of propagation is very popular for herbaceous plants with stems that have an apical bud from which the plant grows.

Figure 1A. Example of shoot cuttings made from branch tips.
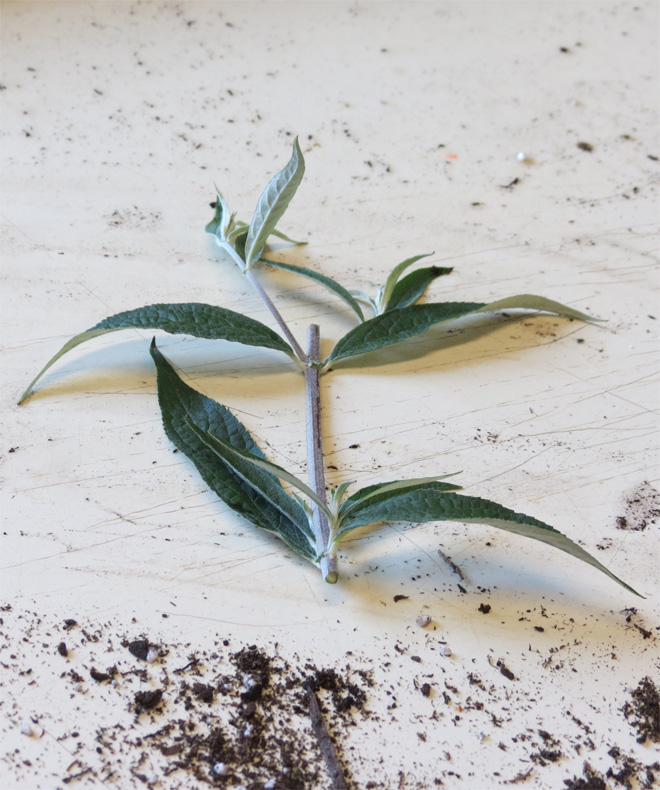
Figure 1B. Example of shoot cuttings made from stems.
Leaf Cuttings
Some plants can be propagated from leaf cuttings (Figure 1C), such as begonia, African violets, and many succulents, such as jade plant and Christmas cactus. The ability of plants to propagate via leaf cuttings is related to the presence of adventitious buds in their leaves. Not all plants have these small, dormant, meristematic areas in their leaves. Under favorable conditions, the adventitious buds within the tissues of the leaf “awaken” and prompt development of an entire miniature plant. Leaf cuttings from succulent plants and those with a multitude of epidermal hairs generally do not need misting to form roots. In fact, they tend to rot if placed under excessive moisture.

Figure 1C. Examples of shoot cuttings made from leaves.
Root Cuttings
Some plants are propagated from sections of root that have the ability to generate adventitious buds and shoots. The cutting is literally a section of root placed in rooting media or a propagation bed. This propagation method is less common.
Timing
While most herbaceous plants can be propagated at any time of the year, timing is critical for the success of woody ornamental propagation from cuttings. Woody plants have different types of shoot cuttings, depending on the season. Cuttings for woody plants are termed softwood, semi-hardwood, and hardwood, depending upon the time of year when plant material is collected.
Softwood cuttings are taken early in the growing season. Softwood is the emerging shoots of shrubs, trees, and evergreens. The wood is still green and easily bruised with a fingernail. This tissue is often too tender and succulent, and will not propagate well for all species. These cuttings root faster compared to other types, but need to be kept cool and moist during collection. Once cut, these soft shoots will lose water quickly. Softwood cuttings that are excessively wilted during collection likely will not root. Examples of woody plants that can be propagated by softwood cuttings are beautyberry, crape myrtle, and butterfly bush.
Semi-hardwood, or greenwood, cuttings are taken later in the growing season. The best time to take semi-hardwood cuttings is in summer, from June to September. The growth flush is completed, the wood is firm, and leaves are mature. If working with larger branches, use only the semi-hardwood cuttings. This category applies to broadleaf evergreens, such as those in genera Rhododendron, Photinia, Ilex, Magnolia, and Camellia.
Hardwood cuttings are taken later in the dormant season. This category applies to deciduous, broadleaf, and needle evergreens. Generally, last season’s growth is collected during the fall and winter.
Following the recommendations in Table 1 can increase the success of propagating new plants. When choosing to create new plants vegetatively, gardeners must determine the best method for the particular plant being reproduced. Many resources, such as those included in the Resources section of this publication, will provide these plant-specific recommendations and guidance. The directions may include multiple methods of propagation for some species, while other species may have only one propagation method.
Table 1. Examples of Species-Specific Propagation Information.
| Species | Type of cutting | Timing | Conditions | Rooting period |
|---|---|---|---|---|
| Chinese Holly (Ilex cornuta) Japanese holly (Ilex crenata) Inkberry (Ilex glabra) | 4-in. terminal stem cutting with semi-hardwood, rooting hormone applied | June, August, or September (firm wood after each growth flush) | In shade, in soil, under mist, or other suitable setting | 10–12 weeks |
| Smooth Hydrangea (Hydrangea arborescens) | Softwood, rooting hormone applied | June–July | Under mist, peat:perlite | 3–4 weeks |
| Bigleaf Hydrangea (Hydrangea macrophylla) | Bigleaf Hydrangea (Hydrangea macrophylla) | May–July | Under mist, peat:perlite | 3–5 weeks |
| Panicle Hydrangea (Hydrangea paniculata) | Terminal stem cutting, rooting hormone applied | May–July | Under mist, peat:perlite | 4–5 weeks |
| Roses (Rosa) | Softwood, wounded, rooting hormone applied | Spring and summer | Under mist, peat:perlite | 3–4 weeks |
| Rosemary (Rosmarinus officinalis) | 2- to 3-in. semi-hardwood terminal cutting with half of the leaves removed, rooting hormone applied | Fall and winter | Mist or open bench, sand or well-drained medium | |
| Spirea (Spiraea) | Softwood, rooting hormone applied | When plants are in leaf (May to early September) | Well-drained medium | 2–4 weeks |
Note. Do not propagate patented, PPAF, or trademarked plants. From The reference manual of woody plant propagation: From seed to tissue culture, by M. Dirr and C. Heuser, 2006. Copyright 2006 by Timber Press.
Tools And Supplies
To propagate plants, some basic tools are necessary. They do not have to be expensive or of commercial grade to be effective.
Stock Plant
A healthy plant is essential for plant propagation. It should be free of insects and disease and be in a state of good nutrition. Though unhealthy plants can be propagated in an effort to save them, they likely will take longer to form roots and recover, and they are more likely to die during the propagation process.
Tools to Cut or Sever
The tools used to cut or sever propagules (the cutting that propgates the plant) will depend upon the type of cutting being made or the plant material being used (Figure 2). Simple scissors or needle-nosed floral snips may be used to collect herbaceous tip and leaf cuttings, while pruning shears and loppers may be necessary for softwood or hardwood cuttings. Inexpensive paring knives or grafting knives also can be used to collect softwood or herbaceous cuttings. It is important to keep tools as sharp as possible to ensure good cuts.

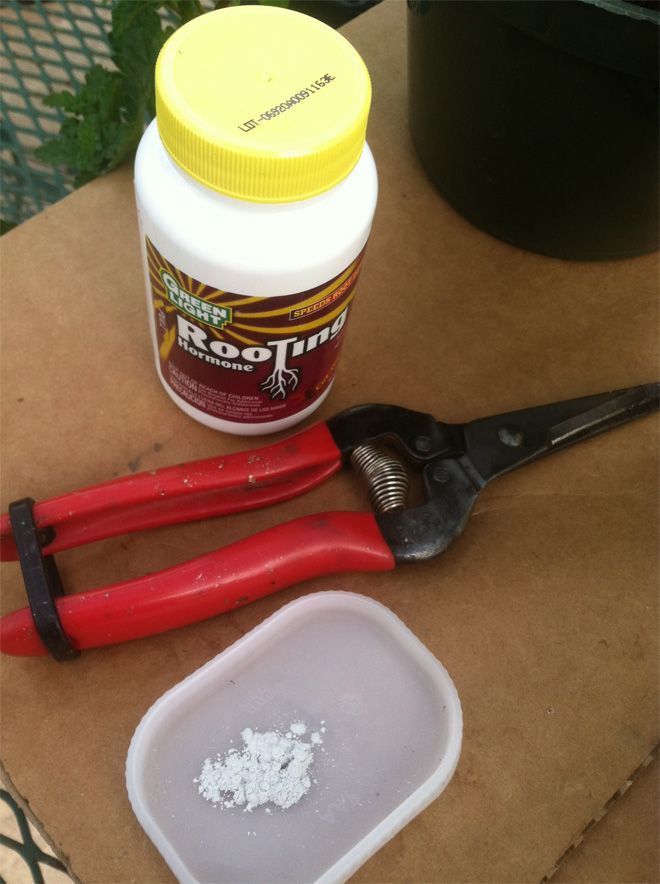
Figure 2. Propagation tools include knives, scissors, and pruning shears.
Media
Propagation media needs to be sterile, fine-textured, weed-free, and without fertilizer to give young plants the best chance for success (Figure 3). Weeds compete with the germinating seedlings for water and nutrients, and disease organisms can kill seedlings in the early stages of germination. Fertilizers can dehydrate embryos or plant tissues.
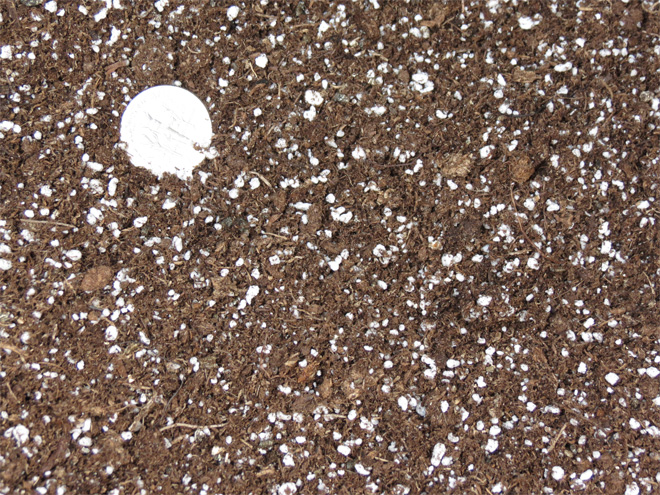
Figure 3. Propagation media.
There are several choices for propagation media. The easiest option is to purchase a bag of premixed propagation media without fertilizer. These media provide air/water relationships of 25% to 40% air space and are suitable for plant propagation. Alternatively, materials can be purchased separately and mixed together to create a media that has good moisture-holding capacity and good drainage.
Sand should be sterile; use sharp builder’s sand with a particle diameter of 0.5 to 2 mm. Sand has no buffering capacity; its pH varies with source and can change with the water being applied to the plant. Sand contains no nutrients and has no water-holding capacity. It is suitable when mixed with peat, perlite, and other components.
Perlite is a crushed aluminum-silica volcanic rock that is heated rapidly to 1800 °F. It is sterile, lightweight and chemically inert. Perlite contains no nutrients, has low water-holding capacity, and a pH of 7 to 7.5. For propagation, use horticultural grade #2. Similar to perlite, scoria is a naturally occurring volcanic rock, crushed and screened for size. Pumice is a white, natural volcanic glass. Both have similar qualities to perlite.
Vermiculite is a clay mineral that is heated to 1400 °F. It is sterile and lightweight. Vermiculite has high nutrient- and water-holding capacity, and a pH of 7 to 7.5. For propagation, use coarser grades.
Peat may come from several types of plants: sphagnum moss, hypnaceous moss, reed and sedge, and humus or muck, all collectively are called peat. Peat moss is excellent when mixed with sand and perlite; peat provides water and nutrient-holding capacity, while perlite provides aeration.
Bark (hardwood or pine) is relatively sterile and lightweight when dry. It has high nutrient- and water-holding capacity, and a pH of 3 to 4.5. The fine shredded form is popular for propagation—70% to 80% of the particles are between 1/40 and 3/8-in., and 20% to 30% of the particles are smaller than 1/40 in. Bark can be used alone or mixed with other media.
Other amendments are used to adjust pH; provide calcium, magnesium, and other nutrients; and improve the wettability of the mix. These can include lime, gypsum, starter charge (fertilizer), and wetting agents.
Propagation media can be mixed to meet your personal preferences. Sphagnum peat moss often is combined with perlite (2 parts coarse perlite to 1 part peat) for seed-starting media. Another popular recipe is 3 parts bark, 2 parts peat, and 2 parts perlite. The propagation medium should have a pH of 5.0 to 6.5. A good recipe for making propagation media includes 4 quarts of shredded sphagnum peat moss, 4 quarts of fine vermiculite, 1 tablespoon of superphosphate, and 2 tablespoons of ground limestone. Mix thoroughly, then wet completely. Leave the soil to drain, and do not plant for 5 to 6 days. This allows the lime to react with the peat moss and create a favorable environment for the seedlings.
Gardeners often use homemade mixes made of garden soil. While it will work, it is not the preferred medium as it is heavy, holds a tremendous amount of water, and often contains weed seeds or disease. If using garden soil, it needs to be prepared before use. Put moist soil through a 1/4-in. sieve, place a layer up to 3 in. deep in a baking tray, and bake for 30 min at 400 °F. A microwave also may be used—seal the soil in a pierced roasting bag and heat on high power for 10 min. Some plants will even root in water alone. Use a clean container and fresh water at room temperature. It is helpful to change the water every 3 to 5 days.
Rooting Hormones
Vegetative propagation methods are often enhanced by the use of plant hormones. Natural hormones occur in plants and are known to regulate various growth processes. Some hormones are present in buds and in leaves and are involved in the formation of adventitious roots. When cuttings are treated with rooting hormones, they tend to root more quickly and may form more roots than if no rooting hormone is used.
Rooting hormones are available as powder or liquid formulations with varying strengths of active ingredient for use with different plant tissues (Figure 4). Rooting hormones can be purchased at most garden supply stores. Rooting products are only used in small amounts at a time. For sanitation purposes, avoid sticking plant materials into the main container of the rooting product. Instead, pour a small amount into a paper cup or onto a piece of paper before dipping cuttings into the rooting powder. Discard any leftover powder.

Figure 4. Powder and liquid rooting hormones.
In general:
- Auxin concentrations of 500 to 1,250 ppm are used to root the majority of softwood and herbaceous cuttings.
- Auxin concentrations of 1,000 to 3,000 ppm with a maximum of 5,000 ppm are used to root semi-hardwood cuttings.
- Auxin concentrations of 1,000 to 3,000 ppm with a maximum of 10,000 ppm are used to root hardwood cuttings.
Rooting Chamber
When propagating plants by cuttings, leaves need to be kept wet to maintain a favorable water status and to remain cool. The objective is not to water the cuttings, but to minimize transpiration and loss of moisture from the plant tissues. Permanent, commercial systems use intermittent mist within a tented or otherwise enclosed container (Figure 5). A mist system usually includes a water supply, a cutoff valve, a pressure regulator, a filter (to screen small particles), a solenoid valve, and mist nozzles. A timer also is needed, which should be installed away from the mist. It is important to use a timer designed for mist systems as it can be set for short durations, such as 20 seconds every 10 minutes.

Figure 5. A mist propagation system supplies timed bursts of fine water droplets to propagules. Flats of prepared cuttings are placed on the bench in the mist until rooting occurs.
In lieu of a permanent, plumbed mist system, simple propagation chambers can be created from readily available materials. Chambers will need to be closed to create a high-humidity environment for plant tissues as they are forming roots —like miniature greenhouses. Containers can be made from purchased or recycled materials, such as clear plastic bins with lids or soft drink bottles (Figure 6). The containers need to be clear for light penetration, have enough space for the cutting and rooting media, and be able to be closed to hold water and raise and maintain humidity. Media and cuttings can be placed in smaller pots or trays that are placed within the chamber, or the chamber itself can serve as a container for the rooting process. As the cuttings root and grow, the lid gradually can be opened and then removed to harden-off plant tissues and prepare them for planting outside.

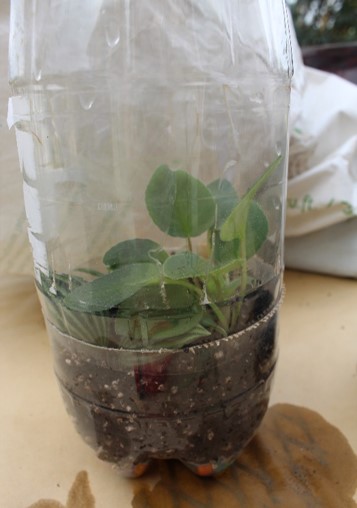
Figure 6. Propgation chambers can be created from readily available materials.
Sanitation is critical in the propagation process. Disease-causing fungi can attack cuttings and kill them at an early stage. To reduce the chance of fungal attack, use disease- and insect-free plants, sterile media, and sanitized tools and containers. To sanitize used containers, wash them to remove any soil or debris and rinse with a solution of 1 part chlorine bleach to 9 parts water. Rinse thoroughly with clean water.
Preparing Cuttings
Preparing cuttings is a multistep process (Figure 7). To remove the plant material from the mother plant, cut just above a node so that a stub is not left behind on the mother plant. Once the cutting is removed from the parent plant, use a sharp knife or clippers to make a slanting, smooth cut just below a node. The angled cut serves to increase the surface area of the cut, which helps with water uptake during propagation. Remove any flower buds. Wound the lower 1/2 in. of stem on the opposite side of the last node by gently scraping the outer layer (Figure 8). The scraping of the stem exposes the cambial layer (tissue layer composed of thin-walled cells involved in cell division) underneath the bark to the rooting hormones. This layer also generates the roots. Remove lower leaves and/or cut leaves in half to reduce transpiration. Some leaves should be left because they are the source of internal hormones that help initiate adventitious roots. Once the cutting is prepared, it is dipped in a rooting hormone to hasten the formation of roots.
Figure 7. Directions for Starting Cuttings.
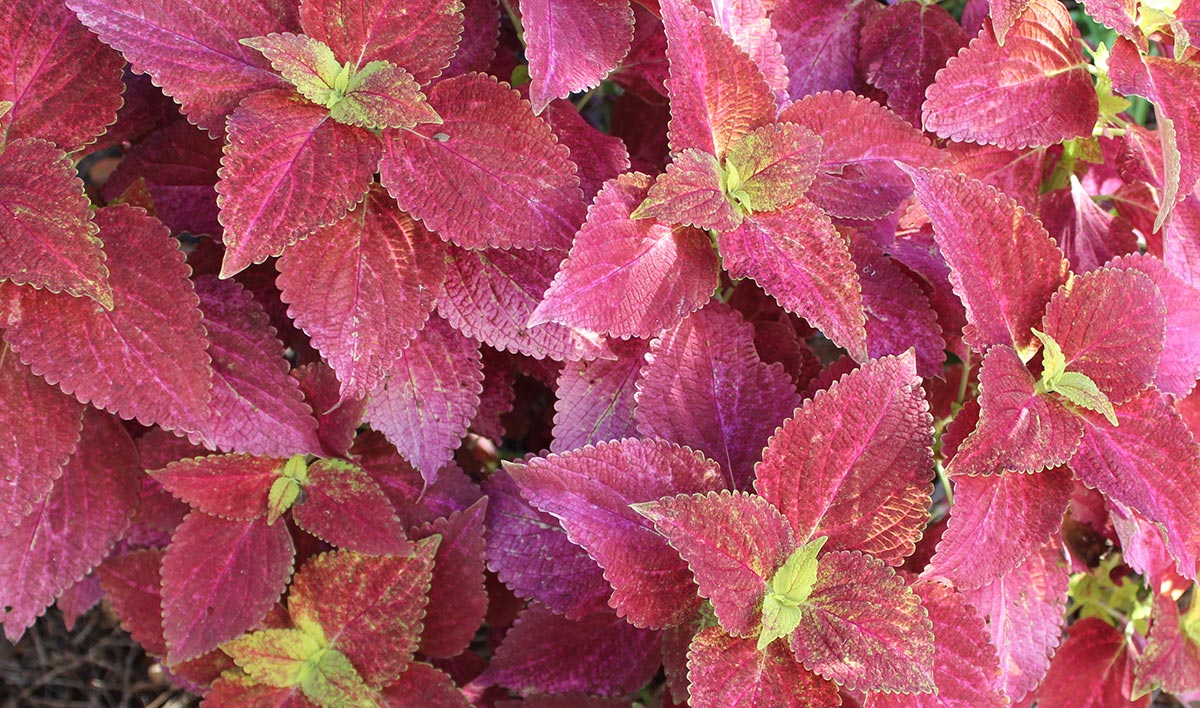
1. Choose healthy plant stock that is free from insects and diseases and is in a state of good nutrition.
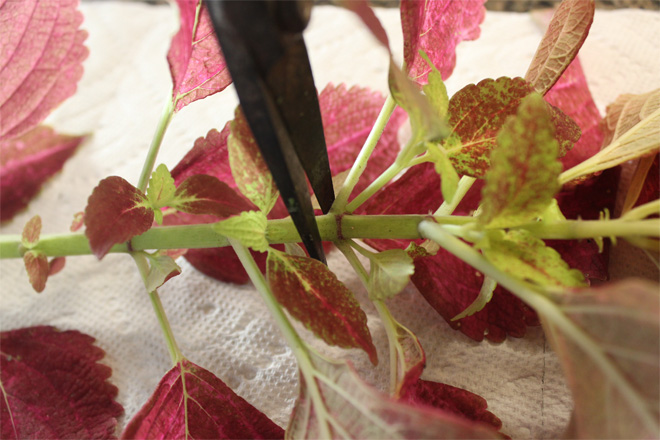
2. Select a healthy stem for the cutting. Using sharp shears or a knife, remove the cutting from the parent plant. Then cut it just below a node (where leaves originate on stem), preferably at a slight angle.
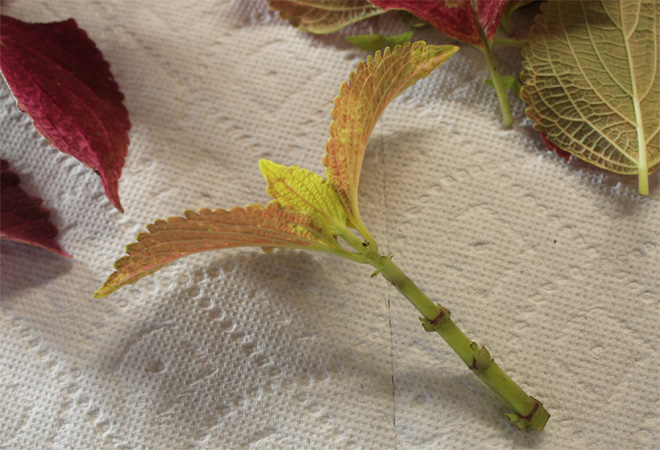
3. Finish preparing the cutting by reducing the length of the stem to 2-3 in. Remove the lower leaves, leaving those at the top of the cutting.
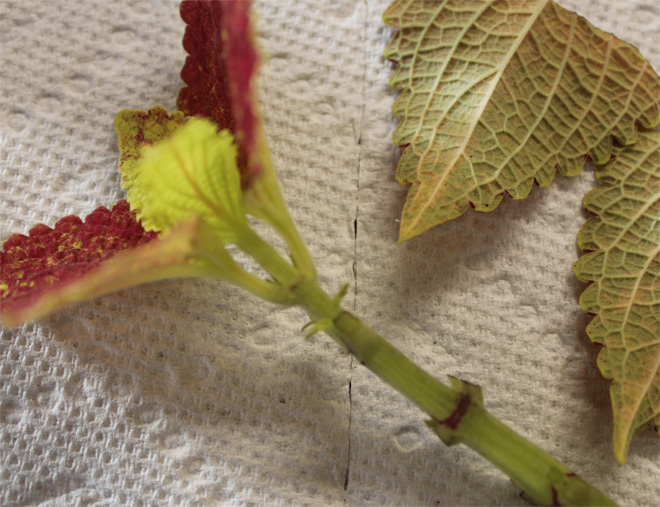
4. If leaves on the cutting are large, cut them in half perpendicular to the midvein. This helps reduce the surface area for moisture loss.
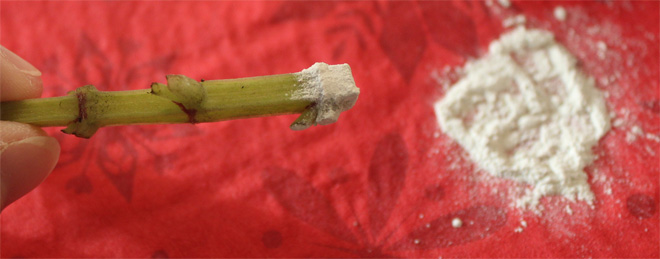
5. Portion a small amount of rooting hormone powder onto a paper towel. Dip the cut end of the plant stem into the rooting hormone. Tap the cutting lightly to shake off any excess.
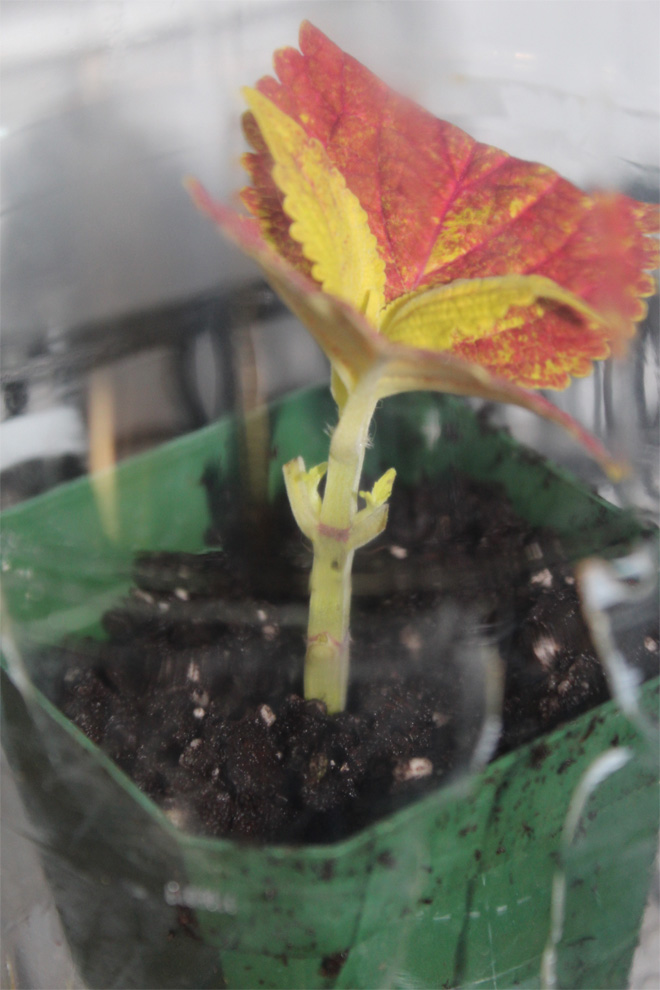
6. Stick the cutting into a pot of moist potting media. Place the pot in a clear, zip-top plastic bag or cover with a clear plastic or glass cloche to maintain high humidity. Mist as needed to maintain a humid environment until the cutting forms roots.
Hardening Off
Once cuttings have successfully rooted, they are capable of supporting themselves and need to be prepared for their intended location. Plants raised in a high-humidity, sheltered location need to be prepared prior to planting in drier, harsher conditions, such as outside in the garden. This preparation process is referred to as hardening off.
One way to prepare plants is to move them outside to a shady location, gradually increasing the amount of sunlight over a period of several days. Alternatively, young, tender plants can be brought outside on an overcast day, and then brought back inside after a few hours. Repeat daily, extending the length of time that plants remain outside by an hour each day until the plants have acclimated to the brighter, drier outdoor conditions.
This transition also can be accomplished by reducing temperatures (to between 45 and 50 °F) and reducing water. The idea is to slow growth and thicken plant cell walls. Start this process 1 to 2 weeks prior to planting seedlings in the garden. Take care to transition plants gradually as extreme changes can slow growth to the point of plant death.
Summary
Reproducing plants can be fun, rewarding, and economical. Many plants can be reproduced vegetatively, such as from cuttings. Using rooting hormones, new roots are encouraged to develop on the leaves and stem of the parent plant. It is satisfying for gardeners to grow new plants to fill in a garden area. Sharing new plants with friends and neighbors generates much pride. Following these simple directions can increase your success in propagating new plants!
Resources
Dirr, M., & Heuser, C. (2006). The reference manual of woody plant propagation: From seed to tissue culture. Timber Press.
Davies, F. T., Geneve, R. L., Kester, D. E., & Hartmann, H. T. (2011). Hartmann and Kester’s plant propagation: Principles and practice. Prentice Hall.
Other publications in this home garden series:
Bulletin 1432, Starting Plants From Seed for the Home Gardener
Status and Revision History
Published on May 01, 2023


