- Updated PDCA Scorecard with Discrimination Levels and Descriptions
- Maximizing Your Animal's Potential
- Behavior and Grooming Preparation
- Show Time
Every animal emerging from the pasture or barn needs time and attention to get her show-ring ready. The showman on the other end of the halter needs to be prepared as well. Faults in either fitting or showing could lead to a less successful show experience than one might have hoped for. For youth, especially, showmanship is a great place to shine regardless of how an animal performs in conformation classes.
The Purebred Dairy Cattle Association (PDCA) has an established scorecard for fitting and showing dairy cattle. As with the conformation scorecards, the showmanship scorecard continues to evolve. The scorecard previously used by judges had three traditional categories (Table 1). Reviewing the priority items listed under each of the three major categories may help exhibitors better understand the basic components that contribute to showmanship evaluation.
| Aspect rated | Maximum points allocated |
|---|---|
| Appearance of the animal | 30 |
| Cleanliness Grooming Clipping Condition and thriftiness |
10 |
| Appearance of the exhibitor | 10 |
| Showing animal in the ring | 60 |
| Leading Posing Show animal to best advantage Poise, alertness, attitude |
25 15 10 10 |
| Total | 100 |
The newest scorecard moves away from these categorical assignments and instead focuses on levels of discriminations, which are listed as slight, moderate or serious for both animal and exhibitor. Understanding the current scorecard and the severity of showing errors should be the first step in preparing for the show ring.
Updated PDCA Scorecard with Discrimination Levels and Descriptions
Slight discriminations—exhibitor:
- Inappropriate halter
- Lead strap tightly looped
- Walks slowly backward into the ring
- Sidesteps when leading calf
- Has stiff, outstretched arm
- Has poor posture - overly stiff or slumped
- Improper head carriage - animal's nose is too high
- Animal's head is not turned slightly toward judge when hide is felt
- Stepping on or kicking at the animal's front feet (a slight touch to move animal's front feet is allowed and should not be discriminated against)
- Inappropriate size of animal for competitor
Slight discriminations—animal:
- Minor instances of animal not handling well
- Is not alert
- Muzzle is not wiped clean
- Switch is not brushed and fluffed
- Clipping lines not properly blended
Moderate discriminations—exhibitor:
- Not wearing white clothing or show-approved attire
- Inappropriate attire that draws attention
- Wearing clothing with a logo
- Does not know animal's birth date, fresh date, breeding date or due date
- Unable to recognize type faults of the animals
- Halter not fitting or put together properly
- Has fingers in the ring of the halter
- Failure to hold throat when needed
- Improper head carriage - animal's head held too low
- Unable to show animal to best advantage
- Slow response to judge or ring official
- Inattentiveness
- Watching the judge too intently
- Over-showing
- Leading too slowly
- Has elbow or hands up
- Is too far to outside or inside the ring
- Failure to switch rear legs when the judge moves around the animal
- Doesn't walk quickly into line
- Incorrect spacing to the animal in front
- Crowding or bumping others when in line
- Leaving extra space in line
- Failure to maintain a straight lineup
- Moves excessively in line
- Unable to back up animal
- Legs incorrectly posed
- Does not keep animal straight from head to tail
- Chewing gum
Moderate discriminations—animal:
- Legs not clipped
- Dirt or dust in hair coat
- Dirt or wax in ears
- Feet not cleaned
- Excessive use of hair sprays, powder or other fitting products
- Clipping too early - hair appears long
- Incomplete clipping
- Excessive clipping
Serious discriminations—exhibitor:
- Lead strap looped and fastened
- Striking the animal
- Positioning the rear legs by stepping on feet
- Fusses with or moves calf to the extreme
- Minor instances of unsportsmanlike conduct
- Late to class
- Wears inappropriate shoes
- Chewing tobacco
- Carries or talks on a cell phone
Serious discriminations—animal:
- Animal causing disturbances to others
How do these discriminations affect the placing of exhibitors?
- Slight discriminations may not impact a placing
- Moderate discriminations may impact a placing
- Serious discriminations will have a significant impact on placing - normally to the bottom half of the class
An exhibitor may also be disqualified. The reasons for disqualification include:
- Violating the PDCA Show Ring Code of Ethics
- Exhibiting unsportsmanlike conduct
- Repeatedly striking the animal
The standards set forth by the PDCA regarding how junior showmen will be evaluated is a great place for you to start thinking about preparing your animal for the commercial or purebred show.
Maximizing Your Animal's Potential
Maximizing your animal's potential would have fit into the overall condition and thriftiness category on the old scorecard but is just as important under the new discrimination list. Overall, animal management and raising practices can alter an animal's performance in shows and in the herd. Raising your animal by a set of guidelines will get both you and her off on the right foot. The following program is not meant to be all-inclusive but to provide a foundation on which to build your heifer-rearing program.
Nutrition
Proper nutrition, especially in developing heifers, can have a large impact on future development and worth. Ideally, some of these animals that start as your show heifers might one day perform well in your milking herd and in your lactating cow show string. Preparing for a show means both getting her trained for showing and getting her in the right nutritional condition for the show ring. Growing heifers will have different needs based on breed and/or size.
In Figure 1, the solid black line marks the average weight for Holstein heifers. Animals below this line are not achieving optimal growth rates based on breed average. Animals above this line are superseding the average, but should be monitored to ensure they are achieving similar height measurements as well.
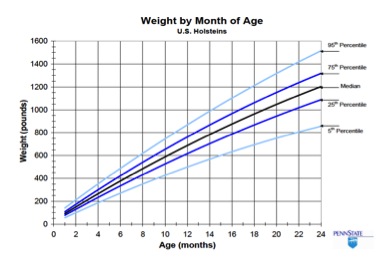 Figure 1. Comparison of weight by age with industry percentiles for Holstein heifers (Source: Penn State).
In Figure 2, the solid black line marks the average wither height for Holstein heifers. If your heifer is falling below this average, protein levels should be re-evaluated for accuracy. If your heifer is above average for height, considerations for energy must be made to substantiate the growth.
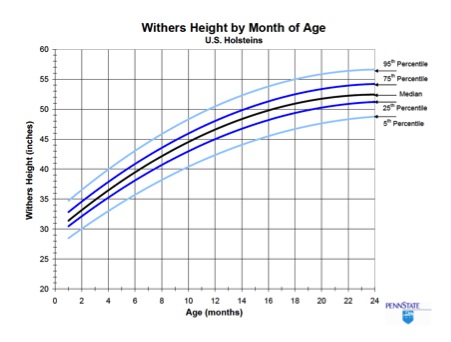 Figure 2. Comparison of wither height by age with industry percentiles for Holstein heifers (Source: Penn State).
Figure 3 shows the average weight and height ranges for Jersey heifers. The blue lines indicate weight and correspond with numbers on the left axis, while orange lines represent height and correspond to numbers on the right axis. Double lines indicate the high and low of the recommended range for wither height and weight.
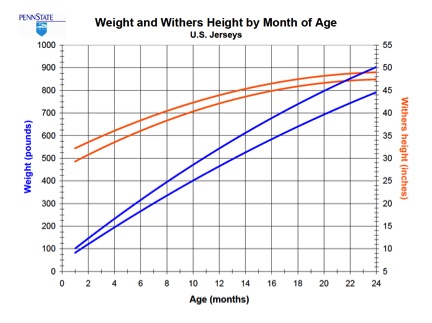 Figure 3. A combined graph of heifer weight and height by age for Jersey heifers (Source: Penn State).
Use these graphs to help easily assess heifer growth. Measurements for weight and height can be simply measured using a weight tape and measuring stick. Measure your heifer's height and weight every other week. Maintain this information on a graph to track and assess your heifer's progress.
Considerations for growth and feed efficiency include level of feed intake, forage quality, body condition score, environmental stresses and exercise level. Often, your conditioning is prepping them for growth of 1.8-2 lb per day in large breeds and 1.3 lb per day in small breeds (prior to breeding). Rations have to be balanced for both height and weight. Gaining that amount of weight without the necessary height will lead to largely over-conditioned animals; therefore, it is important to pay attention to both the energy and protein components of your ration.
When deciding on the energy standards for your animal's ration, it is essential to take into consideration the housing environment (Table 2). Assigning energy levels without taking into account these environmental factors can reduce heifer growth or increase the potential for over-conditioning. The energy content may also be altered by size and growth rate of your heifer, which should be monitored as previously described. Faster growing, larger framed animals will require higher energy levels than their herdmates.
| Environmental Conditions | Energy Accommodation |
|---|---|
| Wet / muddy conditions | Increase dietary energy |
| High wind exposure during colder months | Increase dietary energy |
| Cold, hard resting areas | Increase dietary energy |
| Well-managed freestalls | Manage energy to avoid overfeeding |
| Feeding ionophores | Manage energy to avoid overfeeding |
| Heat stress | Decreased intake—make sure plenty of available water and dietary energy are available |
| Crowding stress | Closely evaluate dietary energy |
| Parasite issues | Treat and evaluate increasing dietary energy |
Protein levels must also be determined upon ration selection or balancing. Crude protein provides the scaffolding on which the animal grows. Protein is responsible for allowing an animal to reach its genetic potential for skeletal size and scale during growth periods and for milk production later in life. Research data currently suggests feeding crude protein (CP) at the following levels: 15–17% for heifers 200–500 lb (6–9 months), 14–15% for heifers 500–800 lb (9–13 months) and 13–14.5% for heifers over 800 lb (13 months to freshening). Crude protein values are simply determined by the nitrogen content of the ration multiplied by 6.25.
Below-optimum values of energy or protein can lead to long-term consequences. A heifer that has been provided with an overabundance of energy but insufficient protein levels can develop fat deposition within mammary tissue, which ultimately causes a reduction of milk secreting tissue when the animal begins lactation. On the flip side, substantial levels of protein met with inferior energy can result in a delay of first breeding and thus entry into the lactating herd as a result of delayed puberty or endocrine disruption. (Puberty should occur when an animal reaches 45% to 50% of her mature body weight.) These animals may also have below-optimum calving weight (82% to 85% of mature body weight) that research confirms leads to reduced first lactation performance.
Balancing your ration appropriately for heifer growth based on availability of feeds is essential (Table 3). As the weight of the animal increases, the ratio of forage to grain changes. Hay or silage quality can also vary, and should be considered with the different forages used. Equally essential is your evaluation of heifer growth and development. This analysis may be based on growth parameters outlined previously or on anticipated feed efficiency.
| Heifer Weight (lb) |
Excellent Hay | Good Corn Silage | Poor Forage | |||
|---|---|---|---|---|---|---|
| Hay | Grain | Silage | Grain | Forage | Grain | |
| 200 | 4 | 3 | 10 | 3 | 3 | 4 |
| 400 | 8 | 3 | 20 | 3 | 6 | 5 |
| 600 | 12 | 2.5 | 30 | 2 | 9 | 6 |
| 800 | 16 | 1 | 40 | 1 | 12 | 5 |
| 1,000 | 10 | 0 | 50 | 1 | 15 | 5 |
| Source: Hoard's Dairyman Heifer Rearing Guidelines. | ||||||
Table 4 outlines the amount of dry matter intake necessary to achieve 1 lb of average daily gain (ADG). Feed efficiency should not be evaluated based on pounds fed, as feedstuffs have variable water content. Evaluating feeds on a dry matter basis allows for an accurate estimate of true feed and nutrient intake. Feed efficiency is expected to decline with calf age. Follow these guidelines when feeding your show animals.
| Age | DMI per pound of ADG1 |
|---|---|
| Calves on milk | 2–2.5 |
| Weaned calves (25% forage) |
3–4 |
| Young heifers (50% high-quality forage) |
4 |
| Heifers on TMR | 6–7 |
| Older heifers (poor to average forage) |
> 8 |
|
1 Amount of Dry Matter Intake (DMI) necessary to get 1 lb of average daily gain (ADG). Source: Hoard's Dairyman Heifer Rearing Guidelines. |
|
Animal Health
Carefully monitoring general health allows the heifer to reach her potential and utilize all nutrients that you are providing in the diet. The two basic animal health maintenance items are a proper vaccination program and consistent monitoring of general animal health and thriftiness.
Vaccination protocols are an insurance policy for your calves. They do not offer failsafe protection but do provide your animals with a defense mechanism against disease. When approaching a vaccination program, it is important to realize that the majority of the animal's lifelong vaccination protocol is lumped into the "youngstock" period. During this time your animal builds immunity that is then boostered through adulthood. The major areas for consideration in heifer vaccination programs are: Leptospirosis, Respiratory Diseases (IBR, BRSV, PI3 and BVD), Clostridial bacteria and Brucellosis. Injectable vaccinations are not recommended until the calf is a minimum of 1 month old. If choosing to initiate vaccinations prior to this time, intranasals should be used.
No matter which vaccination program you intend to use, it is imperative to always follow label directions for handling and administering vaccines. This includes proper and timely administration of booster vaccinations, in particular with killed or inactivated vaccines. Timing of vaccination is also a top consideration with the show animal, as stress can reduce the effectiveness of the vaccination. It is recommended that vaccinations be administered a minimum of one week prior to transportation to an event. Improper procedure can lead to decreased efficacy and potential absence of the proper and intended immune response. Always consult with an animal health professional when designing your vaccination program.
The overall thriftiness of your animal may be impacted by the presence of internal and/or external parasites. Parasites to consider are nematodes, coccidia, lice, mites and grubs. These parasites can play a huge role in the feed efficiency and growth potential of your animal. Treatment for parasites varies between products and producers. Ideally, a heifer will be dewormed four or five times between weaning and breeding.
Spring is the season of greatest parasitic growth and proliferation. In a strategic management program, heifers will be dewormed in early May, followed with a second deworming in mid-June. The first deworming kills any existing parasite load. The second deworming five weeks after the first is in an effort to kill any newly developed adults in the intestinal tract. These adults are the result of larvae picked up from the pastures that developed after the residual killing ability of the initial dewormer. Another deworming would then be called for in October to kill any parasites picked up over the summer and to prepare the animal for winter. A minimum of two dewormings (spring and fall) should be performed each year on growing heifers. Following treatments, do not introduce any animals that have not been dewormed. As with all products, read and follow label directions carefully.
Regularly assessing the general health and wellbeing of animals is imperative to ward off detrimental disorders and diseases that could lead to decreased performance, morbidity or mortality. Animal health assessments rely on the knowledge of what "normal" looks like. The more time that is spent with an animal, the easier "normal" is to quantify. Parameters for basic vital statistics (heart rate, respiration, temperature) in the dairy heifer are outlined in Table 5. Considerations for the animal's activity level as well as ambient environment must be taken into consideration when evaluating basic vital statistics. These are normal for a comfortable animal at rest in a thermoneutral environment.
| Vital Statistic | Ideal Values | How Assessed |
|---|---|---|
| Heart Rate | 50–80 beats/min | Stethoscope behind animal’s left elbow |
| Respiration Rate | 25–40 breaths/min | Visualized on the flank |
| Temperature | 100.4–102.8 °F | Rectal thermometer |
| Information adapted from Merck Veterinary Manual and the CalfTrack™ System. | ||
Recent movement (for example, across a pasture) may increase these values. Likewise, physiological and psychological stresses such as introduction to a new group, struggling against the halter or transportation to a show may alter these values. Finally, warmer conditions often lead to higher respiration and heart rates in an animal's attempt to cool. Rectal temperatures may change as well with the environment and activity. Some events leading to increased rectal temperature include: recent activity (for example, feeding or movement), sunny days, elevated environmental temperature and humidity. Generally, temperatures above 103.5 degrees F are of concern. Keep these points in mind when you perform general health assessments.
Evaluation of animal behavior and temperament is a necessary daily task. Take this time to look at your heifer and simply ask yourself if she looks like she feels okay. Normal behavioral characteristics may alter when an animal is suffering clinically or subclinically from illness. Behavioral aspects may allow you to more quickly pursue additional diagnostic procedures, which may allow for more effective remediation of the underlying problem. Examples of behavioral changes include isolation, being off feed or inactivity.
Maintenance
Hoof trimming may be required to get your animal moving smoothly. Adjustments to the hooves, however, should be made no less than three weeks prior to show day. This allows the animal to compensate for the change in hoof shape and pressure. Trimming too close to show day may lead to the appearance of lameness. Additionally, trimming errors can lead to legitimate lameness issues. For this reason, only experienced individuals should trim hooves. Trimming hooves can do a lot to help your animal's appearance, but if done incorrectly, it has the potential to hurt as well.
Removal of horns should also precede show date by a minimum of six to eight weeks to allow for healing. Removal this far in advance adds to your animal's appearance by not having remaining scabbing or sores.
Though horns are not a discrimination in some show rings, others may ban horned animals from showing altogether. To ensure your ability to compete in all shows, animals should be dehorned. When planning for the dehorning of your animal, method of horn removal will be a big decision. Current methods of dehorning in youngstock include caustic paste, electric or "hot iron" dehorner and the Barnes dehorner. The younger the animal, the easier the horn removal is and the quicker the recovery. Younger animals do not experience the weight or growth setbacks that some older animals may experience following dehorning. The current recommended age for dehorning is 1 month of age. Animals should not progress beyond 2 months before they are dehorned.
Behavior and Grooming Preparation
Breaking the Animal to Lead
Initially breaking the animal to lead can quickly become a test of endurance. You will need to be patient when working with animals and should be realistic in your expectations of progress. Each animal is different as to how long it will take until forward steps are made.
When beginning this process, the first step will be to acclimate your animal to the halter. This period of time allows them to not only become accustomed to the halter but to learn that the halter has the ability to restrain them. A sturdy rope halter is best for most of your initial work. Start this process by putting the halter on the animal and leaving them tied in a sturdy, well-bedded location for short durations of time (15–25 minutes). Do not leave your animal alone during these initial sessions. There is the potential for them to struggle and ultimately hurt themselves. Animals should always be tied with a quick release knot to prevent injury. Do not release just because you see them fighting the halter, as this will teach them the incorrect lesson that fighting against the halter means relief.
After a few days of short tie-ups, you may begin trying to move the animal using the halter. Walking towards something they ultimately want such as feed or water may help movement. These initial walking sessions may involve the animal refusing to walk and/ or running without the realization that they are still attached to the halter. Be prepared for either reaction, as releasing the lead rope should not be an option. Some encouragement outside of feed or water may also be helpful. Brute strength might not win a tug of war battle. Instead, short tugs or having someone encourage movement from behind may help. Be careful that the animal does not lunge on top of you when a forward movement is made. Do release pressure once the animal has made a move in the right direction. This offers positive reinforcement to the animal giving to the pressure of the halter.
As the days progress, you should gradually gain momentum with the animal voluntarily walking with minimal pressure. Make sure your sessions with the animal are short (15–20 min) but occur a few times a day. Longer sessions will lead to frustration for both animal and handler and may set you back in your training. A few weeks prior to the show, you will want to work your heifer with a show halter. There will be a period of adjustment for the heifer to acclimate to the change in halter type, especially the chain portion of the lead.
Cleaning
Starting to wash your animal a week or two prior to show date may seem futile, realizing she will most likely dirty up again. However, these initial cleanings can aid in the removal of some long-lasting stains, especially on the knees and hocks. This early cleaning may also afford you the opportunity to identify and treat any existing skin conditions. Final washing should be done just prior to the show.
There are a number of products labeled specifically for washing of livestock, though some people prefer a cheaper cleaning agent such as a favorite brand of laundry or dish detergent. Make sure whatever product you use doesn't over-dry the skin and lead to flakiness, which can prove troublesome on show day when you are attempting to get a nice sheen. Some places to splurge would be on your whitening shampoos. Be sure to follow label directions on all whitening products. Do not use bleach. This used to be a common practice; however, the irritation to the animal is not the only downside to such a product—it can actually leave the hair more yellow than white.
Clipping
When you start to clip your animal is up to you. Some may choose to do initial clipping sessions as far as two to four weeks in advance of the show date. Clipping this far in advance will allow the showman to identify any problems such as ringworm or warts in enough time to treat and heal. However, your final clip should not precede show day by more than two to three days. If you do a final clip too soon before show day, fitting the topline on or just before the show can cause issues with your ability to blend with body hair that has started to grow back out. This "body clip" should include the head, neck, ears, complete body (aside from a path of hair along the top on which to build your topline), the tail above the switch and the legs (from the knee or hock up at a minimum; see Figure 4). The underside of the animal may be left unclipped and will be discussed at the end of this section. Clipping should be done with patience to avoid injury to clippers or animal as well as help to avoid clipper marks.
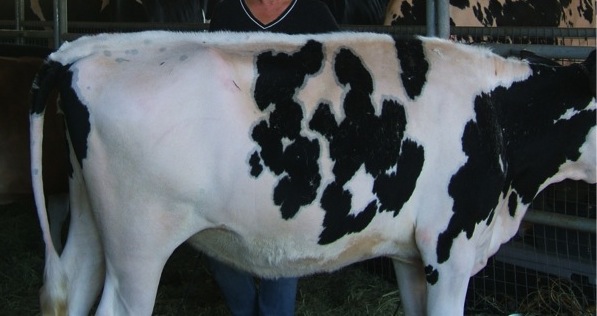 Figure 4. This animal has had a full body clip with topline and belly hair left on. No further fitting of the topline or belly hair has been completed.
An important rule of thumb to help as you begin clipping is that clipping against hair growth is going to shorten the hair according to your blades; however, clipping with hair growth is going to blend the hair. When doing a complete body clip, you will clip against hair growth. Figure 5 shows the proper clipper direction for removing hair on various parts of the body. Pay attention to going against bone and getting a close clip in all body indentions such as around the hips and short ribs. This can help add refinement to your animal. Some may choose to leave hair a touch longer in precise locations in order to blend pieces of the animal into a smoother appearance.
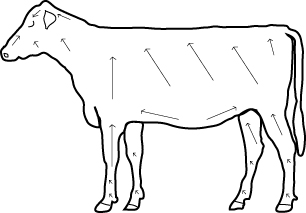 Figure 5. Arrows indicate the proper clipping direction for removal of hair in a full body clip.
The practice of leaving hair on the underside of the animal has become fairly common, and gives the illusion of more depth of rib/body. This hair should be blended into either the chest floor or up alongside the elbow. Much like with the topline, you are going to want to trim some length to add fullness to the hair. You do not want to be able to see through the hair or the illusion is lost.
Toplines
Toplines need to be groomed without being distracting. The topline should adhere to the PDCA Show Ring Ethics guidelines, which state that the maximum allowable length of naturally growing hair is not to exceed 1 in. Also, there is to be no addition of foreign objects, hair or hair substitutes. Trimming down the topline not only allows you to meet the 1-in. requirement but also helps remove longer, possibly spindly hair. You ultimately do not want to be able to see through the topline when viewing from the side.
Getting that topline to stand takes time and can be helped with some additional products. The warmth of a dryer always helps to get hair moving in the direction you want, making sure on the topline to blow against hair growth to get the standing effect. You might also find a rosin topline powder useful as you initially begin working the topline. This begins to give you some control without the stickiness and difficulty of clipping through a clear, adhesive product. Clear Magic and Dairy Magic are examples of commercially available adhesive products for use on toplines. A light misting of either of these products may be used to help establish some manageable control before a thicker, final spray. A good brush is essential. Many prefer their topline brush to be something as simple as the classic Goody brush.
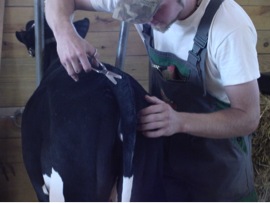 Figure 6. Topline scissors can be used for finishing touches without the fear of removing too much hair. This image also shows a topline forming a squared-off rump.
Clipping the topline needs to be focused on blending. If looking at any point in the topline, the observer should find a gradual increase in hair length from the body clip to the tallest point of the topline. This means that your blending of the topline might actually begin an inch or more out from the center of the animal's back. This blending should also be incorporated when ending the topline at the neck/shoulder as well as the tail. Again, the length will taper down to the body clip.
As you evaluate your topline, there should be no immediate starts and stops to the hair. You can use topline scissors to make any final adjustments to the topline, as in Figure 6. Also, as you move over the rump, remember that the appearance should be of a squared off, not rounded rump when viewed from the side. Figure 7 shows an example of a well-fit, well-blended topline. When first learning to clip and prepare toplines, try practicing on some heifers not going to the show.
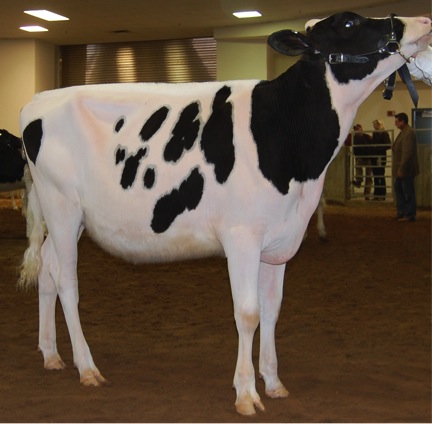 Figure 7. Example of a well-blended topline. The topline is straight and without abrupt starts or stops. This picture also shows an animal that has some belly hair left on.
Following the final spray up of your topline, you may find that the adhesive left colored hair with a white coating. This is especially true on black hair. In order to give the hair that finished appearance, you may want to use a black-colored spray, such as Black Magic or black Dairy Magic, which gives the black hair its color back. Be aware that you should not use this to alter the coloring of white spots and that it does not contain an adhesive. Touch-up colors for other breeds can generally be found in beef fitting supplies.
Show Time
Your final preparations for the show should include a good look at your show box and the show catalog. Making sure you have everything packed well in advance will ease the stress of the show day barn movein. A good look over the show day program will also make sure that you are prepared for what is to come. Know where you will be going for check-in and when you must be in the barn. Review all show rules related to both the exhibitor and the animal. Make sure you are aware of all classes that you will be participating in (showmanship, conformation, groups). Confirm that your animal meets all health requirements for show entry. These requirements may also have very specific timeframes for the show (for example, a veterinary certificate dated within 30 days of the show). For this reason, health requirements should be confirmed one week prior to the show. This 7-day window will allow for you to rectify any requirements that may be missing. These final preparations and reviews will make for a smoother transition to the barn and ensure that you will have the chance to enter the show ring.
Once you are in the ring, you have one final piece to this puzzle — knowing and showing your animal to the best of your ability and to her best advantage. If possible, watching classes before your own is always a good idea. This will provide you with an opportunity to see how the judge moves and lines up animals in the ring as well as what he or she finds particularly important in a good showman.
Dressing for the Show Ring
White: That is the main thing you need to remember. White clothing provides a clean appearance, is not distracting and is a matter of respect in the junior shows. This means a white shirt and white pants. Boots are the preferred shoe; open-toe shoes, such as sandals, should not be worn. Boots and belts should not have any bright patterns or colors. Additional accessories should be kept minimal. The wearing of hats and/or tennis shoes into the show ring is unacceptable.
Halter Selection and Fitting
The halter should properly fit your animal. It should fall on the bridge of the nose without being too tight and without pushing into the animal's eye when the halter is held. When working with your show halter prior to show day, make sure you test how you are going to hold the halter and the way it ultimately fits on the animal. Many people choose to place their hand inside of the halter for leading; in this case, size adjustments may be needed.
Halters should not be distracting — for example, incorrectly sized or in a standout color. Ideally, the color of the halter should blend with your animal; thus, browns and tans are traditionally used on all breeds except the black and white Holstein, in which case black is the most common. Pick the color that stands out the least on your animal. The lead rope should be neatly organized and looped but should never be wound around the leader's hand.
Moving Your Heifer FORWARD in the Ring
Walking backwards around the ring has become a show ring practice of the past. Forward movement with shoulders turned toward the animal and judge is what you will now find being done most often. If stopping to set your animal up, you may turn to face your animal for setup and posing. Always watch the judge, regardless of which way you are facing. You may turn your attention to your animal when setting up and for checks on how she is posed. As the judge moves around your animal, be aware that you may be required to move. Always remain out of the way of the judge's eyesight of your animal.
Maneuvering the Ring—Parading and Lining Up
You will move in a clockwise direction around the ring (Figure 8). This puts your animal between you and the judge. Whenever you are in the ring, your animal should remain between you and the judge. Always use the full ring and do not crowd towards the middle unless requested to do so by the judge. Move slowly around the ring — there is no race here! The slow movement allows your animal to stay put together. The only exception to this rule is when you are selected by the judge to move into the line-up. This movement needs to be quick to ensure that you get into the correct placing.
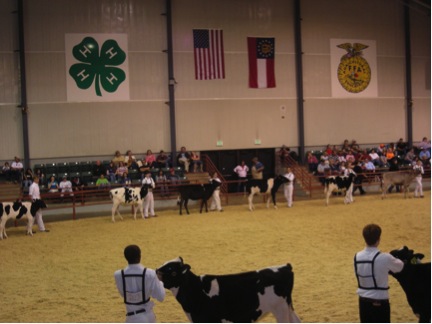 Figure 8. Animals moving in a clockwise direction around the ring with all showmen leading from the left side of the animal and utilizing the full ring.
Make sure you are always courteous in the ring. This means leaving acceptable space between you and other animals both when parading and lining up (Figures 9 and 10). When parading, if the animal ahead of you stops, it does not mean that you can pass. You may choose to assist them. However, remember that if your animal ever stops, she should be properly setup for the judge. If your animal is being disruptive in the lineup, you may need to pull her out and replace her in the line. When moving in and out of line, do not cut corners too close and end up bumping other animals as you move.
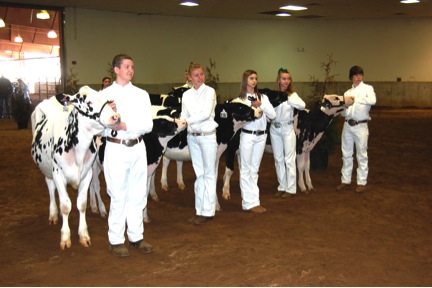 Figure 9. Example of heifers lined up side by side and equally spaced.
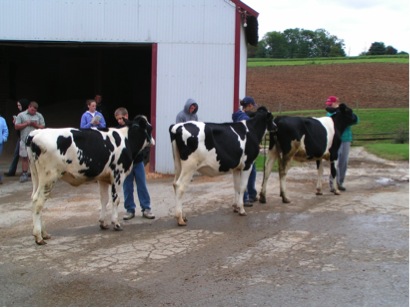 Figure 10. Example of heifers lined up nose to tail. Note that the second heifer in the line-up did not leave adequate space between herself and the first heifer.
Follow the judge's directions without hesitation. Many of the cues that the judge gives you may not be verbal. Most often, hand signals will direct you when and where to go. This is when watching the judge becomes imperative. Failure to observe a hand signal from the judge for a line-up may place you last instead of first.
Setting Up Your Animal Correctly
For all animals, the front feet should be placed together while their rear legs will be scissored. Lactation status will determine the placement of the rear legs. All heifers, unless they are springing heavy, should have the rear leg closest to the judge placed back (Figure 11). In cows, the rear leg closest to the judge should be forward. This leg change allows the judge to see future placement of the udder in heifers and both the rear and fore udder in lactating cows. Leg adjustments must be made as the judge moves around your animal. Whenever the judge crosses the center plane of the animal, rear legs should be adjusted accordingly. Adjustments, if at all possible, should be made from pressure on the halter. As the judge moves around the line-up, you should always remain out of the judge's direct view of your animal. This may include several movements by you in addition to rear leg changes as the judge walks up and down lines or in between animals.
 Figure 11. A heifer setup properly (photo from the judge's perspective). This includes the front feet being placed squarely with the rear leg closest to the judge placed back.
Overcome Flaws
Prior to walking into the show ring, you should be aware of your animal's physical flaws, such as excess skin in the throat, being narrow on the chest floor, having roaches in the back or being loose in the loin. You should try to show your animal to overcome these flaws, which might mean you pull skin from the throat, try to set your animal up wide on the front feet, pinch an animal down or keep her rear legs tucked underneath her. All of these minor changes will improve your animal's appearance and exhibit your understanding of the animal you are handling.
Be Prepared
The final item to be prepared for in the show ring is for questions from the judge. Often, judges are interested in how much you have learned from the process of fitting and showing your animal. They may ask you questions regarding your animal's pedigree, diet, conformation, etc. Make sure that you invest time in getting to know your animal's history, current status and how she has been managed to this point.
Most Importantly—Have Fun!
Overall, this experience should be both fun and rewarding. Set goals for yourself and your animal and work to achieve them. As long as you have met your own expectations, your project has been a success! You will learn invaluable skills during this activity, ranging from dairy cattle evaluation to patience. Value each trial and tribulation and learn from it. Have fun — a good judge always appreciates those who are enjoying what they are doing.
Status and Revision History
Published on Mar 31, 2014
Published with Full Review on Mar 31, 2017
Published with Full Review on Mar 11, 2025


