- Growth of the Rootstock
- Planting in the Seedbed
- Fertilization and Weed Management in the Seedling Bed
- Container-grown Seedlings
- Graftwood Collection and Storage
- Budding Pecans
- Bark Grafting
- Four Flap or Banana Grafting
- Whip Grafting
- References
Pecans grown from seed are not true to type. This means that a nut produced by a given variety will not, when planted, produce a tree identical to the parent. In fact, each seedling tree is unique and will have extremely variable nut quality. Therefore, in order to propagate a tree of a given variety, buds or shoots from the parent tree must be grafted onto a seedling rootstock.
In order to fully understand the processes discussed here, one should be familiar with the following terms:
Budding – A form of grafting in which a single scion bud is joined with the rootstock to form the graft union.
Cambium – Thin layer of cells between the bark and wood capable of forming new cells.
Grafting – The process of joining the scion with the rootstock.
Scion (Graftwood) – Mature dormant shoot of a known variety to be used for grafting or budding. The scion usually comes from the previous season's growth and measures 5 to 6 in. in length and 1/4 in. to 5/8 in. in diameter.
Rootstock (Understock) – The root, trunk or limb to which the scion is grafted.
Topworking – Replacement of the top of a tree with a desired variety by budding or grafting.
The proper budding or grafting technique may vary with size of the rootstock/scion, experience of the worker, climate and time of year. Often, individuals who propagate trees have their own personal preferences with regard to propagation methods. As with many practices related to pecan production, timing is important for successful propagation.
Growth of the Rootstock
Most commercial nurseries use open-pollinated seeds from domestic and/or native varieties that perform well in a given region. In Georgia, the most commonly used rootstock seed is 'Elliott' or 'Curtis.' 'Elliott' normally has good germination and develops good stem caliper relatively quickly. 'Curtis' is similar to 'Elliott' but is more cold tolerant and should be used for pecan rootstock in the northern part of the state. Regardless of the variety used, be sure that nuts are from the current season and free of insects and disease.
Pecan nuts should be stratified for six to eight weeks prior to planting. This can be done by placing the nuts in a container of peat moss or layering them with sand and peat moss. Stratified seed should be kept moist but not wet at a temperature of 35 °F. Stratification hastens germination once the nuts are planted and helps the seedlings to emerge more uniformly, facilitating the ease of weed control in the nursery.
Following stratification, nuts should be soaked for two to three days prior to planting in a container of water to activate enzymes that stimulate growth. A hose left dribbling into the container provides oxygen, which helps to prevent the growth of harmful fungi. Additional measures to protect against infection with seed-rotting pathogens include keeping the soaking nuts in 35-40 °F temperatures and changing the water daily. If nuts are soaked at room temperature, the water should be changed every few hours.
Pecan seeds should be planted from mid March to mid April for best results. Seeds can be planted in a seedbed or in containers. There are advantages and disadvantages to both methods.
Just as each seed from an individual tree is not identical to the parent, there is a considerable amount of variation in rootstock, even from seed arising from the same parent tree. This accounts for much of the variation in tree performance as the grafted tree develops and comes into full production.
Planting in the Seedbed
Seedbeds (Figure 1) provide easier planting but more difficult harvest of the trees. Fertility of the seedbed should be determined before planting based on soil test recommendations. Seeds should be planted 4 to 6 in. apart in the row and 3 to 4 in. deep. Planting depth should be shallower in clay soils than in sandy soils. Round-shaped nut varieties such as 'Elliott' and 'Curtis' can be planted easily with a mechanical planter and are the most common varieties used as rootstock in the Southeastern United States. Large or oblong nut varieties tend to hang up in the planter and must be planted by hand.
White plastic may be laid in raised beds over the rows prior to planting in order to minimize weed competition (Figure 2). Holes can then be punched into the plastic for planting the nuts.
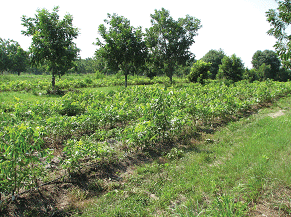 Figure 1. Pecan nursery trees growing in a seed bed.
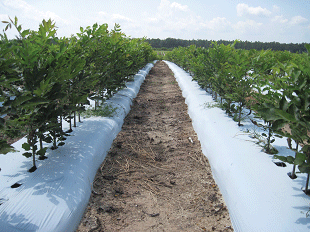 Figure 2. Pecan nursery trees grown on plastic.
Fertilization and Weed Management in the Seedling Bed
Fertilize first-year trees by broadcasting 10-10-10 at a rate of 50 lb N/acre before planting. In the second year, apply 20-20-20 plus minor elements by injection through irrigation every two weeks at a rate of 1 teaspoon/gallon.
Weed management is one of the most difficult challenges to nursery production of pecans. Following germination, but just before seedling trees break the soil surface (five days to two weeks after planting, depending on weather, etc.), apply oryzalin herbicide (2-4 quarts/acre) or paraquat (2.5-4 pints/acre) plus oryzalin. Paraquat is a contact herbicide without systemic activity and will only damage tissue that it touches. Do not allow paraquat to touch emerged seedlings, as it could kill them. Oryzalin is a pre-emergence herbicide and may be sprayed over the top of seedlings after emergence to prevent emergence of grasses and small-seeded broadleaf weeds.
After the above application, fluazifop (8-24 oz/acre), sethoxydim (1-2.5 pints/acre), or clethodim(6-8 oz/acre) may be used for grass control. Apply bentazon (1.5-2 pints/acre) for broadleaf weed control (morningglory, bristly starbur, coffee weed, ragweed and yellow nutsedge control). If yellow nutsedge is over 6-8 in. tall, a second application of bentazon seven to 10 days later may be needed. Use bentazon with a crop oil at 2 pints/acre.
A hand sprayer with a shielded wand may be used to direct glyphostae or paraquat application to weeds without damaging small trees. Take extreme caution to avoid contact of these herbicides with young trees.
Container-grown Seedlings
Pecan seedlings also grow well in a variety of container shapes and sizes. A container with an open bottom should be used. Roots should be air pruned by placing the pots on a screen wire bench. By using this method, the roots will grow no farther than the bottom of the pot before being air pruned. This prevents circling of the taproot in the container and promotes a fibrous root system.
A potting soil mixture that allows free movement of water through the pot should be utilized. A mix of three parts ground pine bark, one part peat moss and one part coarse sand works well. All potting mix should be sterile. Amend potting media by incorporating 15 lb of controlled-release 17-7-12, 4 lb of dolomitic lime and 1.5 lb of Micromax micronutrients into the media. This should provide all the required nutrients for the first year and early into the second year. In the second year, additional slow-release fertilizer may be needed, but there is no need for lime or micronutrients.
Graftwood Collection and Storage
Stored graftwood is required for several grafting methods. Unless the wood is collected and stored properly, the grafting endeavor is destined for failure. A variety of problems may occur in the collection and storage process, including drying out or freezing the wood, immature buds, old shoots, and insect and/or disease damage. Therefore, care should be taken when proceeding with these steps.
Scions should be cut from the previous season's growth of a productive tree. Scions should be straight and smooth, measuring ¼ to 5/8 in. in diameter. They should be long enough (6-8 in.) for three to four healthy buds and should be insect and disease free. Water sprouts often work well as scion wood. Scions from older wood may be used, but are generally less successful.
Scions cut from the end of the shoot should be avoided because the buds are often immature and may be damaged by cold, have pithy wood and a concentration of insects and disease. The terminal end of the shoot should be cut off where it reaches about 3/8 in. in diameter or at the point where the wood no longer has a pithy appearance.
When whip grafting, graftwood can be used immediately and storage may not be necessary. When using the 4-flap or bark graft techniques, graftwood should be cut when the trees are completely dormant (January-February). Budwood used for spring budding should be collected in early to mid March.
Scions should be packed in moist cedar shavings in old bread bags, storage bags or garbage bags, which are then boxed into plastic containers. For smaller scale bundling, place the scions in a plastic bag (bread wrapper). Add enough moist cedar shavings to cover the scions inside the bag. This will prevent the development of pathogenic fungi and will prevent drying out of the wood. Do not allow water to accumulate in the storage container. All bundles should be labeled with respect to pecan variety using a waterproof marker to ensure grafting of the desired variety.
Graftwood can be stored for up to six months at temperatures between 30 and 38 °F. The wood should not freeze, but it should remain dormant. Pecan buds may swell when stored at 35 °F for a prolonged period of time.
Budding Pecans
Patch budding may be used to propagate nursery stock or top-work larger pecan trees. Budding simply involves removing a portion of the bark along with a single dormant bud from scionwood. The bark and bud from the scionwood are fitted into a space cut into the bark of the understock. After the bud begins to grow, the shoot above the bud is pruned away and the grafted bud becomes the primary shoot.
Patch budding requires that the bark of both the stock and scion be slipping easily. It is usually done in late July or August, but can also be done in the spring. The diameter of the rootstock and budstick should be about the same size, from ½ to 1 in. in diameter. Although the budstick should not be larger than 1 in. in diameter, the patch can be inserted successfully into stocks as large as 4 in. in diameter; however, adequate healing can be troublesome in such situations.
A double bladed knife is used to make two transverse parallel cuts 1 to 1 3/8 in. apart on either side of the bud. Two vertical cuts are then made that connect each side of the transverse cuts. The patch of bark containing the bud is cut from the budstick in the same manner that the patch is removed from the stock.
Budsticks, consisting of the current season's shoots, can be obtained at the time of budding. They should be vigorous and contain vegetative or leaf buds. Remove leaves immediately as budsticks are selected. Place budsticks in a plastic bag containing moist cedar shavings and store in a cooler until needed. Budsticks should be used as soon as possible after collection. If considerable budding is to be done, it is best to cut budsticks as they are needed. It is best to use buds on the middle and basal portions of the stick.
Budsticks can be collected when dormant and stored as preciously described for graftwood. If budsticks are cut during the dormant season, they should be removed from storage four to six days prior to use and placed in a room at about 80 °F, which will stimulate the bark to slip and allow buds to be removed from the sticks. This usually takes four to five days. Wood should be kept moist during this time.
You can determine when a bud is mature by the color of the underside of the bark on the bud patch. If it is white, the buds are mature. If it is green, the buds are immature. Buds at the base of the shoot are usually the first to mature. If buds do not slip easily, it is too late in the season or conditions are not right for budding. If bark has difficulty slipping due to drought stress, trees should be watered for two to three weeks before budding.
No preparation of the understock is necessary on nursery stock and young trees where branching limbs are less than 1 ½ in. in diameter. Larger trees should be heavily pruned or dehorned in the winter months to allow new growth to develop along the large limbs. Budding can be accomplished on this new growth in July and August of the year they were dehorned or in the spring of the following year.
 |
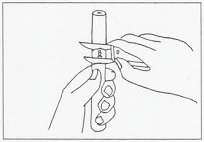 |
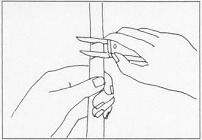
| Figure 3. Cutting the stock with a budding knife. | Figure 4. Cutting the scion. |
 |
 |
| Figure 5. Placing bud patch onto stock. | Figure 6. The completed budding process. |
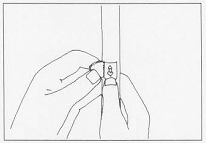
Using a budding knife, the bark should be cut and removed on the stock between existing buds (Figure 3). A bud and bark strip should be removed from the bud stick using the same knife (Figure 4). Patches must be cut to fit very precisely for pecan. Protect all wounds and strips from sunlight and wind. Handle the budwood carefully and do not bruise, split or rub the budded patch on the tree.
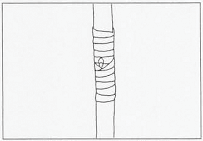
Place the strip and bud from the scionwood onto the stock (Figure 5). Secure the stock with rubber bands, grafting tape or vinyl tape (Figure 6). Cover over all exposed areas, but allow the bud to show through the wrap.
Spring buds should be forced to grow by cutting off the stock about 3 in. above the bud two to three weeks after budding. Before doing so, you can determine if the patch is alive by lightly knicking the bark with a pocketknife. If the tissue under the bark is green, it is still alive. Durable wrapping materials may need to be loosened after the budding wound has healed.
Bark Grafting
Bark grafting is often used to graft a relatively small scion onto rootstock that is too large for the four flap graft or whip graft. Bark grafting should be done in the spring, usually late April to early May, about two to three weeks after growth begins in the spring. The primary rule for bark grafting is that the bark on the scions should be tight, while that of the rootstock must slip.
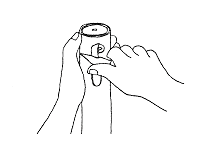
The rootstock should be sawed off smoothly, leaving one or two side branches below the cut to keep the tree actively growing and to later regulate growth. Using a sharp knife, remove the rough, outer portion of the bark to the point where the scion will be inserted (Figure 7). Leave as much of the flexible inner bark as possible since the scion will later be fitted beneath this inner bark layer.
 |
 |
| Figure 7. Removing the rough, outer portion of the bark where the scion will be inserted. | Figure 8. Scion prepared for bark grafting. |
 |
 |
| Figure 9. Fitting the scion. | Figure 10. Inserting the scion. |
 |
 |
| Figure 11. Removing the bark strip. | Figure 12. Attaching the scion with brads (left) and staples (right). |
 |
|
| Figure 13. Wrapping with aluminum foil. | |
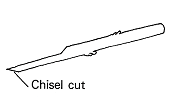
Choose a scion with at least three buds. Make a sloping cut through the scion about 1 ½ -3 in. from the lower end. This cut should be as flat as possible since it forms the seat of the graft against the stock. On the opposite side, make a sloping cut about ½ to ¾ in. long to form a slight wedge (Figure 8). This cut provides additional contact between the cambium of the scion and the stock.
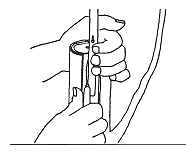
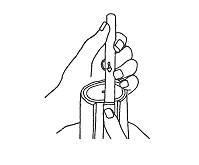
Place the scion against the stock. With a sharp knife, cut through the bark of the stock along each side of the scion (Figure 9). Loosen this strip of bark with the point of the knife and peel it back as deeply as the long cut on the scion. Slip the scion under this strip of bark and gently push downward to the bottom of the loosened bark (Figure 10). Cut the strip of bark, leaving a flap about ¾ in. long (Figure 11).
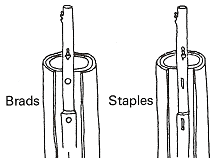
Hold the scion in place and carefully nail the scion to the stock with two brads. Drive one brad through the flap of bark and into the scion just above the chiseled cut at the bottom of the scion. The remaining brad should be driven into the scion near the top of the stock. A heavy-duty staple gun may be used instead of brads. Use 9/16-in. staples placed vertically to prevent girdling of the scion (Figure 12).
Two scions may be grafted to increase the chances of a successful graft. If both survive, keep the second scion pruned back during the time that the grafting cut scabs over and heals, then remove it.
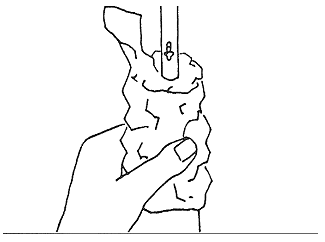
Seal the graft by covering it with an 8- to 12-in. square of household aluminum foil. Cut or tear the foil to its center and fold it with the bright side out around the stock and scion. Cover the top 6 in. of the stock, the top of the grafting cut and the lower ½ in. of the scion, leaving the lowest bud on the scion exposed. Crimp the foil, forming a loose mold over the stock (Figure 13). Wrap the graft with Parafilm.
Four Flap or Banana Grafting
The four flap or banana graft is one of the easiest grafts to use, even for the novice. It is ideal for small caliper trees up to 1 in. in diameter. This graft is most successful when the scion and rootstock are of similar size. For the best fit, the scion should be slightly larger than the stock.
The high degree of success with the four flap graft can be attributed to the large amount of contact between the cambium of the rootstock and scion. Whereas most grafting techniques only allow for the cambiums to connect at two locations, the four flap allows eight opportunities for cambium contact with each graft. Therefore, a precise cut and fit is less critical with the four flap graft.
Scion wood for the desired cultivar should be collected while dormant in late February or early March. Diameter if the scion wood should be from a minimum of 3/8 in. to 1 in. at maximum. Use healthy, 1-year-old wood with well-developed buds for the scion. The four flap graft can also be used on older trees. When this is done, use limbs less than 1 in. in diameter. Large limbs should be dehorned, allowing new growth to develop for 1 year.
The four flap graft should be made in early spring after the bark begins to slip (April and May). Remove all lateral growth on the stock to about 6 in. This keeps the tree vigorous, protects it from sunscald and keeps the scion from becoming too tall or whip-like and breaking out. Cut the stock straight across with sharp pruning shears at a comfortable working height with a trunk or limb diameter of ½ to 1 in. Place a small rubber band around the stock and place it 3 to 4 in. below the cut. This should fit snugly around the stock.
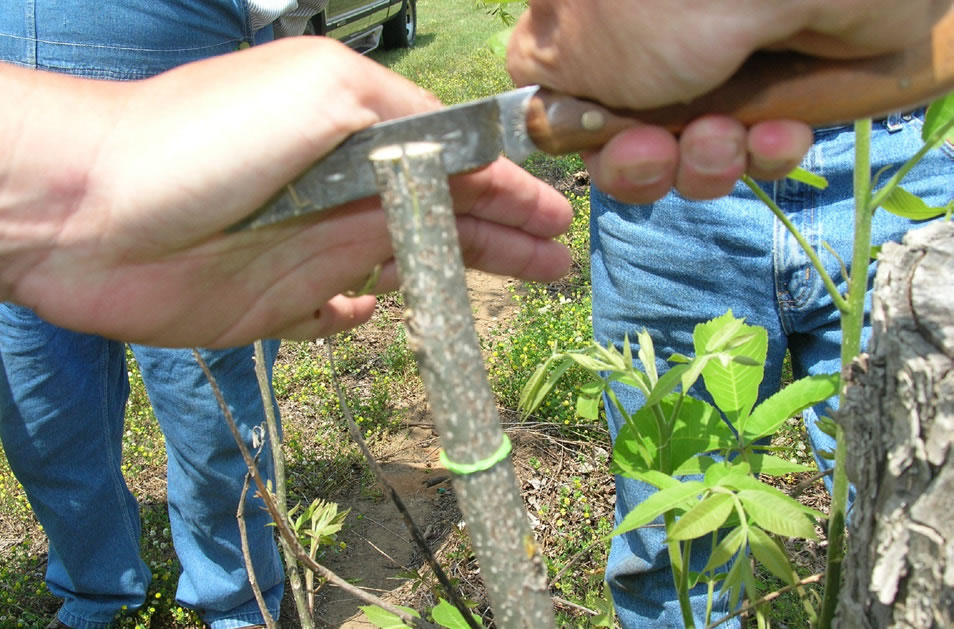
Place the knife blade straight across the cut surface of the stock and slice down through the center about ¾ in. (Figure 14). After this cut is made, make a second cut perpendicular to the first.
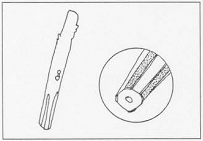
Choose a smooth, straight piece of scion wood approximately 6 in. long and approximately the same diameter as the stock. Each scion stick should have two to three plump, healthy buds. With a sharp knife, make a flat cut through the bark on three to four sides of the scion, beginning 1 to 2 in. from the bottom end (Figure 15). Gradually increase pressure on the knife so that the cuts taper to join in a square at the base (Figure 16). These cuts should expose a long line of cambium around the edges of the bark.
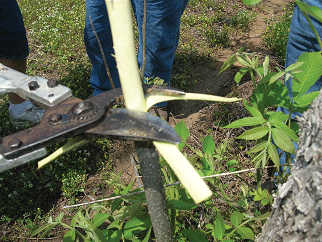
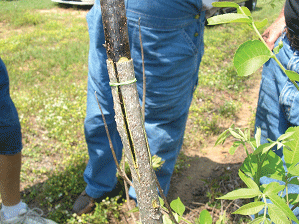
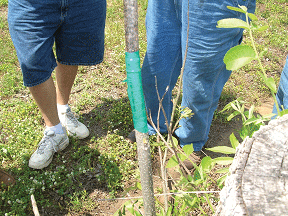
Pull down four flaps of bark on the stock to expose 2 -2 ½ in. of bare wood (Figure 17). Carefully cut and remove the plug of exposed stock so as not to damage the four flaps (Figure 18). Insert the scion upright on the stock and pull up on the four flaps to cover the cut surface of the scion. Push the rubber band up near the ends of the flaps holding them in place (Figure 19). Wrap the cut areas with a ¾-in. rubber band or grafting tape (Figure 20).
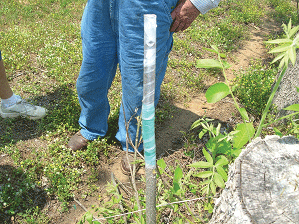
Wrap the cut areas and the scion with Parafilm strips to seal the cuts and scion (Figure 21). Buds will grow through the Parafilm as they develop. Parafilm allows for the free exchange of air and moisture so that moisture does not build up inside the protective covering. Successful grafts will begin growing in three to four weeks.
 |
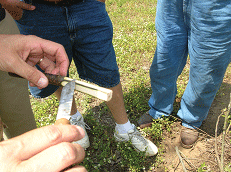 |
| Figure 14. Initial slicing of the stock for four flap or banana grafting. | Figure 15. Cutting the scion (Photo: Bill Goff, Auburn University). |
 |
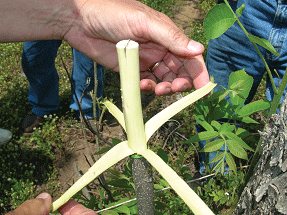 |
| Figure 16. Scion prepared for four-flap graft. | Figure 17. Peeling back of the four flaps (Photo: Bill Goff, Auburn University). |
 |
 |
| Figure 18. Cutting the stock for four-flap grafting (Photo: Bill Goff, Auburn University). |
Figure 19. Rubber band holding scion in place (Photo: Bill Goff, Auburn University). |
 |
 |
| Figure 20. Wrapped scion (Photo: Bill Goff, Auburn University). |
Figure 21. Completed four flap graft wrapped with Parafilm (Photo: Bill Goff, Auburn University). |
Whip Grafting
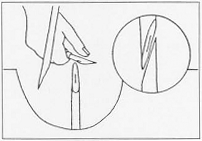
Seedling trees and nursery stock of 1, 2, and 3 years of age with a diameter up to 1 in. may be grafted by the "whip" method. Whip grafting may be done in February and and March when the buds are dormant.
 |
 |
| Figure 22. Cutting the seedling stock for whip grafting. | Figure 23. Cutting tongues on the stock and the scion. |
 |
 |
| Figure 24. Fitting the scion and stock. | Figure 25. Taping the graft. |
 |
|
| Figure 26. The completed whip graft. | |
Young trees of less than 1 in. in diameter should be whip grafted at or near the soil line. Four to 6 in. of soil should be removed from the base of the tree so that the graft can be placed below ground where it will be slow to dry out and require less care and wrapping. As an alternative, the graft can be placed close to the ground and the soil mounded around the tree afterwards.
The whip graft can also be used on older trees. When this is done, use limbs less than 1 in. in diameter. Large limbs should be dehorned, leaving only the smaller ones or allowing new growth to develop for 1 year.
Select 1-year-old wood, the same day the grafts are to be established. Use 4- to 10-in. pieces of wood approximately the same size as the rootstock. The best size to graft is 1/4 to ¾ in. in diameter. Use 4-6 in. scion wood on older trees and 7-10 in. wood on small seedling trees.
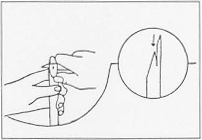
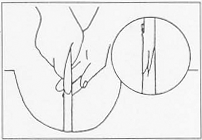
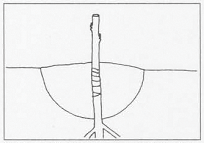
Using a sharp knife, make a cut 1 to ½ in. long at the top of the stock with one smooth slice (Figure 22). Make the same cut at the top of the scion. Cuts should be made at an angle. Make a ½- to ¾-in. reverse cut nearly parallel to the first on each of the cut surfaces (Figure 23). Fit the scion on the stock so that the two are face to face (Figure 24). The tongues made by the reverse cuts on the stock and scion are inserted into grooves made by the reverse cuts on the opposite piece of wood.
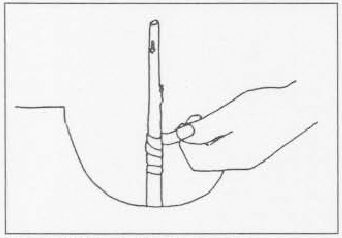
Immediately after making the graft, wrap it with plastic grafting tape, string or a rubber band so that the scion will be held in proper position with the stock (Figure 25). Bank soil around the scion and stock, leaving one or two buds exposed on the scion (Figure 26). Remove soil after 5 to 8 in. of new growth has developed. For older trees, wax or seal the wrapped cut area with Parafilm.
References
Goff, W. D., McVay, J. R., & W. S. Gazaway. (1989). Pecan production in the Southeast (Circular ANR #459). Alabama Cooperative Extension Service.
Hartmann, H. T., & Kester, D. E. (1997). Plant propagation: Principles and practices. Prentice-Hall.
Status and Revision History
Published on Dec 14, 2010
Published on Jan 04, 2011
Published with Minor Revisions on Jan 04, 2014
Published with Full Review on Mar 28, 2017
Published with Full Review on Oct 09, 2024


