Introduction
With recent droughts and increased emphasis on water conservation, rainwater harvesting (RWH) has become an important alternative source for outdoor irrigation. RWH is the collection of runoff from roofs during a rainfall event. The water is conveyed through a gutter system, filtered and stored in a tank for later use. In Georgia, non-potable harvested rainwater can be an alternative water supply for uses such as washing vehicles, landscape irrigation, livestock and wildlife watering, cooling towers and toilet flushing.
**Please Note: Georgia plumbing codes do not permit harvested rainwater to be used for potable applications.
History
Rainwater harvesting is not a new concept. It is an ancient technique that has supplied human water needs for thousands of years. According to archeological evidence, RWH took place 4,000 to 6,000 years ago (Gould and Nissen-Peterson, 1999). It is believed that these early systems were used to collect runoff from hillsides for agricultural and domestic purposes.
Reasons for RWH
Approximately 1 percent of the water covering the Earth?s surface is freshwater that can be collected for human consumption. This water is found in lakes, rivers and streams. Since the turn of the twentieth century, the U.S. population has tripled, and worldwide water consumption has doubled every 20 years (Van Giesen and Carpenter, 2009). Growth in Georgia and neighboring Southern states consistently exceeds the national average, and continues to pressure public water supplies. Despite individual efforts to conserve water, Georgia?s ever-increasing demand for water is creating a need for alternative sources of irrigation water.
Outdoor water use increases during the summer months by as much as 50 to 70 percent. Much of this increase is attributed to irrigation of residential landscapes. Since water used for irrigation purposes does not require the same level of treatment needed for potable water supplies, irrigating with harvested rainwater can lower consumers? water bills, reduce demand placed on municipalities when rainfall is below average and increase the water available when other uses are limited.
Benefits
Four of the most important environmental benefits of having a RWH system are:
- Conserving potable water and creating a supplemental water supply.
- Retaining stormwater.
- Slowing and reducing runoff.
- Achieving several green building goals.
Rainwater harvesting creates an alternative watering source that can be used any time, even when irrigation is restricted. RWH reduces the volume of stormwater that runs off landscapes into streams, and thereby decreases soil erosion, flooding and water pollution. If captured, rainwater can be used for landscape irrigation.
The National Green Building Standard awards points for rainwater that is collected and used as permitted by local building codes (six points), and an additional two points if harvested rainwater is distributed using a renewable energy source or gravity (Van Giesen and Carpenter, 2009). Incentives such as tax-exempt rebates may offset system costs (check with a tax preparer for more detailed information on tax-exempt rebates).
The initial installation cost for RWH systems can vary considerably; however, rainwater is free and the annualized cost of harvesting rainwater is minimal. Electricity for running a pump, if one is needed, and regularly scheduled maintenance are all that is required. As a result, RWH installation costs can be recovered over time as municipal water usage is reduced.
Water Characteristics
Local conditions and the catchment surface can sometimes affect water quality, so rainwater should be tested through your local Cooperative Extension office to minimize problems with metals or corrosion. Harvested rainwater may also contain pathogens, such as fecal bacteria from birds and other wildlife, that may require treatment for certain uses. Rainwater normally has a pH in the range of 5.5-6.0 , is low in minerals and salts, and does not contain chlorine like treated water does.
System Components
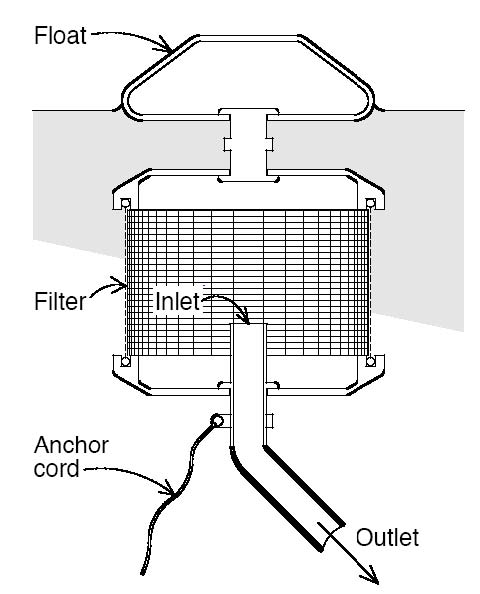
Rainwater harvesting systems can be as simple as a rain barrel (Fig. 1) or as complex as multimillion-gallon industrial systems. Systems can be placed above (Fig. 2) or below ground (Fig. 3). Despite the diversity that exists among different RWH systems, the basic components do not change.
Typical Components:
- The catchment surface (normally a roof), which serves as the rainwater collection component.
- Gutters and downspouts, which direct the water from the roof to the tank.
- A basket filter or leaf screen (some of which also include a mosquito screen), which reduces debris from captured rainwater before it goes to the tank.
- Barrels(s) or cistern(s) to store harvested rainwater.
- A pump (if pressure from gravity is not adequate).
- A delivery system such as outlet pipes, hoses and vents may be needed.
Optional Components:
- First-flush diverters and roof washers, which reduce the amount of debris, dust and other pollutants entering the tank.
- A calming inlet that reduces sediment disturbances as water enters the tank.
- A floating intake that reduces the amount of sediment entering the pump intake.
The catchment surface is typically a roof. The roof material, climatic conditions, wildlife and the surrounding environment all affect water quality. For example, if a roof is surrounded by trees, debris from the trees as well as fecal matter from birds nesting in the trees may affect water quality. Collection efficiency is also affected by the smoothness of the roof. The smoother the roof surface, the more water can be captured. The size of the roof determines the amount of water that can be harvested (see the ?System Sizing? section). Roof material found in Georgia may include: composite or asphalt shingle, wood shingle, metal, tile, tar/gravel, slate and vinyl/rubberized. The roof material can impact contaminants in roof runoff, including heavy metals, polycyclic aromatic hydrocarbons, microbes, pathogens and pesticides (DeBusk, et al, 2009). See also www.bae.ncsu.edu/stormwater/ PublicationFiles/RooftopRunoff2009.pdf.
Gutter size, quantity, location and spacing should be determined by the RWH system supplier or an industry professional. Gutters should be installed sloping toward the downspout. Water should be encouraged to drain away from the building wall so the outside face of the gutter is lower than the inside face. Gutters, downspouts and leaf screens should be firmly secured.
Inlet filtration (Fig. 4) is used to screen or filter water before it enters the tank. Filtration is necessary to ensure high quality water by eliminating debris that washes from the roof. Filters may consist of a coarsermesh leaf screen, a finer-mesh mosquito screen, firstflush diverters / roof washers (Fig. 5) and downspout filters. Leaf screens (Fig. 6) on gutters and downspouts prevent large debris from entering the system. If trees are nearby, leaf screens are recommended. To facilitate regular maintenance and cleaning of the inlet filter and mosquito screen, be sure to mount the screen assembly at a convenient height so it is easily accessible. A first-flush diverter (Fig. 7) or roof washer is a device that routes the first flow of water, which can contain smaller contaminants, from the catchment surface down through a pipe away from the storage tank. This device normally has a cleanout valve or pin hole that, when opened, can be routed to landscape plants via a drainpipe. There are many types of filters on the market; some are self-cleaning and some need to be cleaned manually. If an irrigation system is used, outlet filtration may be needed to prevent clogging of sprinklers or drip emitters. Filtration to ensure successful equipment operation is normally all that is required for outdoor non-potable sources.
The most important component of the system is the tank, which is commonly referred to as a cistern. Before choosing a tank, it is recommended to research local ordinances, covenants and restrictions concerning tank construction and location. Tanks can be constructed of plastic, recycled material, fiberglass, wood, metal or concrete. It is recommended that tanks not be opaque or clear because this may encourage algae growth. Materials that will resist exposure to thermal and ultraviolet sunlight are available. Less expensive tanks can also be wrapped with wood, metal or other facing material to present a more pleasing appearance. Aesthetically pleasing tanks can be purchased that will enhance the landscape. No matter how they look, storage tanks should be labeled with graphics and text that indicate the stored rainwater is a non-potable source.
Tank components include the inlet pipe or access where the water from the downspout enters. This inlet should have a screen (Fig. 8) to keep mosquitoes out or be sealed around the inlet pipe. Place an overflow near the top of the tank to release water in the event that more is captured than can be stored. All tank overflow outlets should be at least the same diameter as the inlets. The overflow can be routed to a rain garden or other landscaped areas via a drain pipe. The overflow should not be routed toward the house foundation or septic field lines. Place an outlet, which can include a hose bibb assembly or shut-off valve, toward the bottom of the tank. This valve should be located at an elevation that is convenient for filling containers or attaching a garden hose. If the outlet is located too close to the bottom of the tank, it will clog with sediments that settle to the bottom.
Other tank components may include a floating intake (Fig. 9) and calming inlets. Regardless of filters and screens, some debris can still enter the tank. The small particulates / sediments will sink to the bottom and other debris may float. The cleanest water is in the middle. The floating intake?s sole purpose is to intake water from the calm, clean water in the middle of the tank. It connects to the pipe outlet, typically near the very bottom of the cistern, where water is drawn for use. Calming inlets minimize the disturbance of the sediment that settles at the bottom of a cistern. These inlets are designed to mix the anerobic (without oxygen) water at the bottom of the tank with the water closer to the top of the tank, which contains more oxygen. The inlet is installed at the end of the inlet pipe and rests on the bottom of the tank. On most systems, this inlet pipe is normally left uncovered.
Delivery pressure may be supplied by gravity or supplemented with a pump depending on the location of the tank and intended water usage. Excluding the tank, pumps are typically the most expensive component of the system so choosing the proper pump is important. Pumps have different features that should be considered. Submersible pumps are commonly placed inside RWH tanks. If they are located on the outside of the tank, it is important that they are secure to avoid vibration when operating. Ground fault circuit interrupters are recommended to reduce electrical hazards. Devices such as low pressure switches and temperature switches may also be installed to protect the pump from running dry or being exposed to temperature overloads. Pump sizing will be discussed in the “Estimating Irrigation Water Demand” section.
Pump Accessories
Consult a pump manufacturer or vendor to determine which accessories are needed for specific pumps.
- Pressure tank—stores pressurized water to prevent the pump from cycling on and off to meet demand and supply a constant pressure.
- Pressure switch—engages the pump when a pressure drop is observed and disengages it when there is no demand.
- Check valve—prevents water from flowing back through the pump when it is not running.
- Float level switch— disengages the pump when water falls below a predetermined level.
- Throttling valve—controls the flow and pressure of water exiting the pump and is typically in the form of a gate valve.
Delivery systems commonly include pipes connected to an irrigation system and pipes that can be used to drain the cistern for cleaning or for protection from freezing temperatures. Drain pipes should be directed to a rain garden or to another location in the landscape. Hose bibs may be installed on the tank so that a hose can be connected for outdoor water use.
System Sizing
The first step in designing the best system for your needs is to determine the amount of water you currently use in the landscape for irrigating plants, washing sidewalks, decks and vehicles, and any other use that does not require potable water. Storage volume or water captured should equal or slightly exceed the amount of water that is typically used.
The catchment area and rainfall amount determine the supply needed and demand dictates the required storage capacity. If the harvested water is the sole irrigation source, monthly rainfall data for the specific area must be known in addition to estimated intervals between rainfall events. This data can be obtained from local or state weather sources such as www.georgiaweather. net.
The area (length x width) of the catchment surface must be measured. A practical rule of thumb for most homeowners who do not depend solely on RWH for irrigation purposes is to determine storage tank size by the roof area. Simply measure the length and width of a roof that drains to specific downspouts. If only one side of the structure is guttered, only the area drained by the gutters should be used in the calculation.
Example:
Your typical water use is approximately 400 gallons of water during the summer months to irrigate flowerbeds and wash vehicles (See “Methods of Estimating”). The roof area you will be harvesting water from is 20? x 20?, which equals a total area of 400 ft2. A 400 gallon storage tank is appropriated for this example; however, a larger tank could be considered to capture additional volume in case of drought. (NCSU has a RWH calculating tool that can be used to simplify storage calculations: www.bae.ncsu.edu/topic/waterharvesting /model. html.)
The volume of harvested rainwater can also be calculated. It is impossible to collect 100 percent of rainfall from a surface due to splashing, evaporation, overshooting gutters, leaking gutters and first flush diverters. Approximately 62 percent of the rain that falls on the roof can be collected in the rain barrels.
Example:
Volume of harvested rainwater (in gallons) is calculated as follows:
Area of catchment or roof (ft2) x depth of rainfall (feet) x 0.62 (conversion factor) x 7.48 (gallons per ft3)
Roof area is 20 x 20 = 400 ft2
A 1-inch rainfall event occurs (1 inch = 0.0833 feet)
Volume of harvested rainwater = 400 ft2 x 0.0833 feet x 0.62 x 7.48 gallons per ft3) = 154 gallons
An in-depth analysis of how to calculate potential harvested rainwater is available through the American Rainwater Catchment Society Association (ARCSA) website www.arcsa.org/resources/html and the Georgia Rainwater Harvesting Guidelines (2009) www.dca. ga.gov/development/ConstructionCodes/programs/ documents/GARainWaterGdlns.040209.pdf.
Estimating Irrigation Water Demand
Water use will be unevenly distributed throughout the year when water is used solely for garden and landscape irrigation. Therefore, for the typical homeowner, outdoor water demand can be estimated by using water bills to calculate the difference between summer and winter water use.
Depending on the system design, a pump used for RWH may need to both pull water out of a buried tank and create the pressure necessary for its intended use. Properly sizing the pump for an automatic irrigation system requires detailed knowledge of where the water is stored, pump location and intended use of the water. It is important to choose the correct size and type of pump since irrigation distribution and efficiency is critical. It may be necessary to consult an irrigation professional, experienced plumber or RWH installer to make sure all applicable codes are met and to determine the proper pump size for the system. In many cases, a ½, ¾ or 1 horsepower (HP) centrifugal pump will be sufficient for homeowners. For more information, see other Extension publications on irrigation pumps (Harrison, 2009; Thomas, et al, 2009; and Jones and Hunt, 2006), www.bae.ncsu.edu/stormwater/ pubs.htm, and the Texas Manual on Rainwater Harvesting (2005).
Pumps are sized in units of horsepower (HP) and rated in flow of gallons per minute (GPM) for a given pressure per square inch (PSI) or “head pressure.” Flow and pressure need to be determined before calculating pump size since sprinklers require a minimum amount of pressure to function properly. Flow is the volume of water that can be delivered in a given amount of time at a given pressure. A flow meter can be installed on the system to determine GPM. Or, simply turn the pump on and catch the water from the RWH system in a bucket for one minute and measure the gallons of water collected. This will be the GPM.
Pressure per square inch (PSI) or “head pressure” may be simply defined as any resistance to the pump flow. When pump manufacturers list the head pressure, they are referring to the vertical discharge pressure head. Described in very simple terms, a pump's vertical discharge “pressure-head” is the vertical lift in height (usually measured in feet of water) at which a pump can no longer exert enough pressure to move water. At this point, the pump may be said to have reached its “shut-off” head pressure. The higher a pump's head pressure, the more powerful the pump. Since pumps are measured in “Head” or PSI it is important to be able to convert between the two. This conversion is 2.31 feet of “Head” equals 1 PSI.
The pump?s Efficiency Rating is usually indicated and is important in determining the optimal energy efficiency (when the least amount of electricity is used to deliver the given PSI and GPM). Selecting the proper pump for the RWH system can maximize pump life. A pump curve provides a description of pump performance and can be obtained from the manufacturer. The curve illustrates what flow the pump will supply for a given head requirement. For best overall efficiency, the target discharge should be in the middle third of the curve.
Location / Site Preparation
Large systems can be cumbersome and heavy so placement should be planned before installation begins. For all tank systems, locate and avoid utilities.
Place the tank as close to the supply and demand area as possible. The tank should be below the gutters and downspouts. Soil texture is important in determining stability; avoid areas that are highly erodible or prone to flooding.
The base or foundation that supports the tank should be flat and constructed of a stable material because water is very heavy (water weighs 8.3 pounds per gallon). A gravel pad is sufficient for tanks that hold up to 3,000 gallons. Excavating about 1 foot of soil and replacing with size 57 stone makes a suitable base for most small tanks. A concrete pad should be constructed for a tank larger than 3,000 gallons.
Tanks can be buried to save space, for aesthetic purposes or for freeze protection. Underground tanks should be located at least 50 feet from animal stables and areas where wastewater is treated. Underground tanks should be made of a heavily reinforced material and may need interior bracing structures to withstand the weight of backfilled soil. The tank should be compatible with surrounding soils and should be installed in accordance with manufacturer recommendations and local building codes. If plans include burial or partial burial, it is best to consider the elevation of the seasonally high water table. Empty tanks that are buried or partially buried can float out of the ground if flotation is not considered in the design.
To reduce tank temperature and algae growth, place tanks in a shaded location when possible. It is also important to be considerate of neighbors and how they will view the system. It may be necessary to camouflage above-ground tanks with plant material or fencing.
Maintenance
System inspections and maintenance must be done regularly to ensure proper operation. At a minimum, a monthly inspection is recommended. Debris should be cleaned from all inlet filters and screens before and after every significant rainfall event. It is impossible for filtration to totally eliminate debris and contaminants such as sediment; thus, RWH systems will require periodic cleaning. A simple method for the homeowner is to mix laundry bleach, which usually has 6 percent available sodium hypochlorite, at the rate of 2 fluid ounces (1/4 cup) in 1,000 gallons of rainwater (Texas Water Development Board, 2005). If a tank has a submersible pump, the pump can be turned on to stir up the sediments on the bottom. The drain valve can be opened and the tank can be drained. If a pump is used, it should be maintained per the manufacturer?s recommendation.
Pollen can also be a problem in spring time. Once inside the tank, pollen will begin to decompose and may produce foul odors if the water is not used. One solution to the pollen problem is to rinse or flush the tank out with potable or chlorinated water. The walls of the tank will need to be rinsed with fresh water. Another solution is to divert rainwater away from the collection tank during the pollen season. Many RWH system installers recommend a complete tank flush twice a year, in spring and fall, to eliminate a “dead zone” in the tank bottom.
Filtration is commonly adequate for systems that are used as non-potable water sources. However, other types of treatment include ultraviolet light, chlorination, ionization and iodination. For more information on treatment, consult the Georgia Rainwater Harvesting Guidelines or the Texas Rainwater Harvesting Manual.
Freeze protection may be necessary in some locations in Georgia. Tanks may be partially buried (Fig. 2) so that the drain outlets are located below the frost line to avoid freeze damage. Systems that are located aboveground can be winterized if no irrigation is necessary during the winter months. The system can be drained and the downspout taken out of the inlet. When irrigation is needed the following spring, simply return the downspout to the tank inlet.
Mosquitoes may also be a problem if the inlet screens are not fitted properly and the tank is not totally sealed. For some installations, mosquito briquettes or other forms of larvicide may be labeled for use in RWH systems. Be sure to follow all label instructions when applying any pesticide.
References
American Rainwater Catchment Society of America (ARCSA). http://www.arcsa.org/content.asp?pl=6&contentid=6.
DeBusk, K., W.F. Hunt, D.L. Osmond and G.W. Cope. 2009. Urban waterways series: Water quality of rooftop runoff and implications for residential water harvesting systems. North Carolina Cooperative Extension. AG-588-18W. www.bae.ncsu.edu/stormwater/PublicationFiles/RooftopRunoff2009.pdf.
Georgia Automated Environmental Monitoring Network. www.georgiaweather.net.
Gould, J, Nissen-Petersen, E. (1999). Rainwater catchment systems for domestic rain: Design construction and implementation. London: Intermediate Technology Publications.
Harrison, Kerry. 2009. Irrigation pumping plants and energy use. University of Georgia Cooperative Extension. Bulletin 837. www.caes.uga.edu/publications/.
Jones, M.P. and W.F. Hunt. 2006. Urban waterway series. Choosing a pump for rainwater harvesting. North Carolina Cooperative Extension. AG-588-08. www.bae.ncsu.edu/stormwater/pubs.htm
Rainwater harvesting at NCSU. www.bae.ncsu.edu/topic/waterharvesting/model.html.
Texas Water Development Board. 2005. The Texas Manual on Rainwater Harvesting. 3rd ed. www.twdb.state.tx.us/publications/reports/rainwaterharvestingmanual_3rdedition.pdf.
Thomas, P.A., R. Seymour, F. Stegelin and B. Pennisi. 2009. Irrigation and technology assessment. The Greenhouse *A* Syst Publication Series. University of Georgia Cooperative Extension. Bulletin 1275. www.caes.uga.edu/publications/
Van Giesen, E. and F. Carpenter. 2009. Georgia rainwater harvesting guidelines. www.dca.ga.gov/development/ConstructionCodes/programs/documents/GARainWaterGdlns.040209.pdf.
Status and Revision History
Published on Sep 30, 2010
Published with Minor Revisions on Aug 31, 2013