


Preassessment
Why Should I Be Concerned With the Condition of My Well?
About 95% of Georgia’s rural residents rely on their own wells for all of their household water needs—including drinking water. Wells that are properly constructed and maintained generally provide good quality water. However, wells that are improperly constructed or maintained may allow bacteria, nitrates, pesticides, or petroleum products to contaminate the groundwater. These contaminants can put family and livestock health at risk.
Farm activities near drinking water wells have caused many documented cases of well contamination. The condition of your well and its proximity to contamination sources determine the risk of contamination in your drinking water. A well with a cracked casing may allow various contaminants to enter the well. Depending on proximity to the well, feedlots, fertilizer application, animal yards, septic systems, and waste storage areas could release nitrates and bacteria that contaminate the well. Fertilizers or pesticides that are mixed and loaded near the well could spill and contaminate your family’s drinking water supply.
Proper maintenance of your well is crucial. If wells are improperly maintained, they pose a substantial risk of contamination to groundwater resources. A contaminated well also can affect your neighbors’ wells, which threatens their health in addition to your family’s. Once the groundwater supplying your well is contaminated, it is difficult and costly to clean. The only options may be treating the water, drilling a new well, or obtaining water from another source.
How Does This Assessment Help Protect Drinking Water and the Environment?
This assessment allows you to evaluate the environmental soundness of your home, farm, and operational practices related to the condition of your drinking water well. You should read and work through this entire document as it contains information that’s useful when completing the assessment.
- The assessment asks a series of questions about your well’s condition and location.
- The assessment evaluation uses your answers (rankings) to identify practices or structures that are at risk and should be modified to prevent well water contamination.
- The well condition facts section provides an overview of sound environmental practices that may be used to prevent contamination caused directly by well condition or location.
- You are encouraged to develop an action plan based on your needs as identified by the assessment.
- The assessment should be conducted by you for your use.
- No information from this assessment needs to leave your home.
Assessment
Assessing Risk to Well Condition
For each category listed on the left, read across to the right and circle the statement that best describes the conditions on your home and/or property. If an assessment category does not apply (e.g., it asks about the separation distance of animal enclosures but you do not have any pets) then skip that question. Once you have decided on the most appropriate answer, look above that description to find your rank number (4, 3, 2, or 1) and enter that number in the “Rank” column. The entire assessment should take less than 30 min. The glossary of terms used in this assessment appears on page 15; terms that appear in italics are defined in the glossary.
| Low risk (rank 4) |
Low to moderate risk (rank 3) |
Moderate to high risk (rank 2) |
High risk (rank 1) |
Rank | |
|---|---|---|---|---|---|
| Well Location | |||||
| Position of drinking water well relative to potential pollution sources | Upslope from all pollution sources. No surface water runoff moves toward well. Surface water diverted from well. | Upslope from most pollution sources. No surface water runoff moves toward well. | Downslope from most pollution sources. Some surface water runoff may enter well. | Well is in a low area where surface water runoff collects from lawn, gardens, animal enclosures or driveways. | |
| Separation distances between well and contamination sources | Meets or exceeds all state-required minimum separation distances. | Meets most minimum separation distances. | Meets minimum separation distances only for sources required to be at least 100 ft from well. | Doesn’t meet minimum separation distances for all sources required to be at least 100 ft from well.* | |
| Soil and/or subsurface potential to protect groundwater |
Fine-textured soils (clay or clay loam). Water table or limestone deeper than 20 ft. | Medium-textured soils (silt loam, loam). Water table or limestone deeper than 20 ft. | Medium- or coarse-textured soils (sand, sandy loam). Water table or limestone deeper than 20 ft. | Coarse-textured soils (sand, sandy loam). Water table or limestone shallower than 20 ft. | |
| Well Condition | |||||
| Condition of casing and well cap (seal) | No holes or cracks visible. Well cap (seal) tightly secured. Screened vent. | No defects visible. Well cap vented but not screened. | No holes or cracks visible. Well cap loose. | Holes or cracks visible. Well cap loose or missing. Can hear falling water in well. | |
| Casing depth | Cased more than 50 ft below well water level. | Cased 31–50 ft below water level in well. | Cased 10–30 ft below water level in well. | Cased less than 10 ft below well water level, or no casing. | |
| Casing height above land surface | More than 12 in. above grade. | 8–12 in. above grade. | At grade or up to 8 in. above. | Below grade, or in a pit or basement. No concrete curbing around well casing. | |
| Potential Contamination | |||||
| Concrete curbing | 4-in.-thick concrete curbing extends at least 2 ft in all directions and slopes away from well casing. | 4-in.-thick concrete curbing extends at least 2 ft in all directions. Curbing contains cracks less than 1/2 in. wide. | 4-in.-thick concrete curbing extends at least 2 ft in all directions. Curbing contains cracks wider than 1/2 in. and/or water is channeling under curbing. | No concrete curbing around well casing. | |
| Well age | Less than 20 years old. | 21–50 years old. | 51–70 years old. | More than 70 years old. | |
| Well type | — | Drilled well. | Driven-point (sand point) or bored well. | Dug well. | |
| Well Management | |||||
| Backflow prevention | Antisiphon devices installed on all faucets with hose connections. No cross connections between water supplies. | Antisiphon devices installed on some faucets with hose connections. | No antisiphon devices. Air gap maintained.* | No antisiphon devices. Air gap not maintained. Cross connections between water supplies.* | |
| Unused or abandoned well | No unused, unsealed wells. | Unused wells capped and protected. | Unused well that is unprotected or unsealed more than 50 ft away from the well being assessed. | Unused well that is unprotected or unsealed less than 50 ft away from the well being assessed. | |
| Water testing | Consistent satisfactory quality. Bacteria, nitrate, and other tests meet standards. | Bacteria, nitrate, and other tests occasionally meet standards. | Bacteria, nitrate, and other tests rarely meet standards. | No water tests done. Water is discolored after rainstorms Noticeable changes in color, clarity, odor, and taste. | |
| Maintenance | Well is inspected regularly. Leaks are immediately repaired. | Well is inspected occasionally. Leaks are repaired when needed. | Well is not regularly inspected. Only large leaks are repaired. | Well or piping is leaking. | |
Assessment Evaluation
What Do I Do With These Rankings?
Step 1: Identify areas determined to be at risk.
Low-risk practices (4s) are ideal and should be your goal. Low- to moderate-risk practices (3s) provide reasonable protection. Moderate- to high-risk practices (2s) provide inadequate protection in many circumstances. High-risk practices (1s) are inadequate and pose a high risk for causing environmental, health, economic, or regulatory problems.
High-risk practices (1s) need immediate attention. Some practices may require little effort to correct, while others could be major time commitments or costly to modify. These bigger changes may require planning or prioritizing before you act. You should list all activities identified as “high risk” or “1” in your action plan. Examine rankings of “2” further to determine the exact level of risk and give the problems attention accordingly.
Step 2: Determine your well risk ranking.
The well risk ranking provides a general idea of how your well condition might be affecting your ground and surface water and contaminating your soil. Use your ranking total and the total number of areas ranked to determine your well risk ranking.
[Ranking Total] ÷ [Total Number of Areas Ranked] = Well Risk Ranking
| Well Risk Ranking | Level of Risk |
| 3.6 to 4 | Low risk |
| 2.6 to 3.5 | Low to moderate risk |
| 1.6 to 2.5 | Moderate risk |
| 1.0 to 1.5 | High risk |
This ranking gives you an idea of how your well condition and location might be affecting your drinking water. It should serve only as a general guide and not as a precise diagnosis because it represents the average of many individual rankings.
Step 3: Read the Well Condition Facts section.
While reading, think about how you could modify your practices to address some of your moderate- and high-risk areas. If you have any questions that are not addressed in the well condition facts portion of this assessment, consult the references in the back of the publication or contact your county Extension agent for more information.
Step 4: Transfer information to a larger assessment if needed
If you are completing this assessment as part of a larger homestead assessment, you should transfer your Well Risk Ranking and your identified high-risk practices to the overall assessment.
Well Condition Facts
Improving the Condition of a Drinking Water Well
Well Location
A well’s location is a crucial factor in avoiding drinking water contamination, whether it taps water from just below the ground surface or from several hundred feet down. Locating a well in a safe place takes careful planning and consideration of factors like the flow of surface water and ground water. A well located downhill from animal enclosures, a leaking fuel tank, or a failing septic system is at greater risk of contamination than a well located uphill from these contamination sources.
Surface slope does not always indicate the direction a pollutant might flow once it gets into the ground. In shallow aquifers, groundwater flow often is in the same direction as surface water flow. If the aquifer supplying water to your well is deep below the surface, the surface slope may not be an accurate indicator of groundwater flow direction. Determining groundwater movement on your own may require special monitoring equipment (see Contacts and References section).
Separation Distance
Ensuring minimum separation distances from potential contamination sources is an integral part of wellhead protection because soil acts as a natural barrier to and filter against contaminants. The type of soil is an important determinant in the effectiveness of such protection. In sandy soils with low organic content, recommended separation distances may not offer adequate protection. State well codes may not address all activities and structures that are near the wellhead. For example, in Georgia, the Water Well Standards Act of 1985 does not specifically acknowledge some potential pollution sources such as pesticide mixing, pesticide and fertilizer application, vehicle maintenance, and waste-disposal areas.
In areas where wells are located close to livestock operations, the only specified requirement is that the well shall be not less than 100 ft from an animal or fowl enclosure. Other required setbacks are listed in Table 1 and/or illustrated in Figure 1.
Table 1. Required and recommended minimum separation distances for drinking water wells in Georgia.
| Separation Distances Required by Georgia Water Well Standards Act of 1985 | Separation Distances Recommended for Other Farm Sources of Contamination | ||
|---|---|---|---|
| Distance from well | Source of potential contamination | Distance from well | Source of potential contamination |
| 10 ft | Sewer line | 150 ft | Waste lagoon |
| 50 ft | Septic tank | 150 ft | Dead animal burial pits |
| 100 ft | Septic tank adsorption field | 100 ft | Pesticide storage, mixing, and loading facilities |
| 100 ft | Animal or fowl enclosure | 100 ft | Fertilizer storage |
| 150 ft | Cesspool or seepage pit | 500 ft | Petroleum tanks |
Figure 1. Minimum separation distances between well and potential farm sources of contamination.
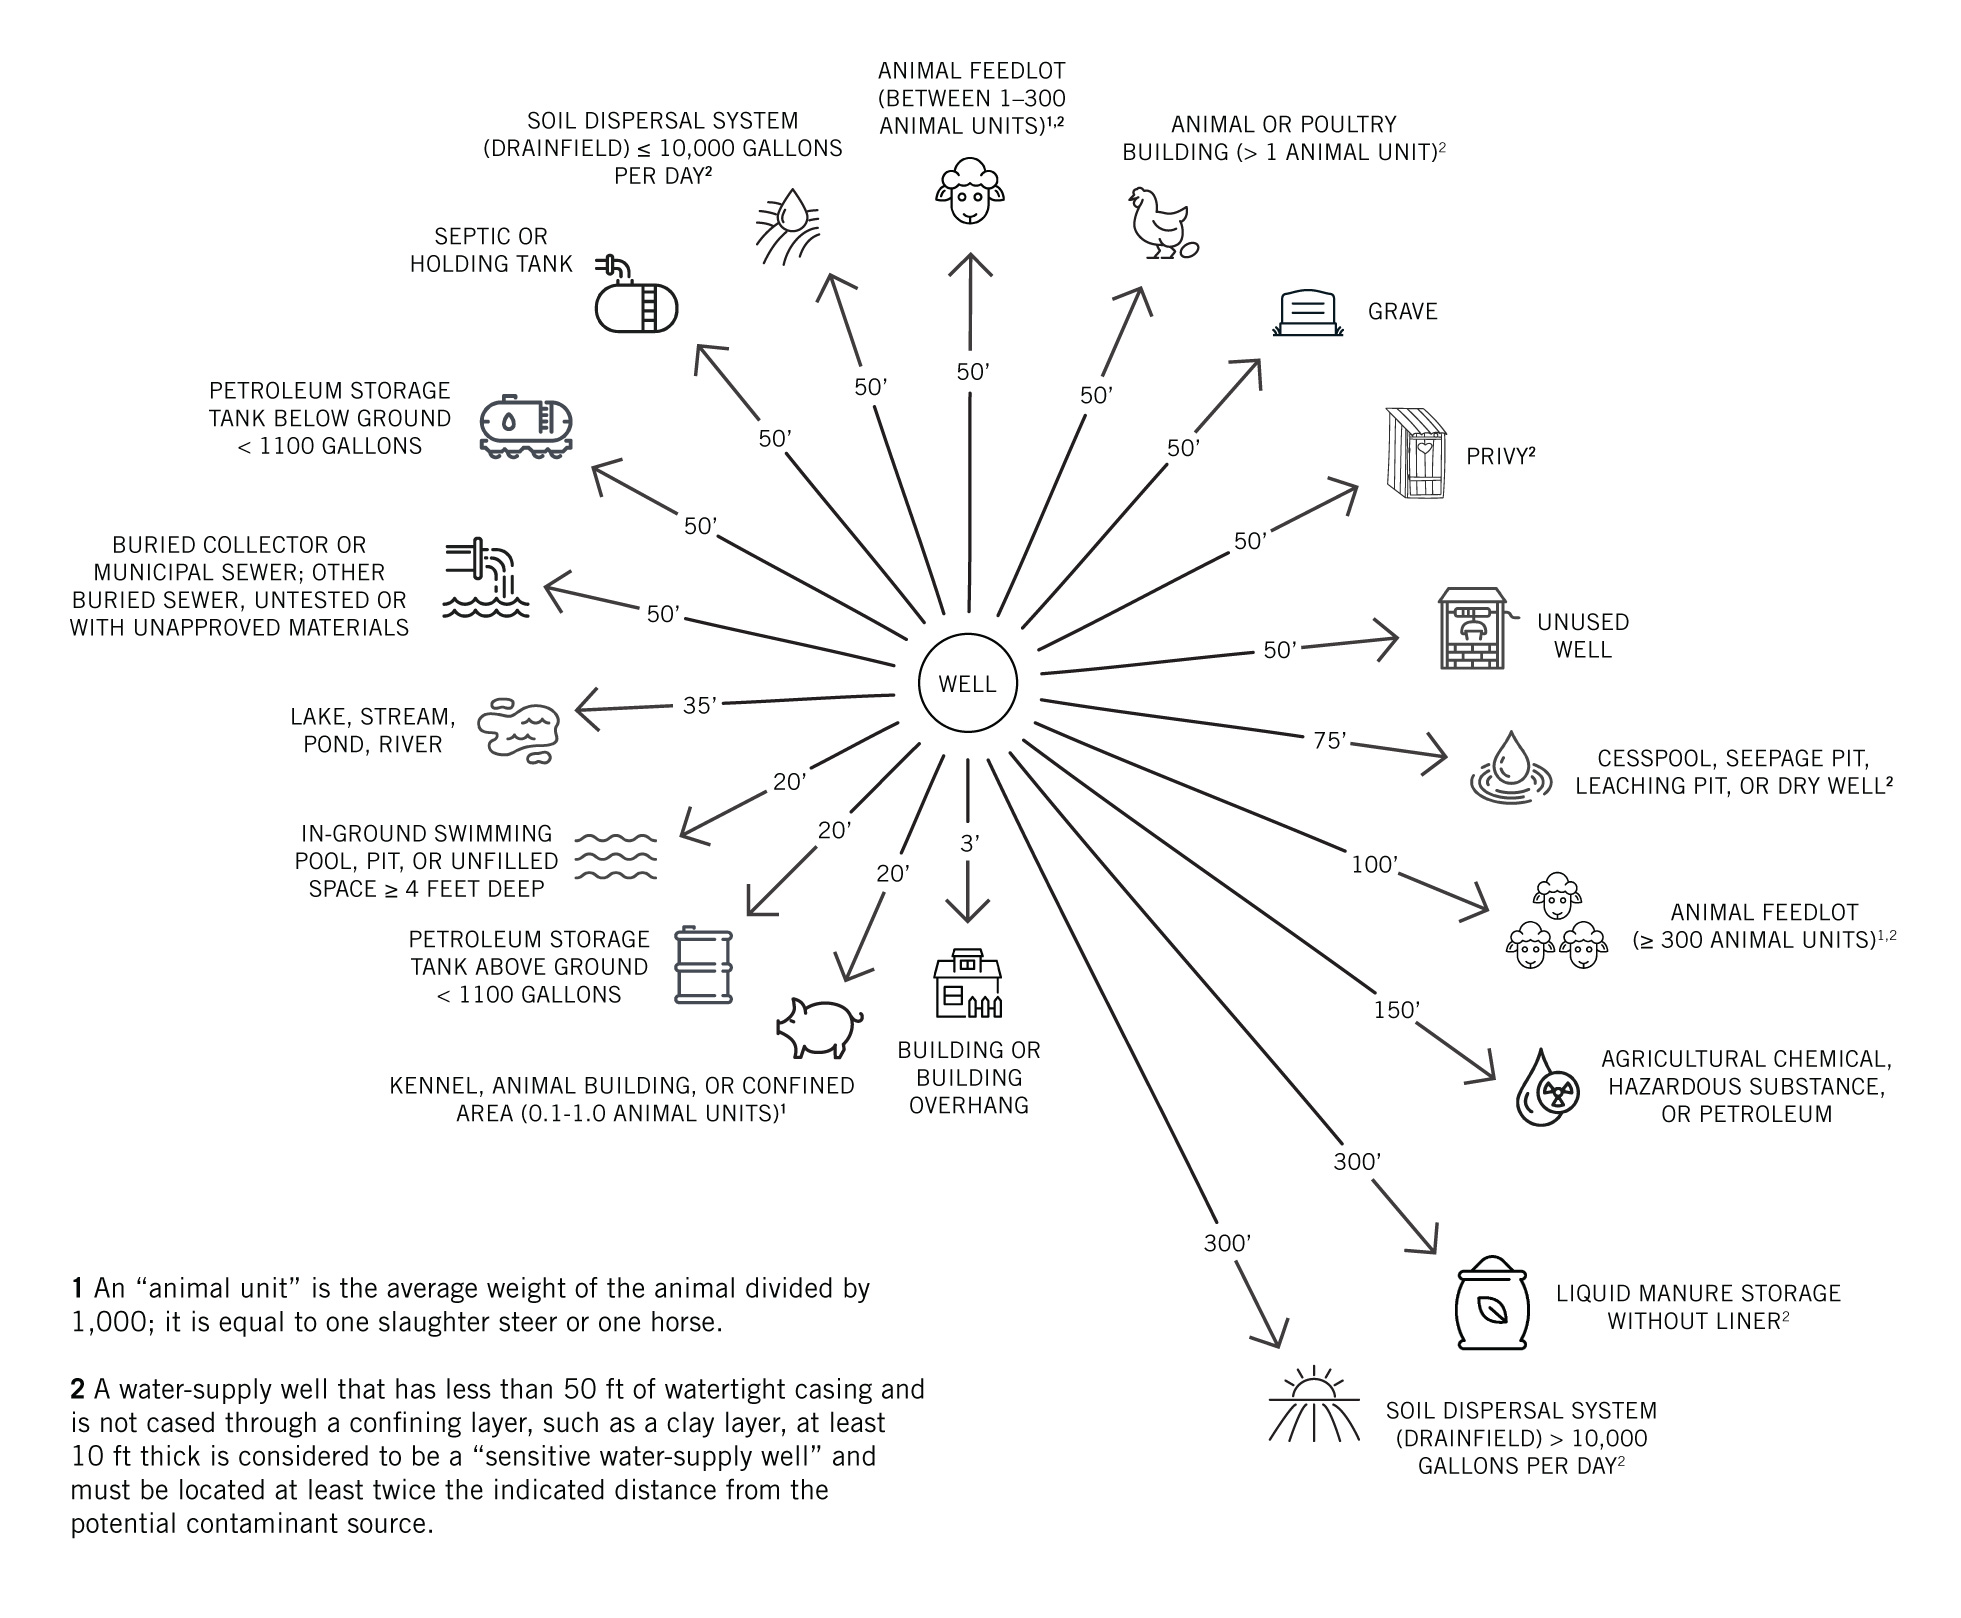
Both soil and slope can make siting a well a tricky business. Greater setback distances may be required based on hydrogeology and soil type. When no distances are specified, provide as much separation as possible between your well and any potential contamination source. This is especially important if your farm is on highly permeable soils or thin soil overlying limestone bedrock, or if the contamination source or activity presents a high risk of contamination. Be sure to consider contamination sources on adjacent properties.
Minimum separation distances are regulated for new well installation. Existing wells are required by law only to meet separation requirements that were in effect at the time of well construction. Keep in mind that separation distances required by the state are minimums. You may want to choose greater separation distances depending on factors at your site. Paying attention to separation distances and proper well construction will provide reasonable assurance that your well will not be contaminated by farm activities in the near future.
Changing the location of your well in relation to contamination sources may protect your water supply, but not the groundwater itself. Any condition likely to cause groundwater contamination should be addressed, even if your well is far away from the potential source. Groundwater contamination is a violation of Georgia law, even if drinking water is not immediately affected.
Simply separating your well from a contamination source may reduce the chance of well water contamination, but it does not guarantee that the well will be safe. Storm water can carry bacteria, nitrates, oil products, pesticides, and other contaminants from one place to another. Wells located in the path of contaminated surface water may be tainted by surface water washing into an improperly sealed well.
Well Construction
Poor well design can allow groundwater contamination from surface water that reaches the water table without filtering through soil. Wells located in pits or wells constructed without grout or a cap can allow surface water to carry bacteria, nitrates, pesticides, fertilizer, or oil products into the drinking-water supply. Proper well design and construction reduces the risk of pollution by reducing the entry of contaminants from the surface (Figure 2).
Figure 2. A typical well demonstrating proper construction to prevent contamination.
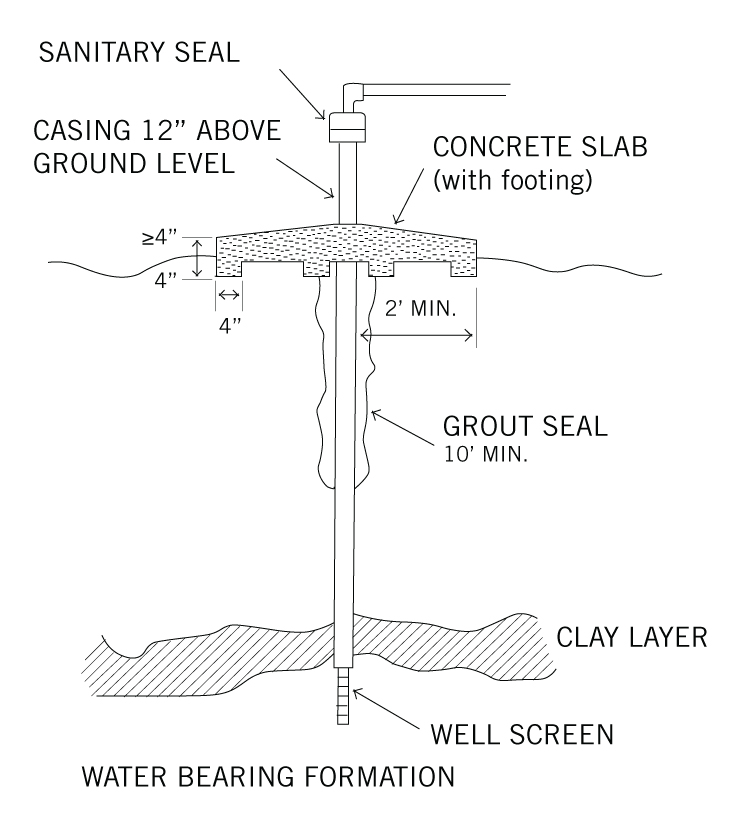
The way in which a well is constructed, even when the design is sound, affects its ability to keep out contaminants. You should check the casing, cap, grout depth, casing depth, and aboveground height of the casing. You should also determine the well’s age, type, and depth.
The following overview of well construction and inspection can help you understand the contamination risk of your drinking water.
Casing and Well Cap. A licensed water-well contractor will install a steel or plastic pipe called casing during construction to prevent collapse of the borehole. Left unsealed, the space between the casing and the sides of the borehole, called the annular space, provides a direct channel for surface water (and contaminants) to reach the well water. To seal off the annular space, a licensed water-well contractor fills the space with grout, which can be made of cement, concrete, a special type of clay called bentonite, or a mixture of Portland cement and water, depending on the geologic materials encountered while drilling the well. Both grout and casing prevent water and contaminants from seeping into the well.
According to the requirements of Georgia law, “A well having an open annular space between the casing and borehole shall be grouted and shall be filled with neat or sand-cement or other impervious materials to prevent the entrance of pollutants or contaminants to the well.” The minimum depth of grout seal for individual wells is 10 ft. However, it is preferred for the well grout to extend all the way from the ground surface to the end of the casing depth.
You can use a light to visually inspect your well casing for holes or cracks at the surface or down the inside of the casing. If you can move the casing around by pushing against it, you may have a problem with your well’s ability to keep contaminants out. You can check the well casing by listening for water running down into the well when the pump is not running. If you hear running water, there could be a crack or hole in the casing, or the well may not be cased down to the water level. Either situation increases risk and is sufficient reason to avoid drinking the water until the situation is corrected.
To prevent contaminants from flowing into the top of the well casing, a licensed water-well contractor will install a tight-fitting, tamper-resistant, vermin-proof well cap. This prevents the entry of insects, small animals, or surface water. The cap should be firmly installed and include a screened vent so that air can enter the well. Vents should (a) face the ground, (b) be tightly connected to the well cap or seal, and (c) be properly screened to keep insects out.
Aboveground Casing Height and Concrete Curbing. To prevent surface water or runoff from entering the well (especially during heavy rainfall), the upper terminal or section of the well casing should extend at least 12 in. above ground level. All Georgia wells built in areas subject to flooding should have a well casing that extends at least 2 ft above the level of the highest known flood of record.
The Georgia Water Well Standards Act of 1985 also states, “All individual and nonpublic wells shall be curbed at the surface by the owner with a watertight curbing of concrete at least four inches thick and extending at least two feet in all directions from the well casing and sloping away from the casing.”
One of the simplest ways to curb a well is to dig a trench 4 in. deep, extend it at least 2 ft in all directions around the casing, and fill it with concrete.
Instructions for Installing a Well Curbing.
Step 1. Carefully remove soil from around the well’s casing to expose the top of the grout seal. Dig a shallow, 4-in.-deep trench around the outside of the grouting. If the grout seal is missing, you will need to use a post-hole digger to dig a hole that is 3–4 ft deep and as wide as the post-hole digger (4 to 6 in.) around the casing.
Step 2. Continue to dig a shallow, 4-in.-deep trench that extends 2 ft from the casing in all directions. Optional: Install flexible landscape edging into the ground to provide a form to pour the concrete into. It may be necessary to pile the soil excavated from the trench around the outside of the form to help ensure that the form will hold the weight of the concrete.
Step 3. Pour premixed concrete to fill the trench. The concrete should be at least 4 in. thick at its thinnest point. Before it sets, lightly trowel or brush the concrete toward the well casing so that when it dries the curbing will have enough slope to carry water away from the casing.
Step 4. After the concrete slab hardens, remove the landscape edging (if used).
Materials for Installing a Well Curbing. For wells with an existing grout seal, a bored well with a casing that is 2 ft in diameter will require about 20 linear feet of landscape edging and 12–15 cu ft of concrete. For a drilled well with a casing that is 6 in. in diameter, a curbing will require approximately 15 ft of landscape edging and 7–10 cu ft of concrete. These numbers are for a circular concrete slab. If you desire any other shape for the slab, the numbers provided will need to be adjusted.
Curbing a well that lacks a grout seal requires considerably more labor and expense. However, it is imperative that these wells be curbed. Otherwise, they will not be protected from potential surface-water contamination.
Well Age
Well age is an important factor in predicting the likelihood of contamination. A well that was constructed more than 70 years ago likely was situated at the center of the farm or in a readily accessible location when it was installed. It may be shallower than recommended and may be surrounded by many potential contamination 10UGA Cooperative Extension Bulletin 1152-03 | Improving the Condition of Your Drinking Water Well sources. Older well pumps are more likely to leak lubricating oils, which can get into the well. Older wells also are more likely to have thinner casings with gaps caused by corrosion or improper grouting. Even wells with modern casings that are 30 to 40 years old are subject to corrosion and perforations. If you have an older well, you should have it inspected by a water-well specialist or a licensed water-well contractor.
Well Type
Dug wells are large diameter holes (usually more than 2 ft wide) that often are built by hand. They pose the highest risk to the drinking water supply because they are shallow and often poorly protected from surface contamination.
Bored wells are constructed using an earth auger and usually are up to 2 ft in diameter. Concrete is the most common casing material. These wells typically are shallow (less than 60 ft deep) and tend to be susceptible to surface contamination like dug wells. These wells pose a moderate to high risk of contamination.
Driven point (sand point) wells are constructed by driving assembled lengths of pipe into the ground. These wells normally are smaller in diameter than dug or bored wells (2 in. or less) and less than 50 ft deep. They can be installed only in areas with relatively loose soils, such as sand, and pose a moderate to high risk of contamination.
Drilled wells encompass all other types of wells, including those constructed by a combination of jetting and driving. Drilled wells commonly are 4 to 8 in. in diameter and pose a relatively low to moderate risk of contamination when properly constructed.
Well Depth
Shallow wells draw from the groundwater that is closest to the land surface, or surficial aquifers, which may be directly affected by farm or other activities close to the well location. Depending on how far the well casing extends below the water table, rainwater, surface water, and irrigation can soak into the soil and may carry contaminants with it.
Local geological conditions can impact the likelihood of contamination and how long it takes for the contamination of a well to occur. In some places, this process happens quickly (e.g., in weeks, days, or even hours). Areas with a thin soil layer over limestone or sand and gravel aquifers are particularly vulnerable. Even thick sands over limestone can be vulnerable to contamination.
On the other hand, thick clay soils slow the movement of water and contaminants and act as a natural filter. As water flows through these soils, contaminants within the water are removed and bound, which improves the safety and quality of the water that replenishes the aquifer. If you have a deep well (more than several hundred feet below the water table), the groundwater supplying the well may have traveled a considerable distance underground. This may offer greater protection from contaminants as the water has more time to filter through the soil.
Managing and Maintaining Existing Wells
Good maintenance means testing the water every year, keeping the well area clean and accessible, keeping potential pollutants as far away as possible, and periodically having a licensed water-well contractor check the well’s mechanics.
Better Management of Your Existing Well. Existing wells were most likely placed according to traditional practice or regulations that were in place at the time of construction. While these wells are still legal, you may want to consider the degree to which your well water conforms to current drinking water standards. Current standards incorporate new knowledge about groundwater contamination and well water.
You should move or upgrade management of activities such as pesticide mixing, tank rinsing, or fuel storage if they are within 100 ft of the well. You might want to upgrade wells, get rid of well pits, install caps or concrete curbing, or extend casings. In Georgia, well repair, abandonment, and new well construction all require a licensed water-well construction contractor. Keep in mind that well equipment does not last forever. Your well may require mechanical attention from a licensed contractor every 10 to 20 years.
For on-farm wells, changing the location of other practices may prove difficult—you can’t move a livestock yard overnight. Until you can drill a new well and plug the old one so that you meet minimum separation distance requirements, change the way you manage such structures to control contaminants. For instance, you could install concrete curbs to direct livestock-yard runoff away from the well. Short-term manure stacks are another example of a potential hazard to groundwater as they may leach bacteria or nitrates. Locate manure stacks away from the well on clay soil or, better yet, on a concrete slab to reduce the chance of polluting your drinking water. Protect piles from rain that could promote runoff and leaching. Other management changes to consider include redirecting traffic areas and moving chemical or gasoline storage areas away from the well, in addition to upgrading or actively managing your septic system.
Backflow Prevention. Backflow or back siphonage from pesticide mixing tanks causes chemicals to flow back into the well through the hose. Use an antisiphon device when filling pesticide spray tanks to prevent the chemical mixture from flowing back into the well and contaminating groundwater. Inexpensive antibackflow devices for hoses that are used to fill farm sprayers may be available from irrigation or spray equipment suppliers but are not sufficient protection when used alone. An air gap should be maintained in systems where doing so is feasible. Also be sure to keep the hose out of the tank when filling the pesticide sprayer. A better alternative to filling spray tanks at the well is to use a nurse tank to haul water and then mix and load pesticides in the field.
According to Subject 40-23-2 of the Rules of Georgia Department of Agriculture, all irrigation systems designed or used for the application of fertilizer or chemicals must be equipped with a backflow preventer consisting of a functional check valve, low-pressure drain, and vacuum breaker. Certain pesticide labels may require additional safety precautions.
You also should consider installing antisiphon devices on all faucets with hose connections, or maintaining air gaps between hoses or faucets and the water level. Otherwise, water from laundry tubs, sinks, washing machines, pressure washers, outside hydrants, and swimming pools could flow back through plumbing to contaminate your water supply.
Water Testing
Keep an eye on water quality in existing wells by testing them annually. Although you cannot have your water tested for all potential waterborne contaminants, some basic tests can indicate whether other problems exist. For example, relatively inexpensive tests for coliform bacteria or nitrate can be used to predict the likelihood of pesticide contamination, which by itself requires a more expensive test.
At a minimum, test your water annually for bacteria and nitrate. A good initial set of tests for a private well includes hardness, pH, chloride, water corrosiveness, and other minerals such as iron and manganese. Test for lead if you have lead pipes or lead solders joining copper pipes in the plumbing system. Replace lead pipes if possible. Test for volatile organic compounds (VOCs) if oil, petroleum, or solvents are stored nearby or if there has been a nearby spill. For more information about well water testing, see UGA Extension Circular 858-2, Testing for Water Quality.
You can find more information on which tests are appropriate for your situation from your county Extension office or health department.
While testing for pesticides can be very expensive (often $100–$300 depending on the group compounds to be tested) the expense may be justified if:
- Your well has nitrate levels over 10 mg/L (reported as nitrate-nitrogen, NO3-N), or you have a test detecting the presence of coliform bacteria.
- A pesticide spill has occurred near the well or back siphonage has occurred.
- Your well is shallow, has less than 15 ft of casing below the water table, or is located in sandy soil and downslope from irrigated croplands where pesticides are used.
You should test your water more frequently if:
- There are unexplained illnesses in the family.
- There are pregnancies in the family.
- There are noticeable changes in livestock or poultry performance.
- Your neighbors find a particular contaminant in their water.
- You note a change in water taste, odor, color, or clarity.
- You have a spill or back siphonage of chemicals or petroleum products near your well or on your farm.
- You apply chemicals or manure to your fields within 500 ft of your well.
- Your livestock operation inspectors require it.
You can have your water tested either by public or private laboratories. Contact your local county Extension office or health department for water testing information. Follow the lab’s instructions for water sampling to ensure the accuracy of results. Use only the container provided or recommended and return samples promptly.
Bacteria sample bottles are sterile and must be returned within specified time limits. These bottles also typically contain a powder that should not be removed prior to sampling the water. Bacteria and nitrates are two important indicators of groundwater contamination. At excessive levels, they may suggest problems with the well’s location or construction and can cause health problems themselves. Hardness and pH indicate how corrosive the water may be to your plumbing system. The chloride level also may indicate other problems. In Georgia, chloride in wells may indicate saltwater intrusion into the aquifer. Many substances considered for testing are naturally present to some extent in groundwater or can vary seasonally.
Keep in mind that some activities occurring off your property can affect your groundwater. Chemical spills, changes in land use, and the presence of landfills can increase the chances of pollutants getting into your water. A high nitrate or bacteria level may suggest unsatisfactory wellhead protection. In some cases, the presence of a contaminant may not be a concern if it is below certain levels or thresholds. For this reason, you may want to talk with a specialist for help interpreting test results or to determine the need for additional testing.
It also is important to record test results and note changes in water quality over time. In addition to water test results, you should keep records of well construction details, dates that shock chlorination occurred, and dates and details of maintenance on the pump and other components.
New Wells
New wells are expensive, but they are a good investment for the future. Getting the most from your investment means locating the well away from contamination sources and maintaining the quality of the well. Some simple principles include the following:
- Follow the state-recommended minimum separation distance from potential contamination sources. See Table 1 and Figure 1.
- Locate your well on ground that is higher than surrounding pollution sources, such as fuel tanks, livestock yards, septic systems, or pesticide-mixing areas. See Table 1.
- Where it is practical, locate the well as far as possible from pollution sources, but no closer than the minimum separation distances listed above.
- If necessary, build up soil around the well so that all surface water drains away from it and install concrete curbing.
- Avoid areas that are prone to flooding or extend well casing at least 2 ft above the highest water level on record.
- Shallow groundwater flow generally follows surface drainage patterns. Groundwater generally flows from upland areas and discharges into a water body at the surface. Unless you know the exact direction of groundwater flow on your property, locate the well so that pollution sources are between the well and the nearest creek, river, or lake. In all cases, locate your well on ground that is higher than surrounding pollution sources.
- Make the well accessible for pump repair, cleaning, testing, and inspection.
- Hire a licensed water-well contractor. Make sure the contractor disinfects the well by shock-chlorinating after construction followed by a water test for bacteria. The contractor also should give you detailed information about well construction, including well depth, casing material and depth, well screen used, grouting materials and depth, and other details.
Unused Wells
Many farms in Georgia have old, abandoned wells that are no longer in use. These wells represent a potential threat to other operating wells in the area because they can serve as a channel for contaminants at the surface to enter the aquifer. Never use an abandoned well to dispose of garbage or any other material that could contaminate groundwater.
The Water Well Standards Act of 1985 requires that all abandoned wells in the state must be “filled, sealed, and plugged” following the recommended procedure. To legally seal an abandoned well, the work must be performed by a licensed water-well contractor.
Action Plan
An action plan provides you with a format to identify potential concerns and take the needed steps to modify the areas of concern identified by your assessment. The table provided below is a basic guide for developing an action plan. Expand your plan if you need more detail or additional areas. Consult the list of references if you need additional assistance to develop a detailed action plan.
| Area of concern | Risk ranking | Planned action to address concern | Time frame | Estimated cost |
|---|---|---|---|---|
Glossary
Abandoned well: A well that is no longer used or a well that has been permanently closed according to Georgia regulations.
Air gap: An air space (open space) between the hose or faucet and water level. This is one way to prevent backflow of liquids into a well or water supply.
Antisiphon device: A safety device used to prevent backflow of a mixture of water and chemicals into the water supply.
Annular space: The space between the well casing and the sides of the borehole (see Figure 2).
Aquifer: A subsurface zone or strata of sand, gravel, or fractured rock that is used as a water source.
Backflow: The unwanted reverse flow of liquids in a piping system.
Back siphonage: Backflow caused by the formation of a vacuum in a water-supply pipe.
Bedrock: The solid rock that is under all soil, sand, clay, gravel and loose material on the earth’s surface.
Borehole: A hole made into the earth’s surface and extending at least 50 ft into the earth or at least 10 ft below the water table—whichever is greater—made with a drill, auger, or other tool for the purpose of exploring subsurface strata in search of minerals; engineering or geologic data; a water supply; blasting purposes; or monitoring.
Casing: Steel or plastic pipe installed while drilling a well to prevent collapse of the well borehole, prevent the entrance of contaminants, and to allow placement of a pump or pumping equipment.
Cross connection: A link or channel between pipes, wells, fixtures, or tanks carrying contaminated water and those carrying potable (safe for drinking) water. If contaminated water is present at a higher pressure it can enter the potable water system.
Drilled wells: Wells not dug or driven, including those constructed by a combination of jetting or driving. These wells are normally 4–8 in. in diameter.
Driven-point (sand point) wells: Wells constructed by driving assembled lengths of pipe into the ground with percussion equipment or by hand. These wells are usually smaller in diameter (2 in. or less), less than 50 ft deep, and can be installed in areas with relatively loose soils and sediments, such as sand.
Dug wells: Large-diameter wells, often constructed by hand.
Groundwater: Subsurface water in a zone of saturation.
Grout: A slurry of cement or clay used to seal the annular space—the space between the outside of the well casing and the borehole—or an abandoned well.
Milligrams per liter (mg/L): The weight of a substance measured in milligrams contained in 1 L. One milligram per liter is equivalent to 1 part per million (ppm).
Parts per million (ppm): A measurement of concentration of one unit of material dispersed in one million units of another.
Water table: The upper level of groundwater in a zone of saturation. Fluctuates with climatic conditions on land surface, and with aquifer discharge and recharge rates.
Volatile organic compounds (VOCs): Chemical vapors that escape into the air from certain activities such as burning fuels or opening paint cans. These chemicals contribute to air quality problems and respiratory related illnesses.
Useful Contacts
| Organization | Responsibilities | Address and website | Phone number |
|---|---|---|---|
| Drinking Water Program Georgia Environmental Protection Division | Questions regarding public drinking water | 2 Martin Luther King Jr Dr Ste 1152 East Tower Atlanta, GA 30334 https://epd.georgia.gov/ |
404-463-1511 |
| UGA Agricultural and Environmental Services Laboratories | Questions related to water testing, interpretation of test results, and wellhead protection or groundwater | 2300–2400 College Station Rd Athens, GA 30602 https://aesl.ces.uga.edu/ |
706-542-5350 |
| U.S. Environmental Protection Agency | Standards and information on drinking water | Office of Ground Water and Drinking Water Ariel Rios Building 1200 Pennsylvania Ave, NW Washington, DC 20460 https://www.epa.gov/ground-water-and-drinking-water |
1-800-395-1033 |
| UGA CAES Department of Crop and Soil Sciences | Questions related to water testing, wellhead protection or groundwater | 1420 Experiment Station Rd Watkinsville, GA 30677 https://site.extension.uga.edu/water/ |
706-542-2461 |
| Local UGA Extension Office in your County | Questions related to well protection and water testing | Search for UGA Extension [county name] or visit https://extension.uga.edu/county-offices.html |
1-800-ASK-UGA1 This will connect you to the UGA county office where your phone is registered |
References
Georgia Environmental Protection Division. (n.d.). Water Well Standards. https://epd.georgia.gov/watershedprotection-branch/water-well-standards
Hawkins, G. L. (2012). Drinking Water Protection in Georgia (Publication No. B1242-5). University of Georgia Cooperative Extension. https://extension.uga.edu/publications/detail.html?number=B1242-5
Hawkins, G. L. (2015). Georgia’s Water Quality Standards (Publication No. B1242-3). University of Georgia Cooperative Extension. https://extension.uga.edu/publications/detail.html?number=B1242-3
Kissel, D., Mowrer, J., Saha, U., Sonon, L., & Turner, P. (2022). Testing for Water Quality (Publication No. C858-2). University of Georgia Cooperative Extension. https://extension.uga.edu/publications/detail. html?number=C858-2
Status and Revision History
Published on Mar 18, 2004
Published on Feb 20, 2009
In Review on Jan 05, 2010
In Review for Minor Revisions on Jan 05, 2010
Published with Minor Revisions on Apr 27, 2011
Published with Minor Revisions on Mar 16, 2023