- Why Compost?
- Requirements for Efficient Decomposition
- Materials for Composting
- Composting Structures
- Preparing the Compost Pile
- Maintaining the Compost Pile
- Suggested Uses for Compost
- Alternatives to Composting Grass Clippings
- Compost Questions and Answers
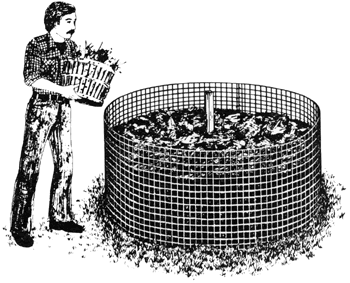
Landscape refuse, such as leaves, grass clippings and trimmings, accounts for up to 20 percent of the wastes being placed in landfills. Bans on outdoor burning and laws which will limit dumping of leaves and grass clippings into landfills make composting and mulching attractive alternatives for managing yard refuse and recycling natural materials. Some cities provide composting areas as a means of disposing of grass clippings and leaves; however, many homeowners find it more convenient and economical to compost these materials in their own backyards. Finished compost can be used as a mulch or as a soil amendment. This publication will tell you how to build and maintain a compost pile as well as how to use the compost in the yard and garden.
Soils can often be improved and made more productive by simply mixing organic matter with them. For many years, the most popular source of organic matter for soil improvement has been well-rotted farm manure, which is now less available, especially for the urban gardener. Today's gardeners should be aware of cheaper and more readily available sources of organic residues. These include plant materials from their own homes and yards, such as grass clippings, scraps of vegetable materials, small twigs, and especially fall leaves. To become usable soil amendments, these materials should undergo a degree of decomposition brought about by certain bacteria and fungi (microbes). The process by which gardeners convert organic matter for use is called composting, and the usable material is referred to as compost. The practice of applying materials such as compost, leaves, or grass clippings to the soil surface to modify soil temperature and moisture, and control weeds and soil erosion is called mulching.
Why Compost?
Composting is the most practical and convenient way to handle your yard refuse because it is easier and cheaper than bagging or taking refuse to a dump site. Compost also improves your soil and the plants growing in it.
Although in time uncomposted materials will eventually decompose, adding undecomposed materials directly to the soil without first composting may have some undesirable effects. For example, if large quantities of uncomposted leaves are incorporated into the soil, microbes will compete with plants' roots for soil nitrogen during leaf decomposition. This competition for nitrogen can result in nitrogen deficiency and poor plant growth. Composting breaks down organic materials into an end product that increases the availability of essential minerals, such as potassium and phosphorous, to growing plants and reduces the competition for nitrogen. The addition of composted materials also improves soil physical properties, such as tilth, infiltration, drainage and water-holding capacity. Composted material is much easier to handle and mix with soil than uncomposted material.
Requirements for Efficient Decomposition
Decomposition of organic material in the compost pile depends on maintaining microbial activity. Any factor that slows or halts microbial growth also impedes the composting process. Efficient decomposition occurs if aeration, moisture, particle size, and nutrient levels (nitrogen) are maintained for optimum microbial activity.
Aeration
Oxygen is required for microbes to decompose organic wastes efficiently. Some decomposition occurs in the absence of oxygen (anaerobic conditions); however, the process is slow, and foul odors may develop. Because of the odor problem, composting without oxygen is not recommended in a residential setting unless the process is conducted in a fully closed system (see plastic bag method under Composting Structures). Mixing the pile once or twice a month provides the necessary oxygen and significantly hastens the composting process. A pile that is not mixed may take three to four times longer to decompose. Raising the pile off the ground allows air to be drawn through the mass as the material decomposes. Coarse materials should be placed on the bottom as the pile is built or placed in the pile and removed after the decomposition starts.
Moisture
Adequate moisture is essential for microbial activity. A dry compost will not decompose efficiently. Proper moisture encourages the growth of microorganisms that break down the organic matter into humus. If rainfall is limited, water the pile periodically to maintain a steady decomposition rate. Add enough water so the pile is damp but not soggy. Avoid over watering. Excess water can lead to anaerobic conditions that slow down the degradation process and cause foul odors. If the pile should become too wet, turn it to dry it out and restart the process.
Particle Size
Grinding the organic material before composting greatly reduces decomposition time. The smaller the size of an organic refuse particle, the more quickly the microbes can consume it. A shredder is useful for chipping or shredding most yard refuse and is essential if brush or sticks are to be composted. A low cost method of reducing the size of fallen tree leaves is to mow the lawn before raking. Windrowing the leaves into long narrow piles one foot high will make the shredding process more efficient. If the mower has an appropriate bag attachment, the shredded leaves can be collected directly.
Temperature
Temperature of the compost pile is very important to the biological activity taking place. Low outside temperatures slow the activity down, while warmer temperatures speed up decomposition. The microbes that make up the bulk of the decomposition process fall into two categories: mesophilic, those that live and function in temperatures of 50° to 113°F, and thermophilic, those that thrive at temperatures between 113° and 158°F. A well-mixed, adequately working compost pile will heat to temperatures between 110° and 160°F as the microbes actively feed on the organic materials. These high temperatures will help destroy weed seeds and disease organisms within the pile.
Materials for Composting
Many organic materials are suitable for composting. However, organic materials containing both carbon and nitrogen in varying amounts (used by the microorganisms for energy and growth) are preferred.
Carbon-Nitrogen Ratio
Microbial activity is greatest when the carbon-to-nitrogen ratio (C/N) is 30:1. For proper decomposition the nutrients in the compost heap should be in the right proportions. The carbon:nitrogen (C/N) ratio will determine how long decomposition will take. When the decomposing organisms do not have the proper diet of carbon, the organisms may lose nitrogen to the atmosphere as ammonia. If the initial carbon portion is too high in the compost heap, the process will be considerably slower and very inefficient. Materials can be blended and mixed to achieve a suitable C/N ratio. Over time, the C/N ratio will generally decrease. When adding compost to the soil, make sure that it has decomposed "properly"; if it is decomposed, it will be high in carbon and will have to use nitrogen from the soil in order to continue decomposition. Below is a table that gives estimates of the C/N ratios of some compost ingredients. (The higher the number, the higher the carbon content and the longer the breakdown time.)
| Table 1. Carbon to Nitrogen Ratio of Common Composting Materials |
|
| Food waste | 15:1 |
| Wood | 700:1 |
| Sawdust | 500:1 |
| Straw | 80:1 |
| Grass clippings | 19:1 |
| Leaves | 60.1 |
| Fruit waste | 35:1 |
| Rotted manure | 20:1 |
| Cornstalks | 60:1 |
| Alfalfa hay | 12:1 |
Organic Refuse Materials
Yard refuse, such as leaves, grass clippings, straw, and non-woody plant trimmings can be decomposed. The dominant organic waste in most backyard compost piles is leaves. Grass clippings can be decomposed; however, with proper lawn management, clippings do not need to be removed from the lawn. If clippings are used, mix them with other yard refuse. Otherwise, the grass clippings may compact and restrict airflow. Branches, and twigs greater than one-fourth inch in diameter should be put through a shredder/chipper first. Add a small amount of soil to the pile. Kitchen wastes such as vegetable scraps, coffee grounds and eggshells may also be added.
Sawdust may be added in moderate amounts if additional nitrogen is applied. Approximately one pound of actual nitrogen (six cups of ammonium nitrate) is required for the breakdown of 100 pounds of dry sawdust. Wood ashes act as a lime source and, if used, should be added only in small amounts (no more than one cup per bushel). Excessive amounts of wood ashes result in loss of nitrogen from the pile. Ordinary black and white newspaper can be composted; however, the nitrogen content is low and will consequently slow down the rate of decomposition. If paper is composted, it should not be more than 10 percent of the total weight of the material in the compost pile. It is recommended that newspaper be recycled through appropriate community paper recycling centers rather than through backyard composting.
Other organic materials used to add nutrients to the pile are blood and bone meal, livestock manure and lake plants. Spent plants and trimmings from the vegetable garden and flower beds and grass clippings are excellent sources of nitrogen for adding to the compost pile. Plants or grass clippings previously treated with herbicides or pesticides can be composted in small amounts, but be certain to allow them to decompose thoroughly before adding them back to the soil as compost. Ideally, you should leave clippings recently treated with herbicides on the lawn to decompose (see section on Alternatives to Composting Grass Clippings). Kitchen wastes, such as vegetable peelings, coffee grounds, and eggshells are very suitable additions to the compost pile.
However, because they may pose a health hazard or create a nuisance, certain organic materials should not be used to make compost. Do not use human or pet feces because they may transmit diseases. Do not add meat, bones, grease, whole eggs and dairy products because they can attract rodents to the site. Also, adding weedy or diseased plants may cause later difficulties in the garden. Many plant disease organisms and weed seeds are destroyed during the composting process when temperatures in the center of the pile reach 150° to 160°F. However, in most compost piles, it is impossible to mix the pile sufficiently enough to bring all wastes to the center. Consequently, some weed seeds or disease organisms may survive composting.
Fertilizer and Lime
Microbial activity is affected by the carbon to nitrogen ratio of the organic waste. Because microbes require a certain amount of nitrogen for their own metabolism and growth, a shortage of nitrogen slows down the composting process considerably. Material high in carbon and low in nitrogen, such as straw or sawdust, decomposes very slowly unless nitrogen fertilizer is added. Even tree leaves, which are higher in nitrogen than straw or sawdust, can still benefit from nitrogen fertilizer. Grass clippings high in nitrogen can aid the composting process, though the homeowner may wish to leave them on the lawn when mixed properly with leaves will enhance decomposition. Manure or blood meal can also be used as organic sources of nitrogen. Otherwise, use a high nitrogen-containing fertilizer. Phosphorus and potassium are usually present in compostable materials in adequate amounts for decomposition.
During the initial stages of decomposition organic acids are produced and the pH of the material drops. Most of the organisms involved in the composting process prefer slightly acidic conditions. The addition of lime to the pile will convert ammonium-nitrogen to ammonia gas and hasten the loss of nitrogen from the pile. Research shows that although lime may hasten decomposition, the loss of nitrogen from the pile often offsets the benefits of lime. The pH of finished compost is usually 6.5-7.0 on the pH scale. In general, lime is not necessary for degradation of most yard trimmings.
Composting Structures
To save space, hasten decomposition, and keep the yard looking neat, contain the compost pile in some sort of structure. Structures can consist of a variety of materials and can be made as simple or complex as desired.
Types of Structures
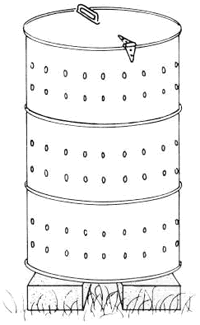 Figure 1. Barrel or Drum Composter
Use of plastic garbage bags is perhaps the simplest way to make compost. The bags are easy to handle and require minimal maintenance. To make compost using this method, fill plastic bags (30 to 40 gallon size and at least 3 ml. thick) alternately with plant wastes, fertilizer and lime. To each bag of composting material add about one tablespoon of a garden fertilizer with a high nitrogen content. Hydrated lime (one cup per bag) helps counteract the extra acidity caused by anaerobic composting. After filling the bag, add about a quart of water. Close the bag tightly. Set aside for six months to a year. Set the bags in a basement or heated garage for better decomposition during winter months. You will not have to turn the mixture or add water after closing the bag. The main advantage of composting in garbage bags is that it requires little maintenance; however, because oxygen is limited, the process is slow.
A barrel or drum composter generates compost in a relatively short period of time and provides easy turning (Figure 1). It requires at least a 55-gallon barrel with a secure lid. Be sure that the barrel was not used to store toxic chemicals. Drill six to nine rows of one-half inch holes over the length of the barrel to allow air circulation and drainage of excess moisture. Place the barrel upright on blocks to allow bottom air circulation and drainage of excess moisture; fill it two-thirds full with organic waste material and about one-fourth cup of a high nitrogen fertilizer. If needed, apply water until the mixture is moist. Every few days, turn the drum on its side and roll it around the yard to mix and aerate the compost. The lid can be removed after turning to allow for air penetration. Ideally, the compost should be ready in two to four months. The barrel composter is an excellent choice for the city dweller with a relatively small yard.
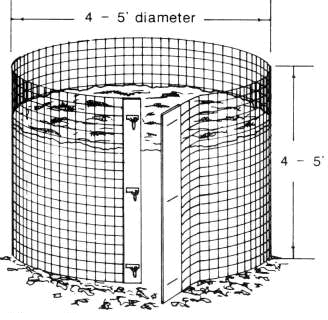 Figure 2. Circular Bin
For larger quantities or organic waste, bin-type structures are the most practical. A circular bin can be made by using a length of small spaced woven wire fencing held together with chain snaps (Figure 2). The bin should be about three to five feet in diameter and at least four feet high. To maintain the shape of the pile and facilitate adding water a stake may be driven in the middle of the bin before adding material. With this design, it is easy to turn the composting material by simply unsnapping the wire, moving the wire cylinder a few feet and turning the compost back into it.
A very efficient and durable structure for fast composting is a three-chambered bin (Figure 3). It holds a considerable amount of compost and allows good air circulation. The three-chambered bin works on an assembly line idea, having three batches of compost in varying stages of decomposition. A balanced mixture of compost material (see Preparing the Compost Pile section) is started in the first bin and allowed to heat up for three to five days. Next, it is turned into the middle bin for another four to seven days, while a new batch of material is started in the first bin. Finally, the material in the middle bin is turned into the last bin as finished or nearly finished compost.
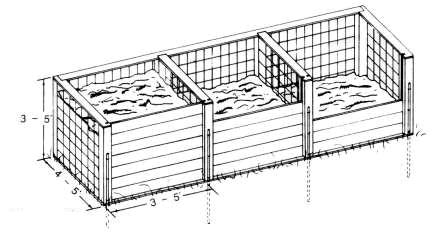 Figure 3. Three-Chambered Bin
To make this structure, it is best to use rot-resistant wood such as redwood, wood treated with a preservative such as "copper green," or a combination of wood and metal posts. Unless the wood is treated or is rot resistant, it will decompose within a few years. Each bin should be about five feet by three feet and about three to four feet high. Removable slats in the front offer complete access for turning.
There are many other structures for composting and no one structure is best. Invent your own, or consult one of the several new books on composting. If you don't want to build a structure, there are several commercial composting units available through local garden stores or mail-order catalogs. Most of these are similar to the barrel composter described previously and are for the city dweller wanting an easy way to make small amounts quickly.
Location
Locate the compost pile close to where it will be used and where it will not interfere with activities in the yard or offend neighbors. Examples of good locations for the pile include areas near the garden or kitchen or between the garage and house. The pile will do best where it is protected from drying winds and where partial sunlight will help heat the pile. The more wind and sun to which the pile is exposed, the more water it will need.
Preparing the Compost Pile
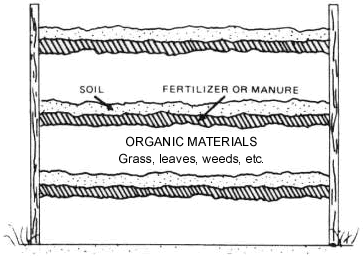 Figure 4. Layering
Prepare the compost pile in layers to facilitate proper mixing. Figure 4 illustrates the layering process. Each pile ideally should be about five feet high.
Steps to follow include:
1.) Coarser materials decompose faster in the bottom layer. The coarse material also allows air circulation around the base of the pile creating a chimney effect that will take air up through the pile and heat it up. Moisten all layers as they are put in the pile.
2.) Organic wastes, such as leaves, grass, and plant trimmings are put down in a layer eight to 10 inches deep. This layer should be watered until moist, but not soggy.
3.) Apply about a one-inch layer of soil or completed compost on top of the fertilizer layer. Adding soil ensures that the pile is inoculated with decomposing microbes. In most cases, organic yard wastes such as grass clippings or leaves contain enough microorganisms on the surface to bring about decomposition. Studies show that there is no advantage to purchasing a compost starter or inoculum. Microbes multiply as rapidly from the soil and/or added organic wastes as from the inoculum. Those microbes already in the soil and on organic materials are just as efficient in decomposing the waste as those provided by the commercial inoculum. Adding soil, however, helps reduce leaching of mineral nutrients, such as potassium, released during decomposition.
4.) Place the nitrogen source on top of this layer. Use two to three inches of livestock manure or a nitrogen fertilizer, such as ammonium sulfate, at a rate of one-third cup for every 25 square feet of surface area. If these nitrogen sources are not available, one cup of 10-10-10 fertilizer per 25 square feet of surface area will also suffice. Do not use fertilizer that contains a herbicide or pesticide. Other organic sources of nitrogen are green grass clippings, lake plants or blood meal.
Repeat the sequence of adding coarse material, organic waste, soil and fertilizer until the pile is completed. Remember to water each section as you make the pile. The pile should be about five feet high, topped off with five to eight inches of straw or hay, with a scooped out basin on top to catch rainwater.
Maintaining the Compost Pile
To prevent odors and hasten decomposition, turn the pile once a month. Turning also exposes seeds, insect larvae and pathogens to lethal temperatures inside the pile. Turning and mixing can be done by inverting segments of the compost or by shifting the pile into another bin. A properly mixed compost pile should have no objectionable odors because elevated temperatures within the pile will destroy odor-causing bacteria. Keep the compost pile moist, but not waterlogged. Odors may arise either from the addition of excessive amounts of wet plant materials, such as fruits or grass clippings, or from over watering. A properly mixed and adequately turned compost heap will not have objectionable odors. An actively decomposing pile will reach temperatures of 130° to 160°F in the middle in just a few days. At this time, you'll notice the pile "settling," a good sign that your heap is working.
If the pile does not heat up, the cause may be one or more of the following: too small a pile, not enough nitrogen, lack of oxygen, too much moisture, or not enough moisture. Turn the pile with a spading fork or shovel when the temperature in the center begins to cool. Turning will introduce oxygen and undecomposed material into the center and subsequently regenerate heating. The composting process is essentially complete when mixing no longer produces heat in the pile.
When the compost is finished, the pile will be about half its original size and have an earthy smell to it. Table 2 lists additional composting problems and their solutions.
As the decomposition process continues, the pile will begin shrinking and settling. Leaves, for instance, will shrink to approximately 30 percent of their original volume. As usable compost is harvested from the pile, you can add small amounts of fresh materials. Bury vegetable wastes inside the pile to avoid attracting rodents. If there's enough material, make a new pile instead of combining fresh materials with old compost. Generally, a well-managed compost pile with shredded materials under warm conditions will be ready in about two to four months. A pile left unattended with unshredded material may take over a year to decompose. Piles prepared in the late fall will not usually be ready for use the following spring.
| Table 2. Troubleshooting guide to composting problems. | ||
| Symptom | Problem | Solution |
| The compost has a bad odor. | Not enough air. | Turn it. Add dry material if the pile is too wet. |
| The center of the pile is dry. | Not enough water. | Moisten and turn the pile. |
| The compost is damp and warm only in the middle. | Too small. | Collect more material and mix the old ingredients into a new pile. |
| The heap is damp and sweet smelling but still will not heat up. | Lack of nitrogen. | Mix in a nitrogen source like fresh grass clippings, fresh manure, or bloodmeal. |
Suggested Uses for Compost
Properly decomposed compost has a number of uses in the garden and around the yard. Compost provides economical and efficient ways to recycle organic matter.
Soil Amendment
Compost is used as an organic amendment to improve physical, chemical and biological properties in the soil. Adding compost will increase the moisture-holding capacity of sandy soils, thereby reducing drought damage to plants. When added to heavy clay soils, compost improves drainage and aeration and reduced waterlogging damage to plants. Compost increases the ability of the soil to hold and release essential nutrients. The activity of earthworms and soil microorganisms beneficial to plant growth is promoted with compost additions. Other benefits of adding compost include improved seedling emergence and water infiltration due to a reduction of soil crusting.
Over time, yearly additions of compost create a desirable soil structure, making the soil much easier to work. For improving soil physical properties, add and incorporate one to two inches of well-decomposed compost in the top six to eight inches of soil. Use the lower rate for sandy soils and the higher rate for clay soils.
To a limited extent, compost is a source of nutrients. However, nutrient release from compost is slow, and the nutrient content is too low to supply all the nutrients necessary for plant growth. Differences in nutrient content are probably due to several factors including age of the compost, amount of water added, plant species, and the amount of soil that becomes mixed into the pile during turning.
It is usually necessary to supplement compost with some fertilizer, particularly nitrogen. If the C/N ratio of the compost is less than 20 to 1, nitrogen tends to be released rather than tied up. For the majority of municipal yard waste composts, the C/N ratio is less than 20 to 1. Thus, while composts may not supply significant amounts of nitrogen, especially in the short run, nitrogen tie-up should not be a major concern with most yard waste composts. Approximately one cup of ammonium nitrate (0.15 lb. actual nitrogen) per three bushels (100 lbs. compost) is required to provide the additional nitrogen needed by most garden plants.
Have your soil tested every few years to determine whether supplemental phosphorus and potassium are required. The pH of most yard waste composts is usually between 7.0 and 8.0. This slightly alkaline pH of compost should not pose any problems when diluted by mixing into the soil and, in fact, is beneficial to plants growing on acid soils. However, because of the alkaline pH, yard waste composts do not appear well suited for use on acid loving plants such as azaleas and blueberries.
Potting Soils
Leaf compost can be used as a component of potting mixes. Generally, no more than one quarter to one third by volume of the potting mix should be compost. Too much compost may result in waterlogging and poor aeration for roots.
Although proper composting destroys most weed seeds and disease organisms, some may still survive due to incomplete mixing. To obtain a completely pasteurized compost for use in the potting mixture, heat the material in an oven at 160?F for 30 minutes.
Mulch
Mulches used in gardens suppress weeds, reduce soil erosion, modify the soil temperatures (cooler in the summer, warmer in the winter), and conserve soil moisture. Yard waste compost makes an ideal mulch for annual and perennial gardens. All that needs to be done is to apply a three to six inch layer of compost around the base of the plant. Periodically throughout the summer, you may need to add more compost over the old layers to maintain the benefits of the mulch.
The soil environment beneath the mulch is favorable for promoting earthworms, which in turn are valuable for aerating the soil. Organic matter is gradually added to the soil as the mulch decomposes. For annual gardens, work the mulch into the soil at the end of the season to further improve soil physical properties. For perennials, it may be beneficial to remove the mulch in the spring to allow the soil to warm up faster.
Complete decomposition of the compost is not necessary when it is used as mulch. In fact, partially decomposed compost applied in fall will help keep the soil warmer in winter as it continues to heat during decomposition. If uncomposted or partially composted leaves are used, apply one tablespoon of a high nitrogen fertilizer to each bushel of mulch.
Alternatives to Composting Grass Clippings
There has been much debate over whether or not to collect grass clippings. However, it is now agreed that as long as the grass is not excessively high and clippings do not thickly cover the lawn surface after mowing, there is no need to collect the clippings. Aside from reducing the work involved in lawn maintenance, leaving the grass clippings on the lawn benefits the turf by returning nutrients and organic matter to the soil. If evenly distributed, clippings left on the lawn can be equivalent to one fertilizer application per year.
In order to keep your lawn looking healthy
Status and Revision History
Published on Jul 01, 2000
Published on Feb 24, 2009
Published with Full Review on Feb 15, 2012
Published with Full Review on Feb 20, 2015
Published with Full Review on May 27, 2020
Published with Full Review on Aug 18, 2022
