Introduction
Irrigation scheduling is one of the fundamental requirements in the effective use of water for agricultural purposes. Many different techniques have been suggested to allow farmers to better manage water in soil. Some techniques are complicated, others are simple. The evaporation from a pan has been shown to correlate with the water removal from soil, especially in the humid area. The unit described in this document is based on the direct relationship between pan evaporation and soil water removal.
The UGA EASY (Evaporation-based Accumulator for Sprinkler-enhanced Yield) Pan Irrigation Scheduler is designed to provide in-field monitoring of crop water needs in humid areas for a fraction of the management time and cost associated with other irrigation scheduling methods. If a farmer is not currently using a more sophisticated irrigation scheduling method, this unit is a simplified, low cost alternative. This system can be homemade and has a visible indicator attached to a float that monitors the water level in a wash tub pan. When a predetermined amount of water evaporates from the tub, then it is time to irrigate. The UGA EASY Pan Irrigation Scheduler is designed to help you keep track of when your next application is needed, so you can avoid applying too much or too little water. The overall goal is to be more efficient in the use of irrigation water.
The system operates under the basic principal of Potential Evapotranspiration (PET). Potential evapotranspiration is the maximum potential rate of water removal from a full canopy with no limitations on water availability in the soil. Placing screen materials over the tub allows this device to more accurately reflect the PET of a full canopy crop. A bonus of the EASY Pan Irrigation Scheduler is that it responds to both water removal (evaporation) and water addition (rainfall and sprinkler-type irrigation).
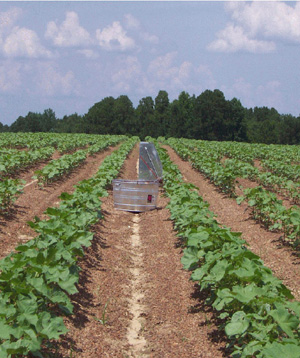 Figure 1. The EASY Pan Irrigation Scheduler in operation on cotton research plots.
Glossary of Terms
Field Capacity is the amount of water in the soil after all free gravitational water has been removed (drained via gravity) and no additional water can be held in the soil.
Hysteresis is an effect on the soil water content that occurs between wetting and drying. If a soil is becoming wet due to irrigation or precipitation, it will increase in water content as the soil water tension (how strongly the water is held in the soil) decreases. As drying (water removal) occurs, the tension will increase as the water is removed. For soils with strong hysteresis characteristics (loams and clays in particular), the soil water content will not be the same during drying as it was during wetting, even though the soil water tension is the same. This effect is related to the pore space in the soil and how the soil water fills those pores while wetting and then releases water while drying.
MAD (Management Allowed Deficit or Depletion) is the percentage of the available water in the soil that will be allowed to be removed by plants before irrigation is required. MAD is primarily a function of the type of crop being grown. For high value crops, MAD may be 40 percent or less. For lower value or large orchard crops (such as trees) MAD may be 60 percent. A MAD of 50 percent is reasonable for most row crops.
PET (potential evapotranspiration) is the rate of water removal by the combination of plants (transpiration) and surfaces (evaporation) which is not limited by water availability.
Readily Available Water is the actual amount of water in the soil that is allowed to be removed from the soil prior to irrigation. Readily available water (RAW) is a function of MAD and the available water (amount between field capacity and wilting point). The available water (AW) is a function of the effective root depth and the available water per foot in the soil. [RAW = MAD * AW]. Appendix B provides some fundamental information for helping to determine MAD, root depths, and available water for your crop and soil conditions. Local soil surveys or other more specific crop and soil information may be necessary to more accurately determine the RAW for particular situation.
Wilting Point, or may be referred to as the Permanent Wilting Point, describes the amount of water held in the soil that plants are unable to remove. The soil will still contain water, but it is inaccessible to plants.
Effective Rainfall and Irrigation
One of the greatest concerns in irrigation scheduling is "how much of the water is actually going into the soil and becomes available to the plant." That water would be termed "effective." Rainfall or irrigation water that does not enter the soil (runoff), or enters the soil and does not remain in the root zone where the plants can access the water (deep percolation) is considered "ineffective."
The EASY Pan Irrigation Scheduler, in a simplified approach, can account for effective irrigation or rainfall. The unit is set up in the field with the crop. Therefore, it is responding to the same environmental conditions as the crop. The EASY Pan Irrigation Scheduler should be installed when the soil is at "field capacity" conditions. It functions as a "reservoir" similar to the soil water reservoir. In the soil, rainfall or irrigation in excess of field capacity either runs off the surface or percolates below the root zone. The EASY Pan Scheduler has similar characteristics. It will only allow water to fill to the "field capacity" condition. Excess water leaves the unit via drilled holes in the tub.
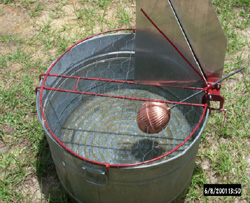 Figure 2. Entire system.
UGA EASY Pan Irrigation Scheduler Components
To fabricate the UGA EASY Pan Irrigation Scheduler, you will need the following components (see Figure 2 and Appendix A):
- #3 (17 gal.) Galvanized wash tub
- Sheet aluminum backboard with indicator vinyl strips (18 gauge, 12 in. x 15 in.)*
- Threaded aluminum positioning rod with 1 in. markings (¼ in. dia. x 24 in. in length)*
- Swivel/mount unit (Figure 3)*
- Threaded brass or plastic toilet bowl float
- Covering screen unit (Figure 4) with supports*
Components for installation and operation:
- Drill with ¼ in. and ½ in. (or 5/8 in.) bits.
- Level
- Concrete/cinder blocks (for taller crops)
- Water supply (tank or other buckets)
- Water treatment for algae (dye, chlorine)
All components of the EASY Pan Scheduler should be readily available locally (hardware or other steel supplier). However, the special components (*) may need to be fabricated in-house or by a local shop with metal-working capabilities. The components can currently be obtained from H. Hardy Supply (2626 South Railroad Ave., Sycamore, GA 31790; 229-567-2065). Other local fabricators will hopefully provide components as well. Current prices for those components are less than $100 (2001 dollars). Appendix A also provides drawings and descriptions of the components which need to be fabricated.
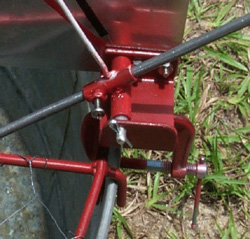 Figure 3. Swivel/mounting unit.
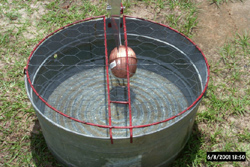 Figure 4. Basic covering screen with 2-inch mesh.
Construction
The pan/tub has two 0.5 to 0.625 inch diameter holes drilled 3.5 inches from the top of the tub and on opposite sides. The pan is leveled and then filled until water flows from the exit holes on the side of the tub. The backboard with the mounting unit is then attached to the pan.
The screen material selected for use is based on the crop to be grown and imposes a necessary limitation on the rate of surface evaporation. Screen materials have been tested between 2-inch diameter mesh (chicken wire) and 1/16-inch diameter mesh (window screen). Basically, the smaller the holes, then the greater the limitation on evaporation. The screen also helps prevents animals from getting to the water surface. Preliminary research has indicated that 2-inch diameter mesh opening screen (chicken wire) is sufficient for peanut. For cotton, a combination of 2-inch screen and window screen is recommended.
Site Selection
The EASY Pan Irrigation Scheduler is currently designed for use under sprinkler irrigation applications with row crops. However, there is potential for use under other crop situations. Low growing crops (peanut, cotton, soybean, vegetables, ...) are the easiest to manage with the unit. Sprinkler-irrigated pecan may also have application potential. The main concern is to have the pan surface near the top of the canopy and not "down in a canopy" where evaporation is limited or the canopy interferes with the operation of the float mechanism.
The unit has been tested on sandy soil conditions in South Georgia. It has performed well with a Tifton loamy sand, one of the predominant agricultural soils in the region.
The unit has not been tested on heavy soil conditions (clay and silty clays). In some cases, hysteresis effects may be very significant in terms of water moving in and out of the soil and the relationship to water availability. Since the unit responds immediately to rainfall or irrigation, the lag time associated with heavier soils becoming wet should be taken into account. In heavy soil conditions where the water in the soil is not given up as freely as in sandy soils, over-irrigation may be a concern. Alternative screening materials should be tested under those conditions.
When selecting a site in the field under a sprinkler irrigation system to install the EASY Pan Irrigation Scheduler, there are several recommendations and constraints that should be considered. The unit should be placed in a sprinkler-irrigated field within 100 feet of a field road (preferably near the center of the irrigated area, and along the route you take to get to the irrigation system). How far the unit is located within the field will depend on how far you can see!
The components that are to be observed are associated with the backboard. The lines on the backboard (black vinyl line for "field capacity/full soil water" and a red vinyl line for "need to irrigate") and the indicator arm on the float mechanism (white) must be visible from the observation point. Location under the edge of an end-gun on a center pivot system is not recommended. Many center pivot end-guns typically have greater variability in water application, and usually apply less water (per area) than under the pivot spans. The unit should also be located so that the backboard is not shaded from the sun during the typical time of reading. Shading of the back-board can make it more difficult to determine the actual position of the arm. The backboard and float apparatus should be positioned to allow an unobstructed view of the unit from the field road. The selection of an appropriate site and mounting location is essential to making the unit "easy" to read.
The UGA EASY Pan Irrigation Scheduler should be placed near the starting point for the irrigation operation. If the irrigation system is sufficiently large to require more than one day to get around or the soils have sufficient water holding capacity that irrigations are infrequent, having the pan near the starting point will help reduce the potential for water stress between irrigations. Since you are using this pan to schedule irrigations, it should represent the conditions around the pan. If the irrigation system will not reach the pan for over a day, then additional water removal will occur and you will exceed the MAD you have set for that system. The goal is to reduce the potential for excessive periods without water being available to the crop.
One additional recommendation is to place the unit in an area represented by the predominant soil type. If an entire field is being irrigated based on one unit, then the most effective irrigation schedule and yield potential is most likely based on that predominant soil.
Installation
The unit should be installed when soil water is at or near field capacity. The pan unit is designed to be level in the field. Under excessive slope conditions, care must be taken to ensure that the upper edge of the pan is level. The operation of the float mechanism and the position of the float depends on meeting that constraint. It is also recommended that the installation occur after plant stand establishment or when the crop is at least a couple of weeks old (roots and canopy are beginning to be established) and the soil water content is at or near field capacity (following a rain event). At this time, most initial field operations have been completed (fertilizer, sprays, tillage). If you wish to use the pan earlier in the crop stage (due to insufficient initial soil moisture), the float should be adjusted to the shortest recommended shaft position (4 inches). At early stages, plants do require more frequent irrigations with less water applied per irrigation since crop roots are not as deep or extensive. If initial soil moisture is sufficient, it is recommended to wait until the plants have been established. Roots need to be encouraged to penetrate the soil.
The position of the float on the float arm can be preset based on the MAD and water holding capacity of the predominant soil. Basically, the setting should be "for the amount of water that you will allow to be depleted from the soil before you irrigate." If you typically irrigate 1 inch each time an irrigation is applied, then the float unit needs to be set to allow at least one inch of water depth to be applied.
"Readily available water" (RAW) should be deter-mined carefully to provide some allowance for rainfall. For example, if RAW is 1.5 inches and you apply only one inch during an irrigation, then the opportunity exists to maintain the soil water within the range desired and still benefit from rainfall events that are less than ½ inch. By not bringing the water level all the way to field capacity when irrigating, the soil has some reserve capacity to store any anticipated rainfall. However, if you get behind and do not irrigate enough to keep up with evapotranspiration, then the unit will indicate that as well.
Once RAW is determined, then the float rod can be positioned for the associated RAW as shown in figure 5. Typically, for peanut grown on sandy soils, the float should be near the "5 in." float rod position. This represents about 1.5 inches for RAW. For deeper rooted crops such as cotton on sandy soils, the float should be near the "6 in." mark (see appendix B). For deep rooted crops on heavier textured soils, the float can be extended. The relationship between RAW and float position is indicated in figure 5. Some variation may exist between pans (as indicated by the marks).
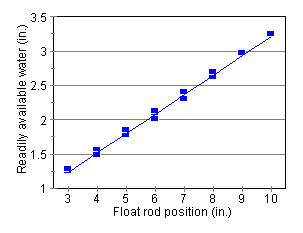 Figure 5. Relationship between the position on the float rod and the depth of water to be removed before irrigating.
The screen over the top of the pan has its own support system. Care is required to make sure the float is free from any obstructed movement. As indicated above, the unit should have the surface of the pan near the top of the canopy. When the crop grows, the pan should be raised accordingly. The unit can be raised by placing it on concrete/cinder blocks to the elevation desired. Care should always be taken to be sure the pan and backboard are unobstructed from viewing on the field road.
The marked line associated with field capacity (black) is positioned with the indicator arm when the pan is filled and water flows from the exit holes. The indicator arm on the swivel mechanism can be "bent" to match up with the "field capacity" lines on the backboard. A new modification is to have the screw hole on the backboard slotted to allow the backboard to be shifted rather than the indicator arm bent. In some cases, a small painted cork has been placed on the end of the indicator arm for ease of reading. In all cases, the observed "field capacity" position is based on viewing from the field road.
Operation and Maintenance
The unique operating characteristics of the UGA Easy Pan is that the irrigator/farmer can read the unit while still in a vehicle. It is recommended that a marking flag be placed at the end of the row where the pan unit is located. The driver then stops parallel to the flag, deter-mines whether the irrigation system needs to be turned on (from the position of the indicator arm).
The backboard has two marked points. The black vinyl line indicates field capacity (soil water is full). The red line indicates a need to irrigate. The indicator rod approaching the red line indicates the soil is drying out and the need for irrigation increases. Irrigation should commence when the irrigation set point is reached (Figure 6).
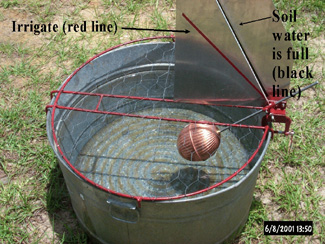 Figure 6. Operating positions for the unit.
If field operations need to be performed during the season, the unit can be shifted out of the way and then put back in place. The backboard can be removed if field equipment does not have sufficient clearance to move over the top of the pan (at least 12-inch clearance).
If the pan is in the field for a long period of time, it may be subject to algae growth or formation of films on the surface, which then reduce the evaporation rate. Blue dye such as Aquashade®, chlorine, periodic cleaning, or some other method can be used to reduce algae growth in the pan.
Winterizing and De-Winterizing the EASY Pan Scheduler:
When the unit is removed from the field, all components should be cleaned and placed within the tub. The unit should be stored out of the rain and in a safe location to prevent damage to the parts.
When setting up the unit at the beginning of the season, cans of white and black spray paint may be useful. Touching up the moveable parts and coating the indicator arm on the swivel unit will make it easier to read (and reduce the potential for rust).
Summary and Future Recommendations
The EASY Pan Scheduler is designed to provide a simple, low maintenance device for irrigation scheduling. The performance characteristics can be easily modified by the user for their conditions (adjusting the float and the screens). If the user desires more accurate and economically-driven approaches to irrigation scheduling, they are encouraged to contact their local specialist from the Cooperative Extension Service. Your local extension office has access to irrigation experts who can provide recommendations for more detailed and sophisticated irrigation scheduling systems.
References
Keller, J., and R. Bliesner. 1990. Sprinkler and Trickle Irrigation. Van Nostrand Reinhold, New York, New York.
Rochester, E. 1995. Landscape Irrigation Design. ASAE, St. Joseph, MI.
The use of trade names, etc., in this publication does not imply endorsement by the University of Georgia of products named nor criticism of similar products not mentioned.
Appendix A
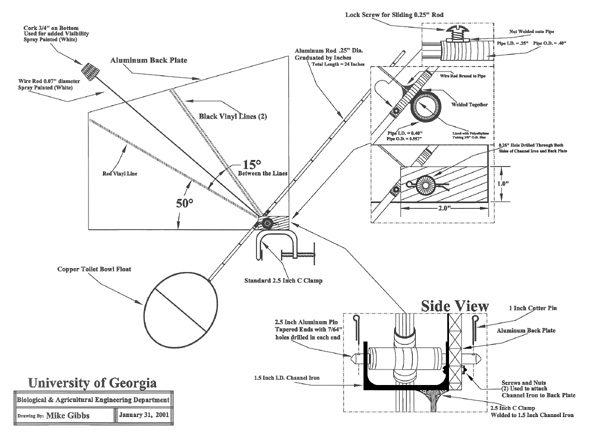 Schematic of the float, mount and screen cover components.
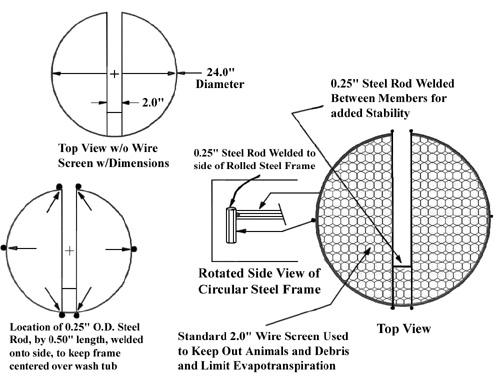 Construction specifications for the wire screen cover.
Appendix B
Information to help in setting the float arm on the EASY Pan
Most of the following information is available in more detail in the Irrigation Guide for your state. In Georgia, the County Extension Offices should have a copy of the Irrigation Guide. The following are general recommendations that have been compiled by Rochester (1995) and Keller and Bliesner (1990).
To calculate the "readily available water" (RAW), determine your available water (Table B.1) based on the predominant soil type, and the effective root depth (Table B.2) for the crop. Using an assumed MAD (average of 50% [0.50 for equation] for most row crops):
RAW = AW * Effective Root Depth * MAD
| Table B.1: Available water holding capacity of different textured soils | |
| Soil Texture | Available Water (in./ft.) |
| Very coarse texture (very coarse sand) | 0.39 to 0.74 |
| Coarse texture (coarse sands, fine sands, loamy sands) | 0.74 to 1.25 |
| Moderately coarse texture (sandy loams) | 1.25 to 1.74 |
| Medium texture (very fine sandy loams, loams, silt loams) | 1.5 to 2.3 |
| Moderately fine texture (clay loams, silty clay loams, sandy clay loams) | 1.74 to 2.5 |
| Fine texture (sandy clays, silty clays, clays) | 1.6 to 2.5 |
| From Keller and Bliesner (1990). | |
| Table B.2: Effective root depths of selected crops (80% of total) | |||
| Crop | Root Depth (ft) |
Crop | Root Depth (ft) |
| Corn (grain and silage) | 0.6 to 1.2 | Peanut | 0.4 to 1.5 |
| Corn (sweet) | 0.4 to 0.6 | Pecan | 1.0 to 2.0 |
| Cotton | 0.6 to 1.8 | Vegetables | 0.2 to 1.0 |
| Based on a deep, uniform, well-drained soil profile (Keller and Bliesner (1990). | |||
1D.L. Thomas is a professor in the Department of Biological and Agricultural Engineering at the Tifton Campus.
2K.A. Harrison is an Extension Engineer in the Department of Biological and Agricultural Engineering at the Tifton Campus.
3J.E. Hook is a professor in the Department of Crop and Soil Sciences and NESPAL.
4T.W. Whitley is a research coordinator in the Department of Biological and Agricultural Engineering, Tifton.
The authors express their appreciation to M.L. Gibbs for the drawings of the individual components.
Status and Revision History
Published on Mar 01, 2002
Published on Feb 20, 2009
Published on May 14, 2009
Published with Full Review on Feb 16, 2012


